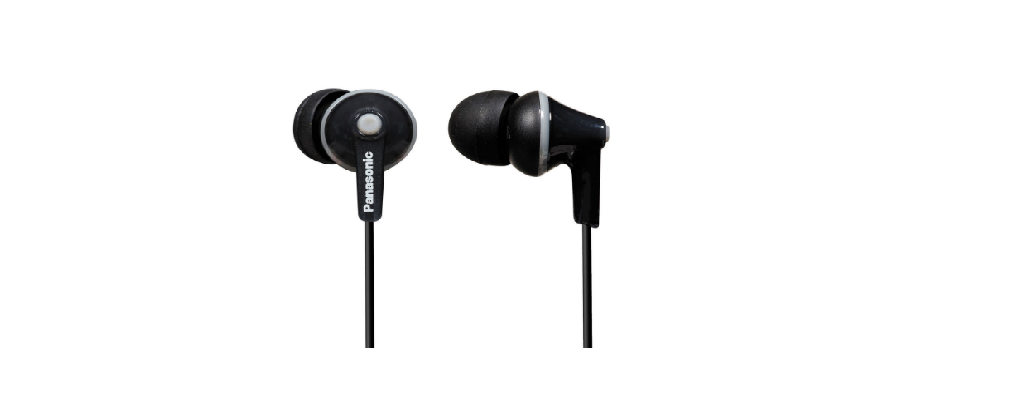
Panasonic RP-HJE120B Wireless Stereo Earphones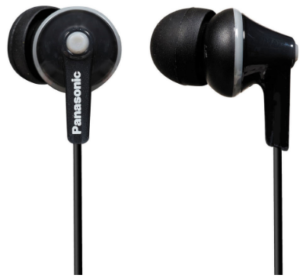
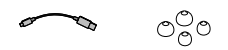
Accessories
Please check and identify the supplied accessories.
- Only for the U.S.A.: To order accessories, refer to “Limited Warranty”.
- Only for Canada: To order accessories, contact the dealer from whom you
- have made your purchase.
- 1 USB charging cord 1 Earpieces set
Safety precautions
Unit
- Avoid using or placing this unit near sources of heat.
- Do not use it while operating a motorized vehicle. It may create a traffic hazard and is illegal in many areas.
- Do not listen with this unit at high volume in places where you need to hear sounds from the surrounding environment for safety, such as at railroad crossings, and construction sites.
Earpieces
- Keep the earpieces out of reach of children to prevent swallowing.
- Securely attach the earpieces. If they are left in the ears after coming off, injury or sickness may be caused.
Allergies
- Discontinue use if you experience discomfort with the earphones or any other parts that directly contact your skin.
- Continued use may cause rashes or other allergic reactions.
USB
- Do not use any other USB charging cords except the supplied one.
Part names
- Earphone
- Earpiece
- Remote controller
- LED indicator light
- Charging terminal
- USB lid
- Microphone
- Battery case (Please remove the battery when disposing of this product. Please read the instructions in this manual.)
Charging
- LED indicator light (next to charging terminal)
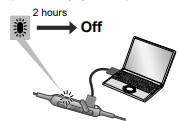
- If the PC used for charging enters “sleep mode”, charging may not take place.
- Close the charging terminal cover securely
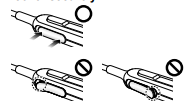
Do not touch the charging terminal with a wet hand.
- If sweat or liquid is attached to the charging terminal, malfunction may occur.
Connecting a Bluetooth® device
Remote controller
- Press the center button for 5 seconds, until the LED blinks Red and blue.
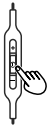
- When the LED is blinking you’ve successfully placed the unit in the Pairing mode.
- Go to your smart device’s Bluetooth® menu and select this device.
Enjoy!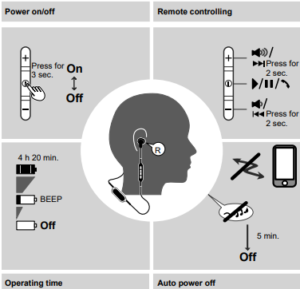
An operation example of the remote control
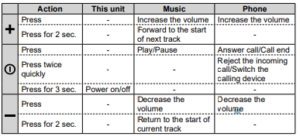
Making a phone call
- Connect the Bluetooth® enabled phone and unit
- When answering an incoming call: Press on the unit and answer the call When making an outgoing call: Make an outgoing call on the Bluetooth® enabled phone
- Start talking
- Press to end the phone call
Troubleshooting guide
Before requesting service, make the following checks. If you are in doubt about some of the checkpoints, or if the remedies indicated in the chart do not solve the problem, refer to “Customer Services Directory” if you reside in the U.S.A., or refer to “CONTACT INFORMATION” if you reside in Canada.
General
- The unit does not respond
- Push the button for 10 seconds. The unit will be reset. (The pairing device information will not be deleted.) Power supply and charging If you are having difficulty charging the unit
- Make sure the computer is turned on and is not on standby or sleep mode.
- Is the USB port you are currently using working properly? If your computer has other USB ports, unplug the connector from its current port and plug it into one of the other ports.
- If the steps mentioned above are not applicable, unplug the USB charging cord and plug it in again.
- If the charge time and operating time become shortened, the battery may have run down. (Number of charging times of the installed battery: Approximately 300.) Charging takes longer
- Make sure to charge a room temperature between 10 °C and 35 °C (50 °F and 95 °F). LED does not light during charging
- Is the USB charging cord (supplied) connected firmly to the USB terminal of the computer? (→ 1 “Charging”) The power does not turn on
- Is the unit being charged? The power cannot be turned on during charging. (→ 1 “Charging”)
Bluetooth® device connection
- The device cannot be connected
- Delete the pairing information for this unit from the Bluetooth® device, then pair them again. (→ 2 “Connecting a Bluetooth® device”)
Sound and audio volume
- No sound
- Make sure that the unit and the Bluetooth® device are connected correctly. (→ 2 “Connecting a Bluetooth® device”)
- Check if music is playing on the Bluetooth® device.
- Make sure that the unit is turned on and the volume is not set too low.
- Pair and connect the Bluetooth® device and the unit again. (→ 2 “Connecting a Bluetooth® device”)
Low volume
- Increase the volume of the unit. (→ 3 “Enjoy !”)
- Increase the volume on the Bluetooth® device. The sound from the device is cut off / Sound quality is bad
- The sound may be disrupted if signals are blocked. Do not fully cover this unit with the palm of your hand, etc.
- The device may be out of the 10 m (33 feet) communication range. Move the device closer to this unit.
- Remove any obstacle between this unit and the device.
- Switch off any wireless LAN device when not in use.
- A communication problem may arise if the battery is not fully charged. Charge the unit. (→ 1 “Charging”)
Phone calls
- You cannot hear the other person
- Make sure that the unit and the Bluetooth® enabled phone are turned on.
- Check if the unit and the Bluetooth® enabled phone are connected. (→ 2 “Connecting a Bluetooth® device”)
- Check the audio settings of the Bluetooth® enabled phone. Switch the calling device to the unit if it is set to the Bluetooth® enabled phone.
- If the volume of the other person’s voice is too low, increase the volume of both the unit and the Bluetooth® enabled phone.
Maintenance
- Clean this unit with a dry and soft cloth.
- Do not use solvents including benzine, thinner, alcohol, kitchen detergent, a chemical wiper, etc. This might cause the exterior case to be deformed or the coating to come off. Keeping the battery performance
- During the long period of disuse, fully charge this unit once every 6 months to keep the battery performance.
Specifications
General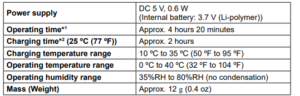
It may be shorter depending on the operating conditions. Time is taken to recharge from empty to full.
Bluetooth® section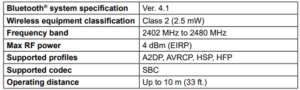
Speaker section![]()
Terminal section![]()
Accessory section![]()
Useful information (For Latin American Countries Only)
Customer Service Directory Obtain product information and operative assistance; localize the closer distributor or Service Center; buy spare parts and accessories through our Website to Latin American: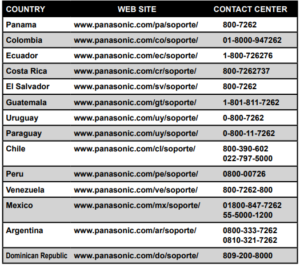
To remove the battery when disposing of this unit
Danger
- As the rechargeable battery is specifically for this product, do not use it for any other device.
- Do not charge the removed battery.
- Do not heat or expose to flame.
- Do not leave the battery(ies) in a car exposed to direct sunlight for a long period with doors and windows closed.
- Do not pierce the battery with a nail, subject it to an impact, or dismantle or modify it.
- Do not let the wires touch any other metal or each other.
- Do not carry or store the battery with a necklace, hairpin, or the like.
- Doing so may cause the battery to generate heat, ignite, or rupture.
Warning
- Do not place the removed battery and other items within reach of infants. Accidental swallowing of such an item may hurt the body.
- If you think such an item has been swallowed, consult a doctor immediately. In the event of fluid leaking from the battery, take the following measures, and do not touch the fluid with bare hands. Fluid entering into an eye may cause loss of eyesight.
- Wash the eye with water immediately without rubbing it, and then consult a doctor. Fluid getting on your body or clothes may cause inflammation of the skin or injury.
- Sufficiently rinse with clean water, and then consult a doctor. A lithium-ion polymer rechargeable battery is built into the battery case. Please discard according to local regulations. When disposing of this product, disassemble it properly by following the procedure, and remove the internal rechargeable battery.
- Disassemble after the battery runs out.
- When disposing of the battery, please contact your local authorities or dealer and ask for the correct method of disposal

- Put a straight-slot screwdriver (commercially available) into the battery case.
- Make sure to keep your fingers away from the tip of the screwdriver.
- Select a screwdriver to is large enough for a space under the joint part.
- Use the screwdriver for leverage, and push and open the battery case.
- Be careful not to touch the battery with the screwdriver.
- Hold the battery and remove it.
- Pull off the battery and separate it from the battery case by cutting off the wires, one by one, with scissors.
- Insulate the wire parts of the removed battery with cellophane tape.
- Do not damage or dismantle the battery
Limited Warranty (ONLY FOR U.S.A.)
Limited Warranty Coverage (For USA Only) If your product does not work properly because of a defect in materials or workmanship, Panasonic Corporation of North America (referred to as “the warrantor”) will, for the length of the period indicated on the chart below, which starts with the date of original purchase (“warranty period”), at its option either (a) repair your product with new or refurbished parts, (b) replace it with a new or a refurbished equivalent value product, or (c) refund your purchase price. The decision to repair, replace or refund will be made by the warrantor.
Mail-In Service–Online Repair Request
Online Repair Request To submit a new repair request and for quick repair status visit our Website at http://shop.panasonic.com/support When shipping the unit, carefully pack, include all supplied accessories listed in the Owner’s Manual, and send it prepaid, adequately insured, and packed well in a carton box.
When shipping Lithium Ion batteries please visit our Web Site at http://shop.panasonic.com/support as Panasonic is committed to providing the most up-to-date information. Include a letter detailing the complaint, a return address and provide a daytime phone number where you can be reached. A valid registered receipt is required under the Limited Warranty.
Limited Warranty Limits and Exclusions
This warranty ONLY COVERS failures due to defects in materials or workmanship and DOES NOT COVER normal wear and tear or cosmetic damage. The warranty ALSO DOES NOT COVER damages which occurred in shipment, or failures which are caused by products not supplied by the warrantor, or failures which result from accidents, misuse, abuse, neglect, mishandling, misapplication, alteration, faulty installation, set-up adjustments, misadjustment of consumer controls, improper maintenance, power line surge, lightning damage, modification, introduction of sand, humidity or liquids, commercial use such as hotel, office, restaurant, or other business or rental use of the product, or service by anyone other than a Factory Service
Contact
- Panasonic Corporation of North America
- Two Riverfront Plaza, Newark, NJ 07102-5490
- http://shop.panasonic.com
- Panasonic Canada Inc.
- 5770 Ambler Drive, Mississauga, Ontario L4W 2T3
- www.panasonic.com
- © Panasonic Corporation 2017-2020
- Printed in China