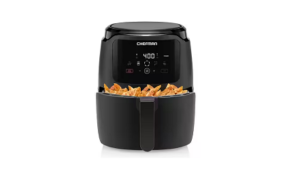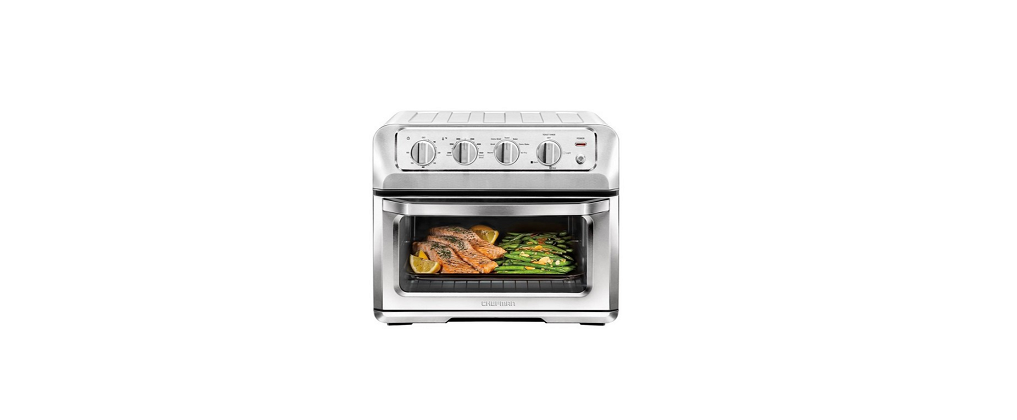
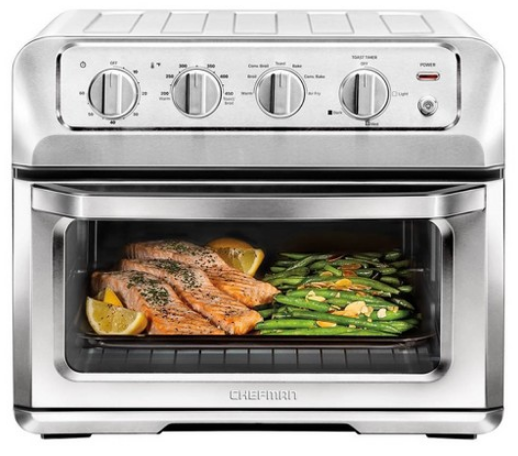
Chefman RJ50-SS-T Air Fryer Oven
SAFETY INSTRUCTIONS
Please read these guides carefully before using the Chefman RJ50-SS-T Air Fryer Oven Instruction Manual.
- Read all instructions.
- Do NOT touch hot surfaces. Use a handle or dials.
- To protect against electrical shock do NOT immerse the cord or plug in water or other liquid.
- Close supervision is necessary when any appliance is used by or near children.
- Unplug from the outlet when not in use and before cleaning. Allow to cool before putting on or taking off parts.
- Do NOT operate any Chefman® brand appliance with a damaged cord or plug or after the appliance malfunctions or has been damaged in any manner. Contact Chefman® Customer Support.
- The use of accessory attachments not recommended by Chefman® may cause injuries.
- Do NOT use outdoors.
- Do NOT let the cord hang over the edge of the table or counter or touch hot surfaces.
- Do NOT place on or near a gas or electric burner, or in an oven.
- Extreme caution must be used while moving the oven when it contains hot oil or other hot liquids.
- Always plug the cord into the wall outlet first. To disconnect, turn off the oven. 13. Do NOT use the oven for other than intended use.
- Oversize foods or metal utensils must NOT be inserted in the oven as they may create a fire or risk of electric shock.
- A fire may occur if the oven is covered with or touches flammable material, including curtains, draperies, walls, and the like, when in operation. Do NOT store any item on top of the oven when in operation.
- Do NOT clean with metal scouring pads. Pieces can break off the pad and touch electrical parts involving a risk of electric shock.
- Extreme caution should be exercised when using containers constructed of anything other than metal or glass.
- Do NOT store any materials, other than Chefman® recommended accessories, in this oven when not in use.
- Do NOT place cardboard or plastic in the oven.
- Do NOT cover the crumb tray or any part of the oven with metal foil. This will cause overheating.
SHORT CORD INSTRUCTIONS
A short power supply cord is provided to reduce the hazards of entanglement or tripping over a longer cord. Longer detachable power-supply cords or extension cords are available and may be used if care is exercised in their use. If a longer detachable power-supply extension cord is used:
- The marked electrical rating of the extension cord should be at least as great as the electrical rating of the appliance.
- The cord should be arranged so that it will not drape over the countertop or tabletop where it can be pulled on by children or tripped over.
WARNING:
Cheer herebotteve m www.P65Warnings.ca.gova
POWER CORD SAFETY TIPS
- Never pull or yank on a cord or the appliance.
- To insert the plug, grasp it firmly and guide it into the outlet.
- To disconnect the appliance, grasp the plug and remove it from the outlet.
- Before each use, inspect the power cord for cuts and/or abrasion marks. If any are found, this indicates that the appliance should be serviced, and the power cord replaced. Please contact Chefman® Support for assistance.
- Never wrap the cord tightly around the appliance, as this could place undue stress on the cord where it enters the appliance and cause it to fray and break.
FEATURES
Please read these guides carefully before using the Chefman RJ50-SS-T Air Fryer Oven Instruction Manual.
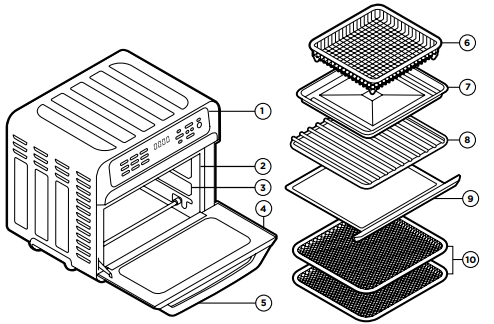
- Capacitive Touch Control Panel
- Easy-Clean Interior
- Rack Insert Positions
- Safety Auto-Shutoff Door
- Cool-Touch Door Handle
- Air Fry Basket
- Broil/Bake Pan
- Flat Wire Rack
- Pull Out Crumb Tray
- Dehydrating Racks (2)
FEATURES
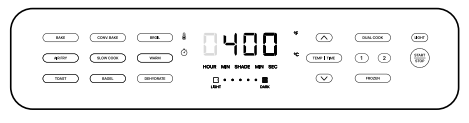
CONTROL PANEL
9 Cook Function Buttons – Press to choose (can choose two from the top two rows with Dual Cook Function)Temp/Time Display – Alternates between the two Toast Settings Display – Shows the shade of your toast or bagel Temp/Time Button – Press to choose Time or Temp for setting. Press and hold to switch between temperature units (°F and °C)Temp/Time Arrow – Press the up arrow for more time, higher temp, or darker toast shade; press down for less time, lower temp, and lighter shadeDual Cook Button – Press to set two cook functions to happen sequentially. 1 and 2 Buttons – Press to set first and second functions for Dual Cook. Frozen Button – Press when toasting frozen bread or bagels to automatically add more time to reach the desired shade.Oven Light Button – Press to turn on the oven light. Press and hold to turn off the sound (beeps) on the unit. Start/Stop Button – Press to begin or cancel cooking.
FEATURES
OPERATING INSTRUCTIONS
BEFORE FIRST USE
- Read and remove all packing materials and stickers from the inside and outside of the Air Fryer and oven except for the ating label on the bottom, which should remain on the nit. Be sure that all accessories are accounted for before throwing away any packaging.
- Gently wipe the exterior of the oven with a clean, damp cloth and dry thoroughly. Wipe the interior with a mild liquid soap and a damp cloth or sponge.
- Hand wash the removable crumb tray and dry thoroughly; the crumb tray is not dishwasher safe.
- Hand wash and dry the broil/bake pan, wire rack, basket, and dehydrating racks. The basket and all racks are top-rack dishwasher safe; the broil pan is not.
- Place the Air Fryer and oven on a flat, heat-resistant surface positioned at least 2 inches away from the wall or any other objects.
- Ensure that the crumb tray is inserted into the bottom of the oven below the door. Do not operate the unit without a crumb tray in place.
HOW TO COOK IN THE AIR FRYER + OVEN
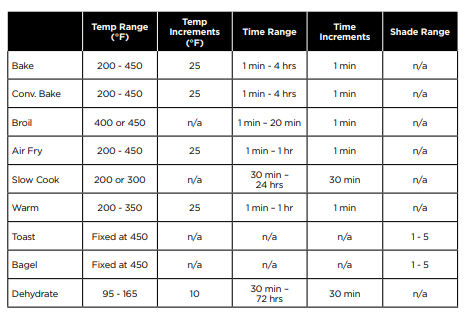
The Air Fryer + Oven has nine cooking functions, so you can customize your cooking for perfect results every time. Not only that, you can also program the oven to perform two different cooking functions sequentially. For example, you can use Air Fry to cook potatoes to crisp perfection then hold them until the rest of dinner is ready by programming theWarm function to come on as soon as air frying ends. (For more on the Dual Cook function, see p. 17.)
OPERATING INSTRUCTIONS
Metal, ovenproof glass, or ceramic bakeware without glass lids can be used in the oven. However, the top of the container must be at least 1½-inches away from the upper heating element. What follows is how to cook using the different settings.
BAKE OR CONVECTION BAKE
Baking is a general cooking method that works just like your regular oven. Use it to make small-batch cookies, brownies, or to bake a cake. You can also roast meats and chicken using the Bake function. Convection Bake moves the air around with a fan to cook foods faster and hotter and is great for pizza.
- Ensure the crumb tray is inserted in its position below the oven door and plug-in unit.
- Place the food on the bake pan or rack3. Slide the food into the oven. 3. Slide the food into the oven.
- Press the Bake or Convection Bake button on the control panel. The button will turn blue.
- Press the Temp/Time button and set the desired time and temperature by pressing the up and down arrows.
- Press the Start/Stop button to begin cooking; the button will turn red.
- To pause cooking, open the oven door. The timer and the heating will pause. (But the oven may still be hot.) When the door is closed, cooking and timing will continue from where it left off. To stop cooking before the timer ends, press the Start/Stop button
- Cookuntiltimer ends. The unit will beep, the word End will appear on the display, and the oven will turn off.
- Using oven mitts, carefully remove the basket or rack from the oven. Check food for doneness, serve, and enjoy!
BROIL
Please read these guides carefully before using the Chefman RJ50-SS-T Air Fryer Oven Instruction Manual.
- Ensure the crumb tray is inserted in its position below the oven door and plug-in unit.
- Place the food on a broiling pan or in a basket on a broiling pan.
- Slide the broil pan into the oven’s top rack position. Press the Broil button on the control panel. The button will turn blue.
- Press the Temp/Time button and set the desired time and temperature by pressing the
up and down arrows. NOTE: You will have two temperature choices: Low (400˚F) and
High (450˚F). - Press the Start/Stop button to begin cooking; the button will turn red.
- To pause cooking, open the oven door. The timer and the heating will pause. (But the
oven may still be hot.) When the door is closed, cooking and timing will continue from
where it left off. To stop cooking before the timer ends, press the Start/Stop button
NOTE:
The interior light does not come on when you open the oven door. To turn it on, press the Oven Light button on the control panel; press it again to turn it off. (The Light button will turn blue when the oven lights it on.)
- Cook until the timer ends. The unit will beep, the word End will appear on the display, and the oven will turn off.
- Using oven mitts, carefully remove food from the oven. Check for doneness, serve, and enjoy!
AIR FRY
Air frying uses fast-moving hot air to cook food to crisp perfection without the need for oil. It’s a great choice for cooking many frozen prepared foods as well as french fries, chicken wings, and more.
- Ensure the crumb tray is inserted in its position below the oven door and plug-in unit.
- Place the food in the basket and place the basket on the broil/bake pan. Alternatively, place food directly on the wire rack and place the broil pan in the bottom position in the oven as a drip tray.
- Slide the pan with a basket or rack into the oven.
- Press the Air Fry button on the control panel. The button will turn blue. 5. Press the Temp/Time button and set the desired time and temperature by pressing the up and down arrows.
- Press the Start/Stop button to begin cooking; the button will turn red.
- To pause cooking, open the oven door. The timer and the heating will pause. (But the oven may still be hot.) When the door is closed, cooking and timing continue from where it left off. To stop cooking before the timer ends, press the Start/Stop button.
SLOW COOK
Slow cooking means just what it says: slowly cooking foods at a lower temperature. Slow cooking is a great choice for tough cuts of meat because the slow cooking makes them tender.
- Ensure the crumb tray is inserted in its position below the oven door and plug-in unit.
- Place the food on the broil/bake pan or rack.
- Slide the food into the oven.
- Press the Slow Cook button on the control panel. The button will turn blue.
- Press the Temp/Time button and set the desired time and temperature.
- Press the Start/Stop button to begin cooking; the button will turn red.
- To pause cooking, open the oven door. The timer and the heating will pause. (But the oven may still be hot.) When the door is closed, cooking and timing will continue from where it left off. To stop cooking before the timer ends, press the Start/Stop button.
NOTE:
The interior light does not come on when you open the oven door. To turn it on, press the Light button on the control panel; press it again to turn it off. (The Light button will turn blue when the oven light is on.)
OPERATING INSTRUCTIONS
Please read these guides carefully before using the Chefman RJ50-SS-T Air Fryer Oven Instruction Manual.
- Cook until the timer ends. The unit will beep, the word End will appear on the display, and the oven will turn off.
- Using oven mitts, carefully remove the basket or rack from the oven. Check food for doneness,
serve, and enjoy!
WARM
The Warm function heats the oven at a lower temperature, perfect for reheating leftovers without drying them out.
- Place the food on the boil/bake pan or rack.
- Slide the food into the oven.
- Press the Warm button on the control panel. The button will turn blue.
- Press the Temp/Time button and set the desired time and temperature by pressing the up and down arrows.
- Press the Start/Stop button to begin cooking; the button will turn red.
- To pause cooking, open the oven door. The timer and the heating will pause. (But the
oven may still be hot.) When the door is closed, cooking and timing will continue from
where it left off. To stop cooking before the timer ends, press the Start/Stop button.
NOTE:
The interior light does not come on when you open the oven door. To turn it on, press the Light button on the control panel; press it again to turn it off. (The Light button will turn blue when the oven light is on.)
TOAST
The Air Fryer + Oven can toast multiple slices of bread to the just-right shade.
- Ensure the crumb tray is inserted in its position below the oven door and plug the unit in if necessary.
- Place bread on the wire rack and slide the rack into the Air Fryer and oven.
- Press the Toast button on the control panel. It will turn blue.
- Press the arrow buttons up or down to set your shade, 1 being the lightest and 5 being the darkest. (The shade choice will display in blue below the Temp/Time display.
- Press the Start/Stop button to begin toasting. The Start/Stop button will turn red and a countdown will appear on the display letting you know how long toasting will take.
- To pause toasting, open the oven door. The timer and the heating will pause. (But the oven may still be hot.) When the door is closed, cooking and timing will continue from where it left off. To stop cooking before the timer ends, press the Start/Stop button
- Toast until the timer ends. The unit will beep, the word End will appear on the display, and the oven will turn off.
- Carefully remove the toast from the oven and enjoy!
CHEFMAN® WARRANTY REGISTRATION
Please read these guides carefully before using the Chefman RJ50-SS-T Air Fryer Oven Instruction Manual.
What do I Need to Register my Product
- Contact Inor motion
- Model Number Ponine purgation, receipt, gif receipt)
- Date code
How Do I Register My Product?
We offer two convenient ways to access the Chefman® registration form:
- Visit chefman.com/register.
- Scan the QR code below to access the site:

CHEFMAN® WARRANTY REGISTRATION
For product information, visit chefman.com
OTHER LIMITATIONS: ALL WARRANTIES OF ANY KIND WHATSOEVER, EXPRESS, IMPLIED AND STATUTORY, ARE HEREBY DISCLAIMED. ALL IMPLIED WARRANTIES OF MERCHANTABILITY AND FITNESS FOR A PARTICULAR PURPOSE ARE HEREBY DISCLAIMED, PROVIDED THAT IF ANY IMPLIED WARRANTIES OF ANY KIND ARE REQUIRED BY ANY JURISDICTION, INCLUDING MERCHANTABILITY AND FITNESS FOR PARTICULAR PURPOSE, THE DURATION OF SUCH IMPOSED IMPLIED WARRANTY IS LIMITED TO ONE (1) YEAR. THIS WARRANTY DOES NOT COVER, AND CHEFMAN® SHALL NOT BE LIABLE FOR, INCIDENTAL, INDIRECT, SPECIAL, OR CONSEQUENTIAL DAMAGES, INCLUDING WITHOUT LIMITATION, DAMAGE TO, OR LOSS OF USE OF THE PRODUCT, OR LOST SALES OR PROFITS OR DELAY OR FAILURE TO PERFORM THIS WARRANTY OBLIGATION. THE REMEDIES PROVIDED HEREIN ARE THE EXCLUSIVE REMEDIES UNDER THIS WARRANTY, WHETHER BASED ON CONTRACT, TORT OR OTHERWISE.
This Warranty gives you specific legal rights, and you may also have other rights that vary from state to state or province to province. Some states or provinces do not allow the exclusions or limitations outlined in this Warranty, so the above limitations or exclusions may not apply to youdependingonthe jurisdiction of purchase.
- Chefman® is a registered trademark of RJ BRANDS, LLC.
- Toast-Air® is a registered trademark of RJ BRANDS, LLC.
Contact Information
Download Pdf