
Ozeri PD4X3-2 Tri-Axis 3D Motion Pedometer
Ozeri PD4X3-2 Tri-Axis 3D Motion Pedometer User Manual.
Product Overview
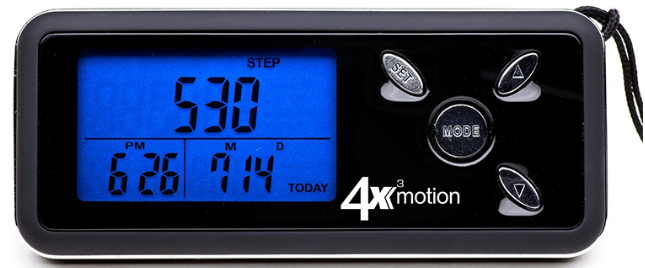
Front View
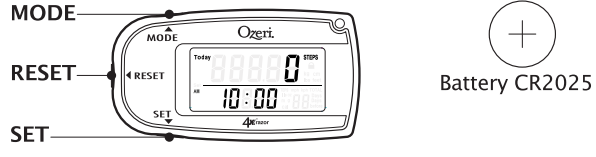
Back View
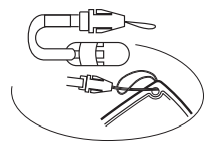
Attach the lanyard to the pedometer through the corner hole
Model
The images in this manual are for illustration purposes only and may vary slightly from the actual product.
Getting Started
Before using your 3D Pedometer for the first time (or after changing the battery), you will need to set it up so that it is personalized to you by following the instructions below
- Remove the battery tab from the pedometer by pulling the tab outwards. This will automatically begin the setup process with the TIME screen.
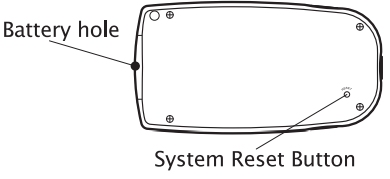
- Program each screen using the Mode and Reset buttons to increase and decrease the digits respectively. Use the Set button to confirm each entry. 3. If this happens, apply a pin to the hole on the back of the pedometer to perform a System Reset.
Programming your Pedometer
- TIME: Press MODE to switch from 24 HR and 12 HR clock display. Press SET to confirm entry. Continue to program HOUR and MIN as follows. Press MODE to advance by 1. For rapid advance, press and hold MODE for over 2 seconds. Press RESET to decrease by 1. Tor decreases rapidly, and press and hold RESET for over 2 seconds. Press SET to confirm the TIME.
- USA (Imperial) or International (Metric) Symbols: Press MODE to switch from Imperial to Metric units of measurement. NOTE: Changing the unit of measurement will reset the pedometer’s programming and delete all recorded exercise data
- STRIDE: After programming the CLOCK, the screen will flash the default STRIDE length (default value is 3 feet. Range is 1 to 6 feet). (default value is 70 cm.The rangee is 30 to 180 cm)Press MODE to advance by 0.25 feet (or 1 cm). Press RESET to decrease by 0.25 feet (or 1 cm). To advance or decrease rapidly, press and hold MODE or RESET respectively for over 2 seconds. Press SET to confirm your STRIDE.
- WEIGHT: After programming the CLOCK, the screen will advance to WEIGHT (default value is 150 lbs. Range is 45 to 350 lbs). (default value is 60 kg. The range is 20 to 160 kg)
NOTE
The pedometer can be reprogrammed at any time (except under
TOTAL STEPS & 30 days memory mode) by pressing SET for over 3 seconds. Reprogramming the pedometer will not erase the 30 Day and TOTAL STEP memory
Using your Pedometer
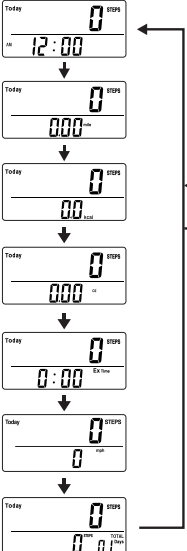
- How to change the display
Press MODE to cycle through the Pedometer’s data views
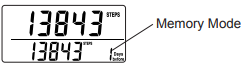
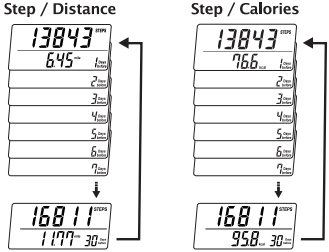
Memory Mode
Your pedometer can store up to 30 days of data for steps walked, calories consumed, and distance traveled. At midnight the LCD resets to zero and the previous day’s data is automatically stored in memory. Even though the daily memory is reset at midnight, viewing the data stored in memory: From either the DISTANCE OR CALORIES screen, press the SET button to view historical data. Once in Memory Mode, press the MODE button to between the STEP, CALORIES, and DISTANCE screens. Press the RESET button to cycle back into historical data by day. Press the SET button at any time to exit the Memory Mode.
Memory Mode is off Memory Mode pedometer will still add each day’s detailed data into its 30-day memory. In addition, the pedometer will also store the steps walked for up to 999,999 steps or 99 days on its TOTAL Step screen
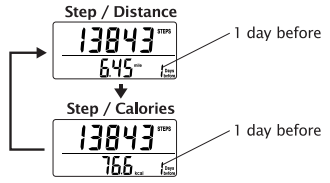
Press the RESET button to cycle back into historical data by day
Motion Lock Mode (for use in vehicles)
In Motion Lock Mode, the pedometer’s motion sensor is deactivated so that no steps or data are mistakenly captured, such as when driving in a vehicle.
Total Memory Mode
Total Memory Mode shows the total steps captured for up to 99 days or 999,999 steps. Press the MODE button until the screen displays TOTAL on the bottom right.
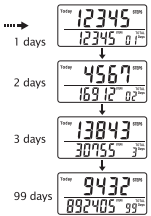
TOTAL MEMORY works by adding each day’s (TODAY’s) steps into the total memory. The steps stored in TODAY’S memory will still be added to TOTAL memory if the pedometer is warm reset.
NOTE
When the TOTAL MEMORY reaches 999,999 steps and/or 99 days, the pedometer will stop counting steps. A RESET must be performed from the TOTAL MEMORY screen. Please refer to the warm RESET instructions.
Reseting the Pedometer (warm reset)
From any of the following display views, press and hold the RESET button for over 5 seconds to reset the pedometer. All exercise data except TOTAL STEPS & 30 days memory will be reset to zero.
The STEP, CALORIES, FAT BURN, ACTIVITY TIME, and DISTANCE will be reset to zero.
When the TOTAL MEMORY reaches 999,999 steps and/or 99 days, the pedometer will stop counting steps. A TÔTAL MEMORY reset must be performed. Switch to the TOTAL MEMORY screen display, then press and hold the RESET button for 5 seconds. This will erase all exercise data stored in the pedometer areas a warm reset erases exercise data, and a cold reset erases all exercise and setup data stored in the pedometer, restoring the pedometer to its original factory-set programming.
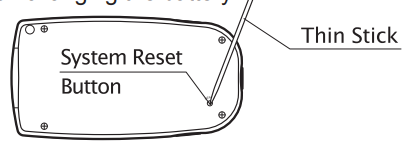
Performing a Cold Reset
A cold reset is required if all data needs to be deleted or if the display becomes unrecognizable.
NOTE
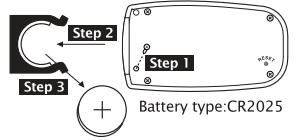
To perform a cold reset, insert a blunted pin into the RESET hole on the back of the pedometer. Please refer to the Setup instructions. Refer to the following diagram when changing the battery
Replacing the Battery
- Remove the screw from the back of the pedometer.
- Pull the battery slot out of the pedometer.
- Replace the battery with a new CR2025 battery.
NOTE
Perform a cold reset again by inserting a blunted pin into the hole on the back of the pedometer
Congratulations on your purchase of the 4x3razor Pedometer, by Ozeri. This pedometer is a great exercise tool that tracks the total number of steps you take and the total time you spend walking, along with the distance you walk and the calories you burn. This pedometer uses a Lithium battery (CR2025 installed). It automatically powers off after 3 minutes of inactivity to preserve battery life.
To change the battery please use the included mini-screwdriver. If you lose this screwdriver, any mini-screwdriver similar to the type used on eyeglasses will work. Please remove the battery insulation tab before attempting to use the Pedometer for the first time. When setting up your pedometer for the first time, you will need to enter your walking stride [the distance between your steps]. Measure the distance between your starting and ending position. Divide this total distance by 10 to get your average stride.
WARNINGS – PLEASE READ FIRST AND KEEP THIS MANUAL FOR FUTURE USE
- This pedometer is not a toy. Keep this pedometer away from children. The pedometer’s lanyard can cause strangulation.
- Always contact your healthcare provider before undertaking a weight loss or exercise regimen.
- Operate this unit only as intended.
- Do not swing the pedometer by the lanyard. Doing so may cause injury.
- Be careful when placing the pedometer in your shorts or trousers not to sit on it while it is still in your pocket. This may damage the pedometer.
- Do not dispose of batteries in a fire. This may cause an explosion.
Dispose of the battery at your local recycling center to avoid pollution and unlawful disposal. - Do not expose this product to rain or extreme conditions.
- Do not attempt to disassemble this product. It has no serviceable parts.
- You may also call the National Battery Hotline at 202 625-3333.
WARRANTY INFORMATION
Should your Pedometer prove defective within 1 year from the date of purchase, return the defective product, freight prepaid along with an explanation of the claim to “Ozeri.” Please pack your Pedometer carefully to avoid damage in transit. Under this warranty, Ozeri will repair or replace any parts found to be defective due to a manufacturer’s defect.
There are no warranties other than that expressly set forth herein. This warranty is not transferable.
Ozeri is not responsible in any way for damages, losses, or inconveniences caused by equipment failure or by user negligence, abuse, or use not by the “User Guide” or any additional safety, use, or warnings included in the product materials. Further, Ozeri is not liable for incidental or consequential damages of any nature resulting from the use of this product and any liability shall not exceed the purchase price of the product. This Warranty gives you specific legal rights. You may also have other rights which vary from state to state.
THIS WARRANTY DOES NOT APPLY TO THE FOLLOWING
Damage due to accident, misuse, abuse, alterations, or vandalism.
- Improper or inadequate maintenance.
- Unauthorized modification or commercial use.
- Damage in return transit
Unsupervised use by children Ozeri Customer Service: Phone: 1-877-299-1296 Email: support@ozeri.com (Ozeri
TM and its subsidiaries assume no liability for damage caused by the use of the Pedometer other than for its intended use or as instructed above and in the User Manual.