
Mee audio AF-T1 Dual Headphone
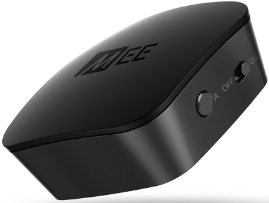
Mee audio AF-T1 Dual Headphone User Manual.
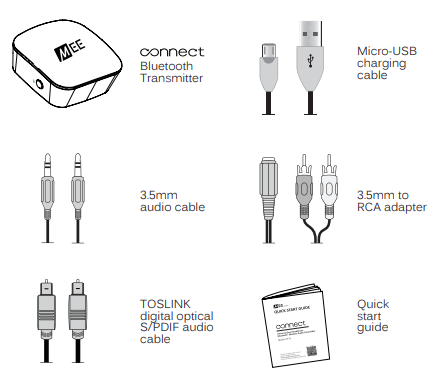
PACKAGE CONTENTS
Product Overview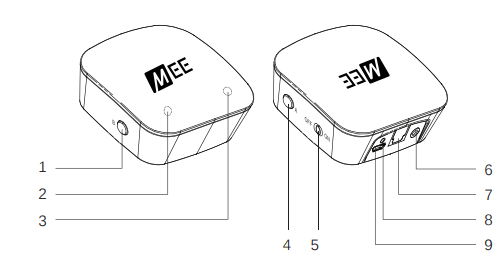
- Pairing button “B”
- Indicator light “B”
- Indicator light “A”
- Pairing button “A”
- On/Off switch
- Analog audio input (3.5mm)
- Digital audio input (TOSLINKoptical S/PDIF)
- Power/charging indicator light
- Micro-USB power/charging port
COMPATIBILITY
The Connect is compatible with any device that has one of the following audio outputs: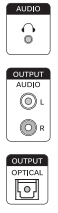
- 3.5mm (1/8”) headphone jack
- RCA audio jacks (red and white connectors)
- TOSLINK digital optical (S/PDIF) connector

Using the Connect with a headphone that supports aptX or aptX Low Latency will provide the best possible audio quality and minimize audio lag/latency.
CHARGING
To charge the Connect, plug the included Micro-USB charging cable into any powered USB port** and the charging port on the rear of the unit. Charge time is approximately 90 minutes. 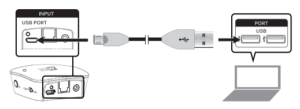
Connect
To turn on, slide the on/off switch on the right side of the Connect unit to the “On” position.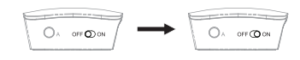
CONNECTING TO TV OR OTHER AUDIO DEVICE
The Connect includes three connection options. Consult the user manual for your television or other device to find the appropriate connector to use for audio output (Audio Out). 
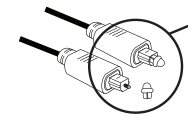
Plug the cable firmly into the optical audio output on the TV and the optical input of the Connect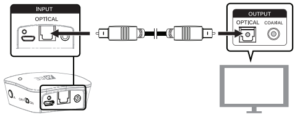
CONNECTING TO TV OR OTHER AUDIO DEVICE
Note: If something is plugged into both the optical and 3.5mm input jacks of the Connect, the analog (3.5mm) input will have priority and the optical input will be muted. To use the optical input, unplug the 3.5mm connector from the transmitter. 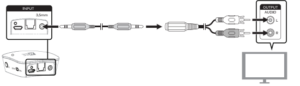
CONNECTING TO TV OR OTHER AUDIO DEVICE
Option 3: 3.5mm (1/8”) headphone jack Some TVs and most standalone receivers have a headphone jack on the front or side. To use the Connect with the headphone jack, plug the included 3.5mm stereo audio cable into the headphone jack on the TV and the 3.5mm input on the rear of the transmitter. A ¼” adapter (not included) may be used with receivers that have a ¼” jack.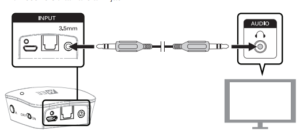
SETUP

Note: The above procedure creates a pairing in slot A. To pair a single headphone in slot B, simply use the pairing button “B” instead. To pair two headphones simultaneously, follow the instructions in the next section.
PAIRING WITH BLUETOOTH HEADPHONES
Optional: Pairing a 2nd Headphone The Connect can stream audio to two Bluetooth headphones simultaneously. A second headphone can be paired after one headphone is already connected (as indicated by a solid blue light on top of the unit). 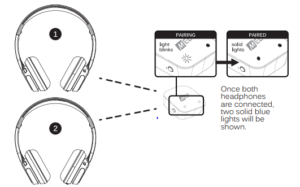
PAIRING WITH BLUETOOTH HEADPHONES
Follow the instructions found in the “Pairing a 2nd Headphone” section to replace one of the currently-paired headphones with a new device. Use the pairing button “A” to replace the headphones paired in slot A and the pairing button “B” to replace the headphones paired in slot B.
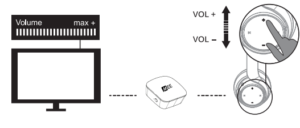
ADJUSTING THE VOLUME
- STEP-1 MAXIMIZE TV VOLUME
- STEP-2 ADJUST HEADPHONE VOLUME
TROUBLESHOOTING
- Issue: Connect will not turn on; Green power light doesn’t turn on or turns on and then off
- Issue: Not charging
- If using a computer, make sure the computer is on and the USB port has power.
- Issue: Unable to pair Bluetooth headphones
- Make sure both the Connect and the Bluetooth headphones are in pairing mode at the same time as indicated by the appropriate tones and/or light
SAFETY AND CARE
Clean with a soft, slightly damp cloth. Do not use chemical cleaners. There are no user-replaceable/reparable parts in the transmitter. Disassembling it will void your warranty. Replacement parts and accessories are available online at www.MEEaudio.com
SPECIFICATIONS
See the Connect product page at www.MEEaudio.com for product specifications.
WARRANTY
MEE audio products purchased from authorized retailers are covered by a 1-year manufacturer’s warranty. Visit the warranty information page at www.MEEaudio.com for warranty information. MEE audio and its logo are registered trademarks of S2E, Inc. All rights reserved. MEE audio and its logo are registered trademarks of S2E, Inc. All rights reserved.