
jocel BM1309-B BREAD MAKER
jocel BM1309-B BREAD MAKER User Manual.
IMPORTANT SAFEGUARDS
Before using the electrical appliance, the following basic precautions should always be followed:
- Read the jocel BM1309-B BREAD MAKER User Manual.
- Before use, check that the voltage of the wall outlet corresponds to the one shown on the rating plate.
- Do not operate any appliance with a damaged cord or plug or after the appliance malfunctions, or is dropped or damaged in any manner. Return the appliance to the manufacturer or the nearest authorized service agent for examination, repair, electrical, or mechanical adjustment.
- Do not press hot surfaces. Use handles or knobs.
- To protect against electric shock do not immerse the cord, plugs, or housing in water or other liquid.
- Unplug from the outlet when not in use, before putting on or taking off parts, and before cleaning.
- Do not let the cord hang over the edge of a table or hot surface.
- Accessory attachments not recommended by the appliance manufacturer may cause injuries.
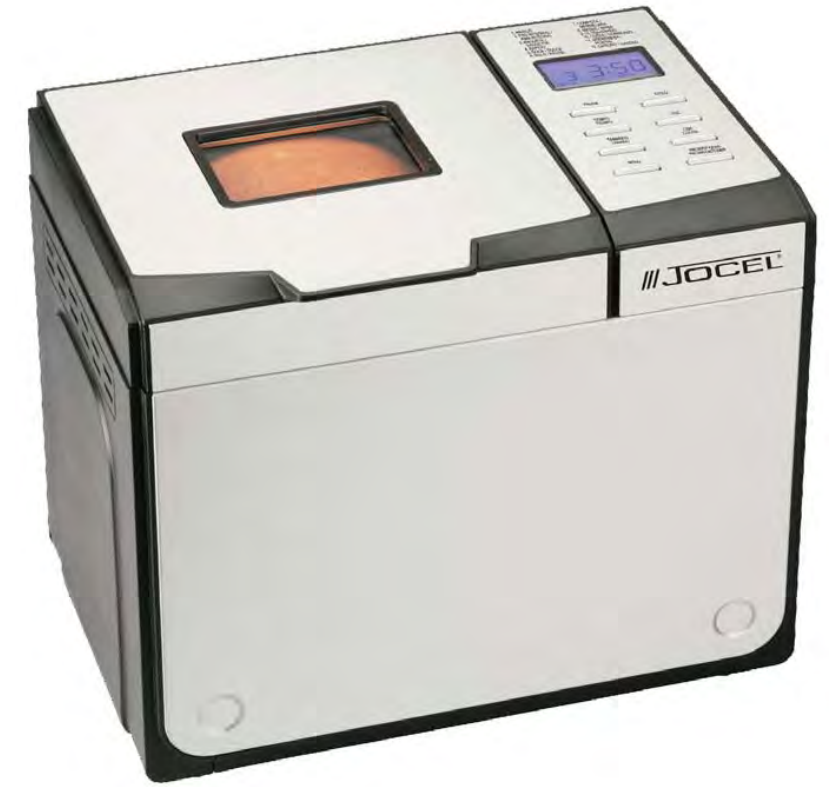
KNOW YOUR BREAD MAKER

INTRODUCTION OF CONTROL PANEL
(The silkscreen is subject to change without prior notice.)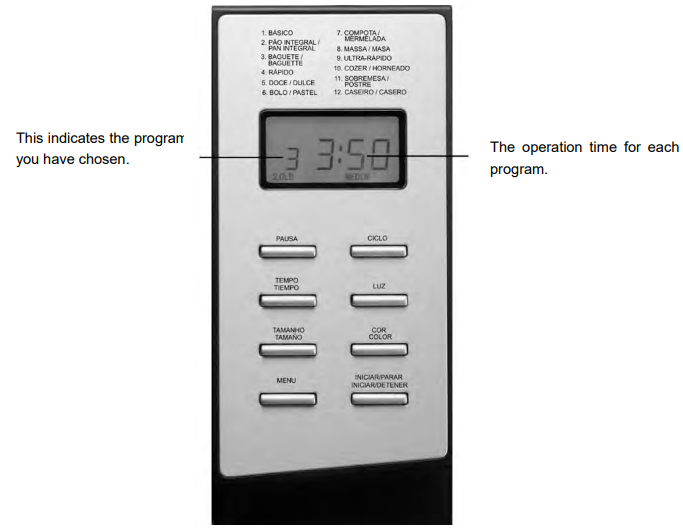
AFTER POWER-UP
As soon as the bread maker is plugged into the power supply, a beep will be heard, and “1 3:00 ” appears on the display. But the two dots between the “3” and “00” don’t flash constantly. The “1” is the default program. 1000g and MEDIUM will appear on LCD. They are default settings.
START/STOP (INICIAR/PARAR)
Starting and stopping the selected baking program. To start a program, press the “START/STOP” (INICIAR/PARAR) button for approx. 1.5 seconds. To stop the program, press the “START/STOP” (INICIAR/PARAR) button for approx. 1.5 seconds, then a beep will be heard, which means that the program has been switched off.
MENU
- Basic: kneading, rising, and baking normal bread. You may also add ingredients to increase flavor.
- Whole wheat: kneading, rising, and baking of whole wheat bread. It is not advised to use the delay function as this can produce poor results.
- French: kneading, rising, and baking with a longer rise time. The bread baked on this menu will have a crisper crust and loose texture.
- Quick: kneading, rising, and baking loaf within a time less than Basic bread. But the bread baked in this setting is usually smaller with a dense texture.
- Sweet: kneading, rising, and baking sweet bread. You may also add ingredients to add flavor.
- Cake: kneading, rising, and baking, but rise with soda or baking powder.
- Jam: boiling jams and marmalades. Fruit or vegetables must be chopped before putting it into the bread pan.
- Dough: kneading and rising, but without baking. Remove the dough and use it for making bread rolls, pizza, steamed bread, etc.
- Ultra-fast: kneading, rising, and baking loaf in a short time, bread with a dense texture.
- Bake: only baking, no kneading, and rise. Also used for increasing the baking time on selected settings.
- Dessert: kneading, rising, and baking dessert.
- Homemade: Can self-program by the customer, to reset kneading, rise, baking, and keep warm every step time. The time range of each program is as follows:
- KNEAD1:6-14 minutes
- RISE1:20-60 minutes
- KNEAD2:5-20 minutes
- RISE2:5-120 minutes
- RISE3:0-120 minutes
- BAKE:0-80 minutes
- KEEP WARM:0-60 minutes
Under the menu of Home Made,
- Press the CYCLE (CICLO) button once, and KNEAD1 will appear on the LCD, then press TIME (TEMPO) button to adjust the minutes, and press the CYCLE (CICLO) to confirm the time for this step;
- Press CYCLE (CICLO) to enter the next step, and RISE1 will appear on LCD, and then press the TIME (TEMPO) button to adjust the minutes, the number will increase rapidly if the TIME button is holding. Further press CYCLE (CICLO) to confirm.
- In this way set the remaining steps. Upon finishing setting for all steps, press the START/STOP (INICIAR/PARAR) button to exit the setting.
- Press the START/STOP (INICIAR/PARAR) button further to activate the operation.
- Note: the setting can be memorized and is effective in the next use.
COLOR (COR)
With the button, you can select LIGHT, MEDIUM, or DARK color for the crust.
LOAF (TAMANHO)
Press this button to select the size of the bread between 1.5 lb (750g) and 2.0 lb (1000g). Please note the total operation time may vary with the different loaf sizes.
TIME (TEMPO)
If you want the appliance not to start working immediately, you can use the button to set the delay time. The step of the set delay function is as follows:
- Select your menu, color, and loaf size.
- Set the delay time by pressing the TIME (TEMPO) button. The delay time should include the operation time of the chose menu. Suppose it is 8:30 PM now and you want the bread to be ready to serve at 7:00 AM of next day, so the delay time should be 10 hours and 30 minutes. Press the TIME (TEMPO) button continuously until 10:30 appears on the display. The increment of each press is 10 minutes.
- Press the START/STOP (INICIAR/PARAR) button to activate this delay program. You can see the dot flashed and LCD will count down to show the remaining time. Please note the maximum delay time is 13 hours. Do not use any perishable ingredients such as eggs, fresh milk, fruits, and onions in the delayed menu.
PAUSE (PAUSA)
After the procedure starts, you can press the PAUSE (PAUSA) button to interrupt at any time, the operation will be paused but the setting will be memorized, and the outstanding time will be flashed on the LCD. Press the PAUSE (PAUSA) button again, and the program will continue.
LIGHT (LUZ)
Press the button once, the lighting lamp will be illuminated to expediently view the operation. Within 1minutes, if you press the button again, the lighting lamp will be extinguished. After 1 minute, you don’t need to press the button, the lamp will be extinguished automatically
KEEP WARM
Bread can be automatically kept warm for 60 minutes after baking. While keeping warm, if you would like to take the bread out, switch the program off by pressing the START/STOP(INICIAR/PARAR) button.
MEMORY
But if the dough has not entered the rising phase when the power supply breaks off, you can press the START/STOP (INICIAR/PARAR) directly to continue the program from the beginning.
ENVIRONMENT
The machine may work well in a wide range of temperatures, but there may be no difference in loaf size between a very warm room and a very cold room. We suggest that the room temperature should be within the temperature of 15 ºC to 34ºC.
WARNING DISPLAY:
- If the display shows “H HH” after you have pressed the START/STOP (INICIAR/PARAR) button, the temperature inside is still too high. Then the program has to be stopped. Open the lid and let the machine cool down for 10 to 20 minutes.
- If the display shows “E E0” or “E E1” after you have pressed the START/STOP (INICIAR/PARAR) button, the temperature sensor is malfunctioning please check the sensor carefully with an Authorized expert.
BE
FOR THE FIRST USE
The appliance may emit a little smoke and a characteristic smell when you turn it on for the first time. This is normal and will soon stop. Make sure the appliance has sufficient ventilation.
- Please check whether all parts and accessories are complete and free of damage.
- Clean all the parts according to the section “CLEANING AND MAINTENANCE”.
- Set the bread maker on BAKE mode and bake empty for about 10 minutes. Then let it cool down and clean all the detached parts again.
- Dry all parts thoroughly and assemble them, and the appliance is ready for use.
HOW TO MAKE BREAD
- Place the bread pan in position, then turn it clockwise until it clicks in the correct position.
- Place ingredients into the bread pan. Please keep to the order mentioned in the recipe.
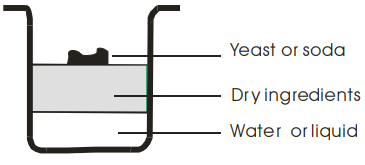
- Make a small indentation on the top of the flour with a finger, add yeast to the indentation, and make sure it does not come into contact with the liquid or salt.
- Close the lid gently and plug the power cord into a wall outlet.
- Press the Menu button until your desired program is selected.
- Press the COLOR (COR) button to select the desired crust color.
- Press the LOAF (TAMANHO) button to select the desired size. (750g or 1000g)
- When do not use or complete operation, unplug the power cord.
SPECIAL INTRODUCTION
- For Quick breads
During the initial mixing of quick bread, dry ingredients may collect in the corners of the pan. It is necessary to help machine mixing to avoid flour clumps. - About Ultrafast program
The bread maker can bake a loaf within 1 hour 38 minutes with a rapid program. Please note that it should be hot water of 48—50ºC, you must use a cooking thermometer to measure the temperature. The influence of temperature is very critical to the performance of baking. If the water temperature is too low, the bread will not rise to the expected size, the water temperature is too high. The fungus in the yeast will be killed before rising, which also will affect the baking performance.
CLEANING AND MAINTENANCE
Disconnect the machine from the power outlet and let it cool down before cleaning.
- Bread pan: remove the bread pan by turning it anti-clockwise, then pulling the handle to remove it, wipe inside and outside of the pan with damp clothes, do not use any sharp or abrasive agents for the consideration of protecting the non-stick coating.
- Kneading blade: If the kneading blade is difficult to remove from the bread, use the hook. Also, wipe the blade carefully with a cotton damp cloth. Both the bread pan and kneading blade are dishwashing-safe components.
- Housing: gently wipe the outer surface of the housing with a wet cloth. Do not use any abrasive cleaner for cleaning, as this would degrade the high polish of the surface. Never immerse the housing in the water for cleaning.
INTRODUCTION OF BREAD INGREDIENTS
- Bread flour
Bread flour has a high content of gluten (so it can be also called high-gluten flour which contains high protein), has good elasticity, and can keep the size of the bread from collapsing after rise. - Plain flour
Flour that contains no baking powder, is applicable for making express bread. - Whole-wheat flour
Whole-wheat flour is ground from grain. It contains wheat skin and gluten. Whole-wheat flour is heavier and more nutrient-rich than common flour. The bread made with whole-wheat flour is usually small in size. So many recipes usually combine whole-wheat flour or bread flour to achieve the best result. - Black wheat flour
Black wheat flour, also named “rough flour”, is a kind of high-fiber flour, and it is similar to whole-wheat flour. To obtain the large size after rising, it must be used in combination with a high proportion of bread flour. - Self-rising flour
A type of flour that contains baking powder, it is used for making cakes specially.-
INGREDIENTS MEASUREMENT
One of the important steps for making good bread is the proper amount of ingredients. It is strongly suggested to use a measuring cup or measuring spoon to obtain an accurate amount, otherwise, the bread will be largely influenced.
- Weighing liquid ingredients
Water, fresh milk, or milk powder solution should be measured with measuring cups. Observe the level of the measuring cup with your eyes horizontally. When you measure cooking oil or other ingredients, clean the measuring cup thoroughly without any other ingredients. - Dry measurements
This extra amount could affect the balance of the recipe. When measuring small amounts of dry ingredients, the measuring spoon must be used. Measurements must be level, not heaped as this small difference could throw out the critical balance of the recipe. - Adding sequence
The sequence of adding ingredients should be abided by, generally speaking, the sequence is liquid ingredients, eggs, salt milk powder, etc. When adding the ingredient, the flour can’t be wetted by liquid completely. The yeast can only be placed on the dry flour. And yeast can’t press with salt. After the flour has been kneaded for some time a beep will prompt you to put fruit ingredients into the mixture. If the fruit ingredients are added too early, the flavor will be diminished after a long time of mixing. When you use the delay function for a long time, never add the perishable ingredients such as eggs, and fruit ingredients.
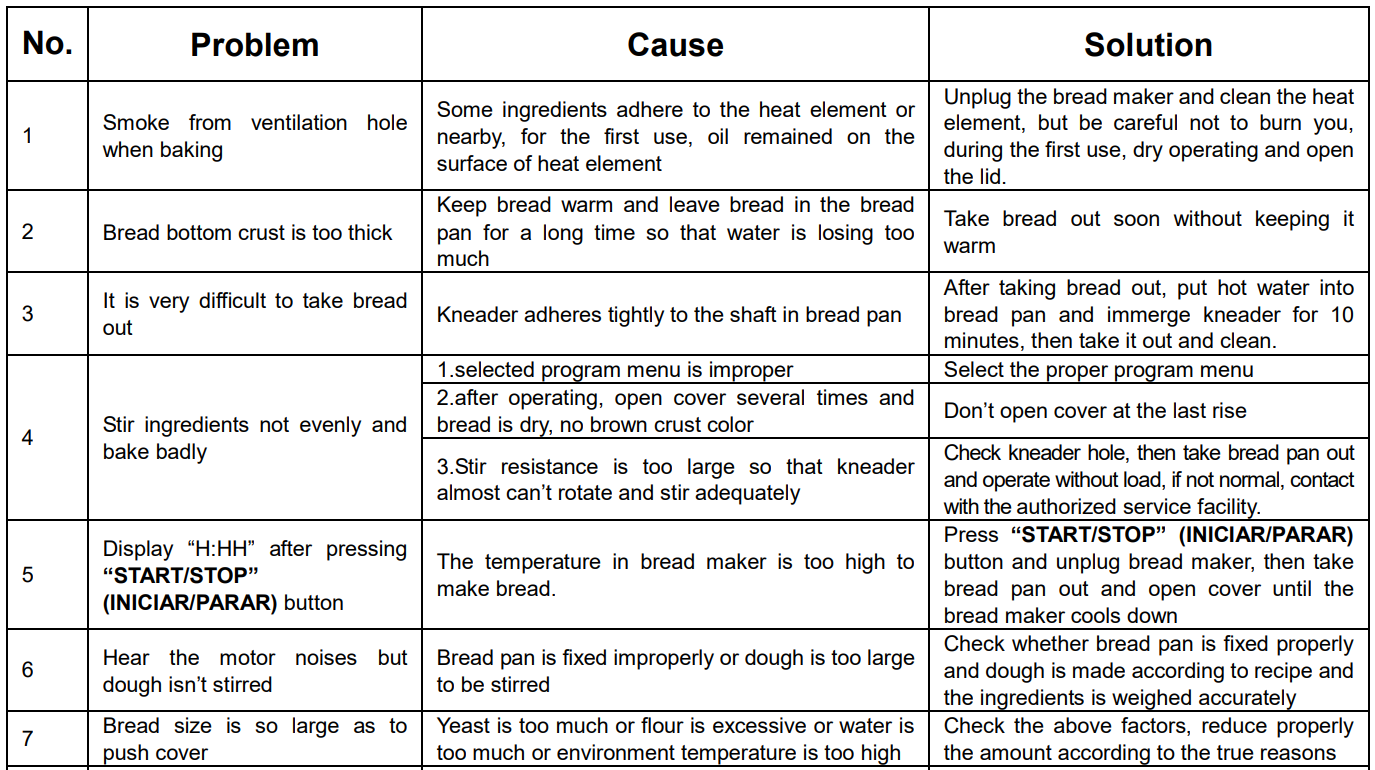
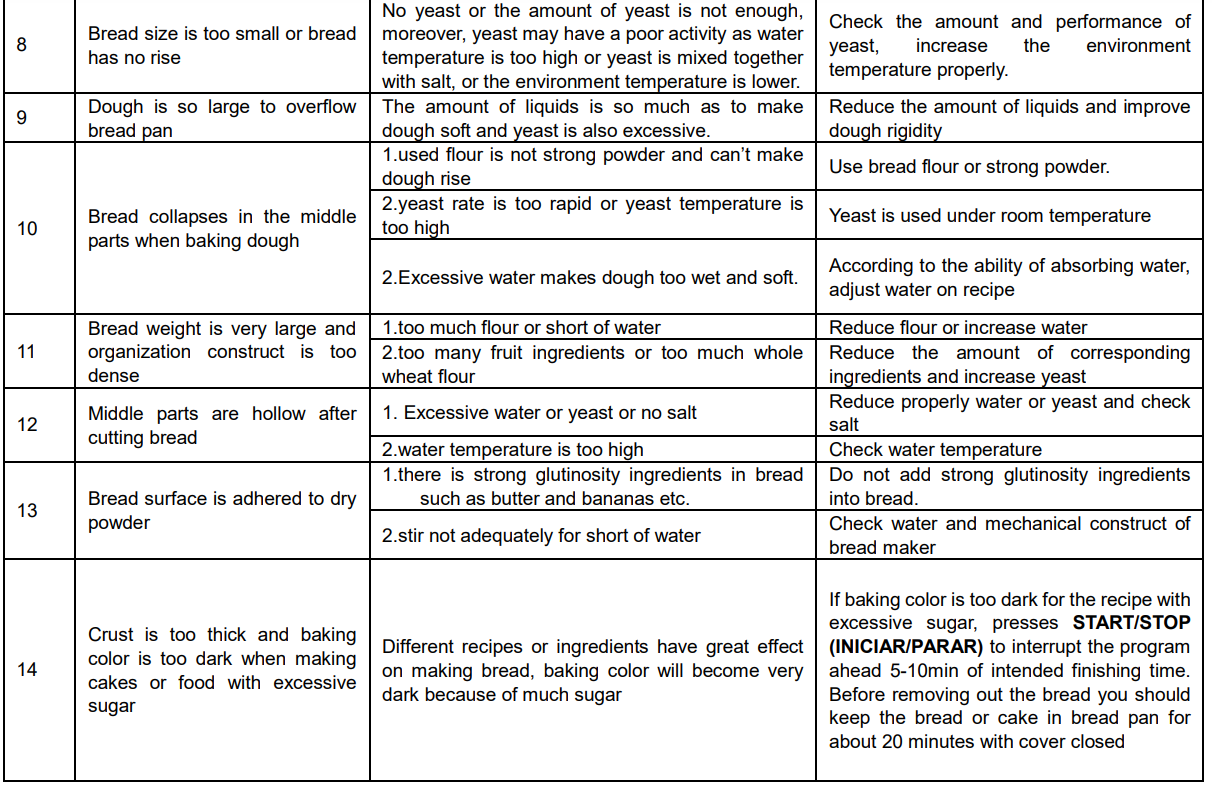
TROUBLESHOOTING GUIDE
RECIPES
The following recipes are only for reference, you may adjust them depending on ingredients, taste, and experiments.
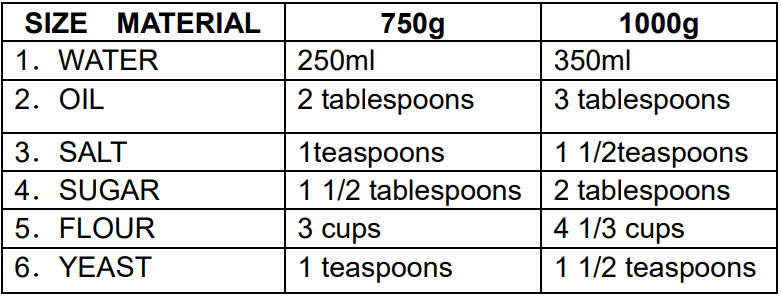
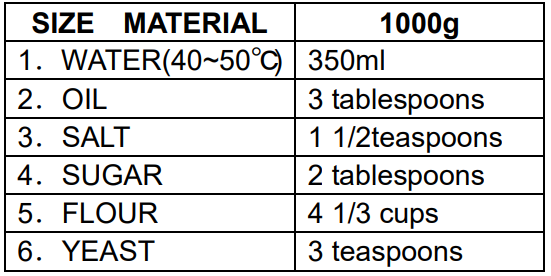
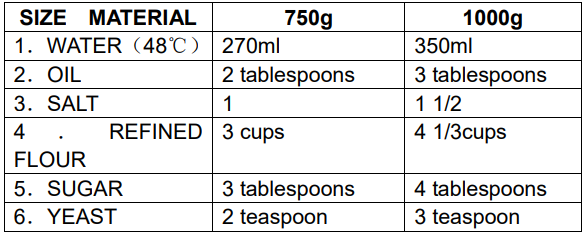
BASIC BREAD
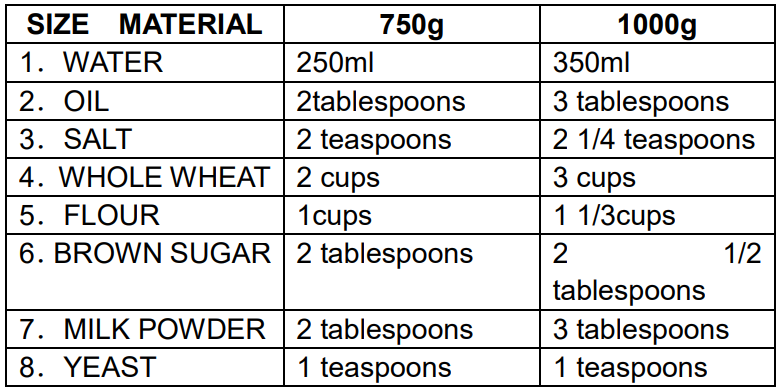
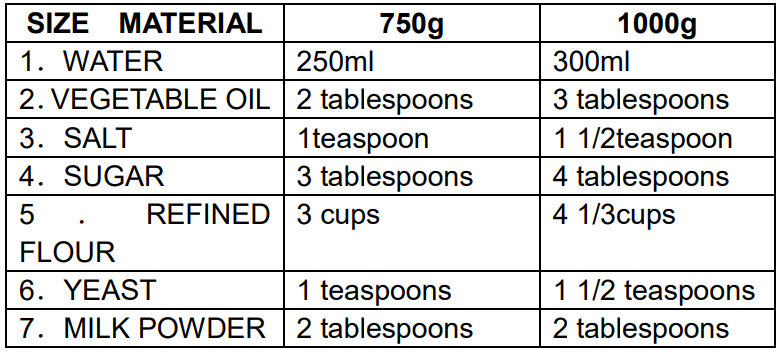
WHOLE WHEAT BREAD:
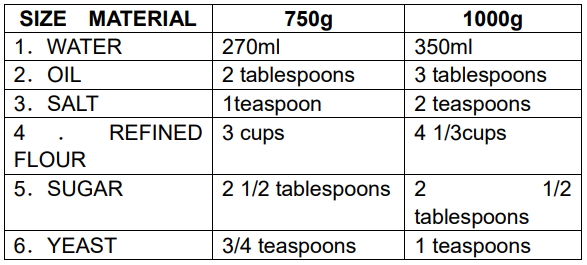
FRENCH BREAD:
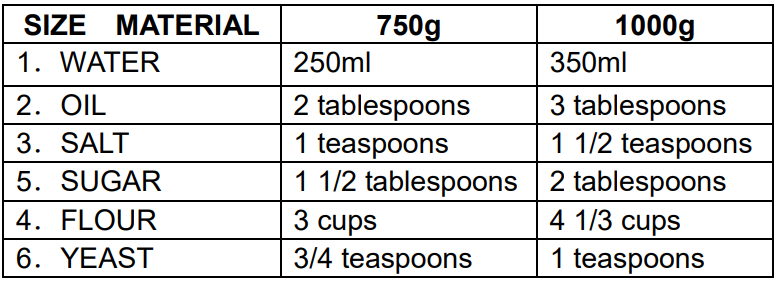
QUICK BREAD:
SWEET BREAD:
CAKE :

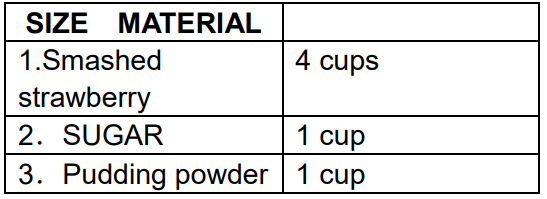
JAM:
DOUGH:
ULTRA FAST BREAD:
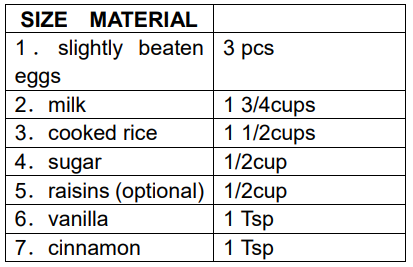
DESSERT
ENVIRONMENT-FRIENDLY DISPOSAL

You can help protect the environment!
Please remember to respect the local regulations: hand in the non-working electrical equipment to an appropriate waste disposal center.