jocel JFG5I007247 5 GAS COOKER
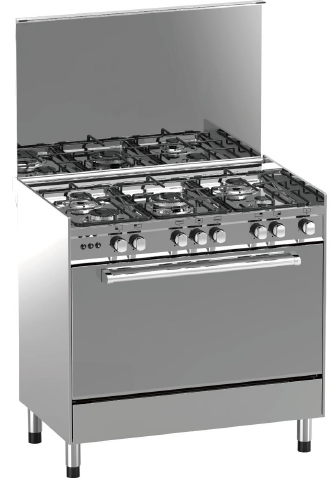
jocel JFG5I007247 5 GAS COOKER User Manual.
NOTES ON SAFETY
The cooker must always be installed by qualified staff.
OVEN DOOR
Keep children away from the glass door of the oven when in use. The glass may cause burns if touched.
GLASS LID
The lid of the cooker must be opened during use of the oven or grill. Never choose the lid while the burners or electric hotplates are in use or still hot; always wait for them to cool.
FIRST USE OF THE OVEN
Operate the oven empty for at least 30 minutes to eliminate any greases, fumes, or impurities left by the production cycle.
MAIN GAS TAP
The mains gas tap should always be turned off after use of the cooker. Check the connection hose for damage periodically.
FLAME CAP COVERS
These are purely decorative. Their use on lit burners does not impair the operation of the appliance.
INFERIOR WARMING COMPARTMENT
Never place inflammable materials in the compartment under the oven.
SPECIFICATION
- Dimension: 90 H x 90 W x 60 D cm
- Oven Capacity Gross: 130 Liters
- Heat Input Gas Burners: Triple Burner 4.0 kW Rapid Burner 2.8 KW
- Pressure: LPG / 30 bar
This manual is prepared for more than one model. Your appliance may not have some of the features outlined in this manual. Please read this manual carefully and pay attention to the figures and information that relate to your model.
INSTALLATION
- The work on installation must be carried out by competent and qualified installers according to the local regulations in force.
- Any modifications to the domestic electrical main which may be necessary for the installation of the appliance should be carried out only by a qualified technician.
- It is dangerous to modify, the characteristics of this appliance.
- Avoid installation of the cooker near flammable material ( e.g. curtains, tea towels, etc. )
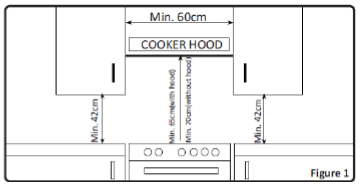
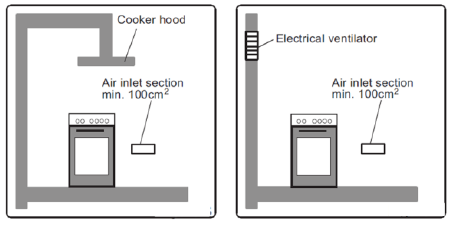
- If installing the cooker with a cooker hood ensure there is a minimum of 65cmto the underside of the hood …see Figure 1
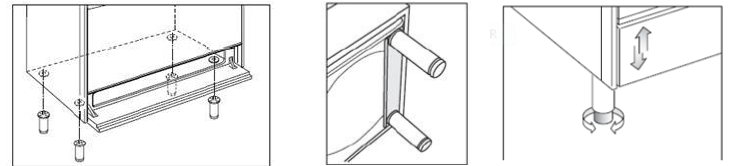
Where supplied you must use the adjustable feet. The cooker chassis must not sit directly on the floor, a plinth, or a support surface. To fit adjustable feet:
- Place the cooker on a piece of polystyrene packaging or similar exposing the base to fit the feet.
- Fit the 4 feet by screwing them tightly into the base as shown below.
- Level the cooker by screwing the feet in or out.
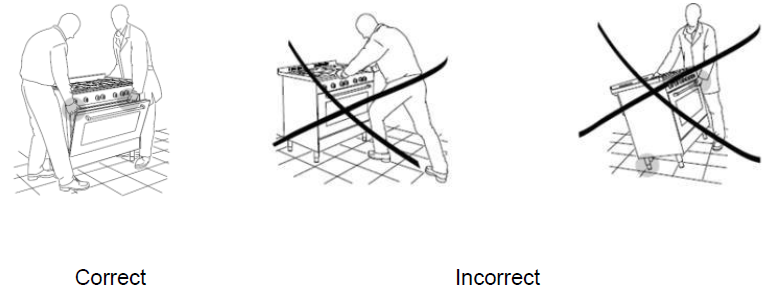
Information: To prevent damaging the adjustable feet, ensure the cooker is always lifted by two people. DO NOT DRAG the cooker. Lift the feet clear of the floor.
Do not lift the cooker by the door handles
WARNING The anti-tip chain must be installed and fixed securely to a wall behind the cooker to prevent accidental tipping of the cooker.
JOCEL DECLINES ANY RESPONSIBILITY FOR POSSIBLE DAMAGES RESULTING FROM AN INSTALLATION THAT DOESN’T COMPLY WITH THE RULES IN FORCE.
INSTALLATION ENVIRONMENT
WARNING
This unit can be installed and can work only in constantly ventilated rooms, according to the national rules in force.
For the gas cooker to work properly, it is necessary that sufficient air for gas combustion can flow naturally into the room. The airflow into the room must come directly through openings of external walls. These openings must have a free passage of at least 100cm² (one or more openings can be made).
Combustion Products Discharge
Gas cooking units must discharge combustion products through hoods directly connected to flues or outside. In case the hood can’t be installed, it is recommended to use an electric fan applied to the external wall or the window of the room, with the condition that openings to let air flow in the room are realized. This electric fan must be powerful enough to ensure in a kitchen an air replacement of 3 to 5 times its volume per hour.
INFORMATION: Upon completing the installation, check and make sure that all pipes and hoses are connected correctly. Always use soapy water to check the gas leaks. For safety reasons, we would advise you to inspect and change the rubber hose for the gas connection yearly.
REGULATING THE MINIMUM SETTING.
The following procedure is recommended:
- ignite the burner and leave it in operation at its rated flow rate for about 10 minutes;
- then turn the knob to the minimum setting;
- remove the knob, pulling it off the tap shaft;
- use a small screwdriver to regulate the minimum setting, turning clockwise to reduce the flame or anti-clockwise to increase it.
In normal taps, the regulating screw for adjusting the minimum setting is inside the rod. In taps with valves, the regulating screw is on the body of the tap itself. After any replacement or adjustments, reassemble all parts carefully to restore the original functions.
OVEN BURNERS
REGULATING THE MINIMUM SETTING (oven burner)
- ignite the burner and turn the knob to the maximum temperature;
- allow the oven to warm up for at least 10 minutes;
- remove the knob from the thermostat rod and use a small screwdriver to adjust the by-pass screw;
- turn clockwise to reduce the flame or anti-clockwise to increase. The flame must be short and stable, must withstand any draughts and closing of the oven door, and must not blowback.
CHILD SAFETY
- This appliance has been designed for use by adults. Take care, therefore that children do not attempt to play with it.
- The appliance will become hot during operation and can remain hot for a long time after being switched off.
- Supervise children and pay attention that they do not touch surfaces or remain in the vicinity of the appliance when in use or when not completely cooled.
USING COOKER FOR THE FIRST TIME
We recommend that before you cook in your new cooker you heat the oven to 180℃for 2hrs to run in your new oven. After the oven cools wipe it out with hot water and a mild detergent. We also recommend cleaning the racks and shelves before use. When using the cooker for the first time you may notice the following:
DURING USE
- Ensure good ventilation of the room, keep adequate natural ventilation, or install an extractor hood with a discharge tube.
- In case of doubt ask the installer for advice.
- Supply the appliance with the type of gas stamped on the relevant label situated near the gas connection tube.
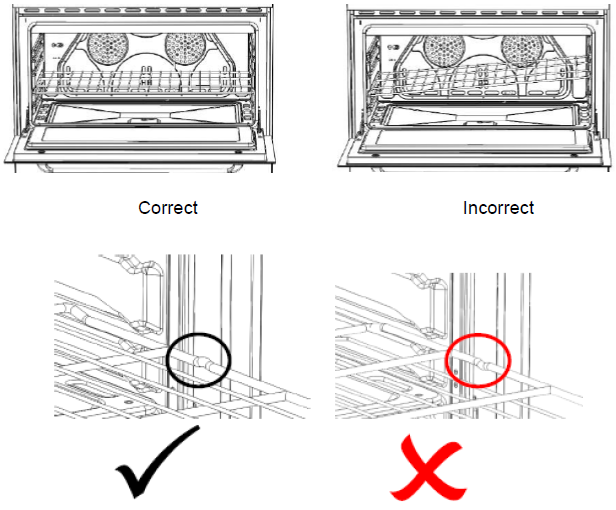
- Ensure that the oven grids are inserted correctly. (See instructions as below.)
- The appliance is heavy, move it carefully.
- To facilitate ignition, light the burners before placing pans on the grid. Check that the flame is regular.
USING THE GAS HOB BURNERS
INFORMATION: Make sure that burners are always in position and located correctly.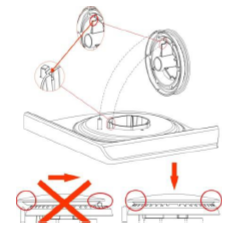
Control knobs on the gas burners
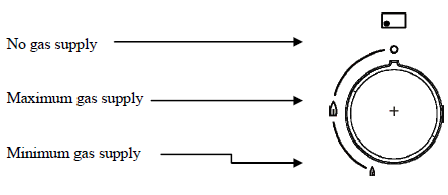
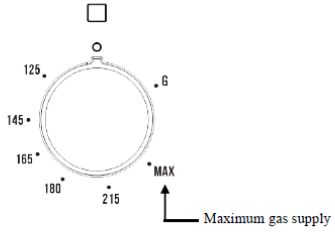
The knobs for the gas burners of the cooker are found on the control panel. The regulating knobs should be turned in an anti-clockwise direction until the small flame symbol, and vice versa for the larger flame symbol.
Ignition of the hob gas burners
To light up the burner, keep pushing the ignition button as indicated by![]() the knob and turn it anti-clockwise to the maximum, and hold it for 3 to 5 seconds.
the knob and turn it anti-clockwise to the maximum, and hold it for 3 to 5 seconds.
- The ignition will spark and ignite the burner. At this position, the gas supply is at its maximum and the flame is also at its maximum.
- You can reduce the flame size by turning the knob in an anti-clockwise direction to achieve your requirements.
- Should the burner fail to light up, turn the knob to its original position and try again.
- Your burner flame should be blue.
Air adjustment of the burner body
The mixing ratio of LPG and air is important to provide complete combustion of gas and to obtain a blue flame.
USING THE GAS OVEN
- Manual ignition of the Oven burner
Open the oven door, then push and turn the oven knob in an anti-clockwise direction to the maximum position, introduce a small flame or spark lighter to the small ignition hole located in the front of the oven burner cover on the bottom of your oven. - Manual ignition of the Grill burner
Open the oven door, then push and turn the oven knob in an anticlockwise direction to the maximum position and hold a flame near the gas grill burner holes.
IMPORTANT SAFETY
Do not slam the oven door when closing.
- Gently close the oven door, and then check if the burner is lighted by looking through the window at the ignition hole. If the flame has been extinguished, immediately re-light the oven.
- After a few minutes, check the temperature and adjust the oven control knob if necessary, to obtain the required level.
FAN OVEN
- cakes (soft and thick)
- large quantities of foods
- cooking various dishes simultaneously
Characteristics of fan cooking
- heat is provided from all directions
- cooking is possible on several shelves
- high moisture removal
- thawing is possible with or without heat emission.
USING THE OVEN LIGHT
- For gas ovens, the light is controlled by a push switch on the control panel.
- For an electric oven, this light continuously illuminates the oven when in use.
- The light switch is on the function selector.
- The light can be used while cooking or cleaning the oven.
TIPS FOR OVEN COOKING
For baking cakes
- Preheat the oven for at least 10 minutes before use.
- Do not open the oven door when baking. The jet of cold air will block the raising block the rising process of some cakes, pastries, and soufflés.
- To check if your cake is baked, insert a toothpick into the mixture; if it comes out clean, the cake is ready. Wait until at least 3/4 of the cooking time has passed before doing this check.
As a general rule remember that
A dish that is well-cooked on the outside but not sufficiently cooked inside would have required a lower temperature and longer cooking time. On the contrary, a “dry” texture would have required a shorter time and higher cooking temperature.
cooking meat
- Meat to be cooked in the oven should weigh at least 1 kilogram to avoid becoming too dry. If you want to roast with a good color, use very little oil.
- If the piece of meat is lean, use oil or butter or a little of both.
- Butter or oil on the other hand unnecessary if the piece is a strip of fat. If the piece has a strip of fat on one side only, put it in the oven with this side upwards:
- When melting the fat will grease the lower side sufficiently.
For cooking fish
- Cook small fish from start to finish at a high temperature. Cook medium-sized
- fish initially at a high temperature and then gradually lower the temperature.
- Cook large fish at a moderate temperature from start to finish.
For Grilling
- The following types of meat are suitable for grilling. Mostly meat or offal cut in slices or pieces of various sizes, but not very thick, poultry cut in half and flattened, fish, some vegetables (e.g Courgettes, aubergines, tomatoes, etc.), skewers of meat or fish, and seafood.
NOTE
If in doubt, always carefully follow the indications given in the recipes you intend to follow. Do not place any utensils such as dripping pans, cake tins, casseroles, Pyrex dishes, aluminum foil, or others on the base of the oven when the oven is in use.
Accumulation of heat might affect the cooking results and also damage the oven enamel.
MAINTENANCE & CLEANING
Before each operation, disconnect the unit by unplugging the socket and gas hose. Oven lamp replacement Disconnect the power supply to the appliance, unscrew the lamp, and replace it with a high-temperature fitting (300℃) with the following specifications:
- Voltage: 220-240V, 50-60Hz)
- Power: 23W
- Convection: E14
NOTE Use only a lamp designed for high temperatures (300℃)
Cleaning the Oven
- Clean the oven cavity carefully after use when it is still warm.
- When the oven is slightly warm it is easier to take off deposits of fats or other substances such as fruit juice, sugar particles, or fat. You may use warm detergent water or an appropriate spray oven cleaner.
- Do not spray directly at the mat steel as this can damage them and pose a hazard. Clean the oven accessories (grate, hot plate, etc.) with warm water.
Gas Cylinder Safety
- Periodically check the condition of the flexible hose of the gas connection and have it replaced by skilled technicians as soon as it shows abnormalities. Annual replacement is recommended.
- For a model with a gas cylinder compartment, do not use this space to keep a non-connected or empty cylinder.
- The unit equipped with a cylinder compartment must be installed in such a way as to ensure sufficient ventilation.
TROUBLESHOOTING
The flow of gas seems abnormal
- Check that the gas cylinder is not empty.
- The burner holes are dirty and clogged.
- The gas regulator is not working.
Smell of gas
- The gas valve is open.
- The gas hose is leaking (check with soapy water).
The oven does not heat up
- The gas valve is not open.
- The oven fire has blown out (for the gas oven).
TECHNICAL ASSISTANCE
For technical assistance requests, our services are available through the following contacts:
Telef. 00 351 252 910351
Fax: 00 351 252 910367
E-mail: assistencia@jocel.pt
http://www.jocel.pt