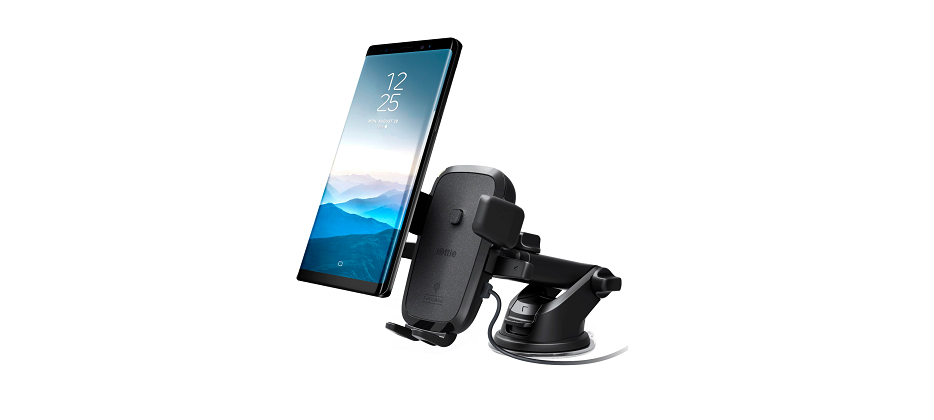
iOttie HLCRIO134 Charging Dash Windshield
Getting Started
For optimal mounting and charging, please follow the detailed instructions within this manual when using the Easy One Touch Wireless Charging Mount. iOttie is not liable for possible damages due to product misuse.
Critical Information
Compatibility
Before using the product, make sure your device is Qi Wireless compatible. Compatible devices include iPhone X, iPhone Xs, iPhone XR, Samsung Galaxy Note S9, S9, S9+, and S8.
Qi Wireless Charging
Use the included iOttie Charger and Micro USB Cable. If you do use a third-party charger, use a Qualcomm Quick Charge 2.0 or equivalent adapter to receive a wireless charge (with compatible devices).
- The Telescopic Arm extends from 5 inches to 7 inches.
- Universal design fits smartphones and cases from 2.3” – 3.” wide.
- Air vents on the back allow airflow to keep the mount cool.
At a Glance
Wireless Charger Specifications
- INPUT 5V/2A, 9V/2A, 12V/1.5A
- CHARGING PORT MICRO USB
- LENGTH 6.0″
- WIDTH 4.4″
- HEIGHT 4.3″
- WEIGHT 6.4oz
Charging Indicator
- Solid Green Light Smartphone charging.
- Blinking Red Light Smartphone not charging. Foreign objects detected or overheating of mount or smartphone.
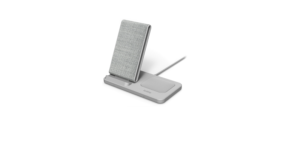
Qi Alignment Guide
The Qi Receiver Coil is usually located in the center area of the phone. Check with your phone’s manufacturer for the Qi coil location. Below are some examples of commonly used phones. For optimal wireless charging, please make sure your smartphone and mount’s Qi coils are aligned.

Installation
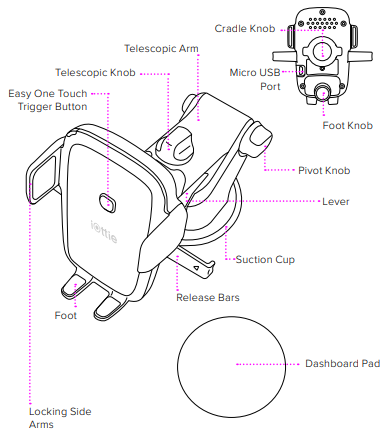
Assembling the Mount
- A. Connect the Mount Cradle with the Ball Joint.
- B. Then, tighten the Cradle Knob.
Selecting a Location
Choose an installation method: Dashboard/Flat Surface (A) or Windshield/Curved Glass (B).
Option A
Dashboard or Flat Surface Installation
Choose an area on a flat surface and wipe any dust or debris from the surface.
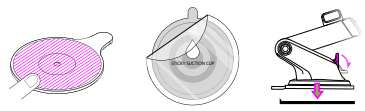
- Peel off the film on the dashboard pad & stick to the desired installation location.
- Push the Locking Lever down to engage the suction
Option B
Windshield Installation or Curved Glass Installation
Choose a location on the windshield and wipe any dust or debris from the surface.
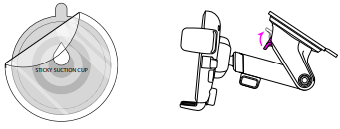
- Peel off the protective film on the Suction Cup and press firmly onto the windshield.
- Push the Locking Lever down to engage suction.
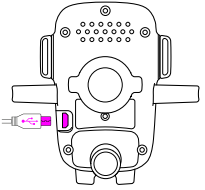
Connecting Power
The Easy One Touch Wireless is powered via a micro-USB cable. There is no on/off switch on the device
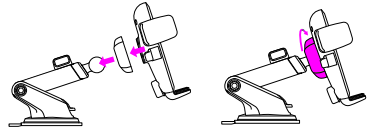
Using the Easy One Touch Mechanism
The Easy One Touch lock and release mechanism makes it simple to mount & retrieve smartphones in seconds.
Mounting
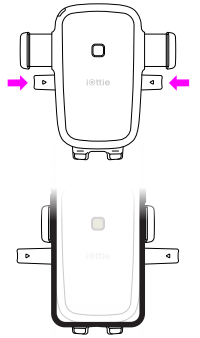
- Press the locking side arms in.
- Press your device against the Easy One Touch trigger button. The mount’s arms will automatically close on contact and hold the device during the driving journey.
Releasing
Press the locking side arms with one hand and retrieve the device.
Adjusting the Mount
- Cradle Knob
When mounting in landscape mode, loosen to rotate the Cradle. Tighten to lock in the desired position. - Foot Knob
Located on the lower back of the Cradle. Loosen to re-position the mount’s foot. The Foot can be adjusted up & down or side-to-side. - Telescopic Knob
Located on top of the Telescopic Arm, loosen to extend the arm, and tighten to secure distance. - Pivot Knob
Located on the side of the Mount Base, turning allows you to pivot the telescopic arm. Tighten to secure position.
Operational Warnings
- During the charging process, the transfer of electricity gives off heat. Your device may become warm, but should not become exceedingly hot.
- If the device gets wet, please cease charging immediately. Remove all plugs and dry the product completely. The device is only to be operated in a dry, indoor environment.
- Please be careful of excessive drops, dents, punctures, or deformities on the device. If you are concerned, please unplug the device and contact the manufacturer.
Declaration of Conformity
Changes or modifications not expressly approved by the party responsible for compliance could void the user’s authority to operate the equipment. You can refer to the following completed FCC warnings. This device complies with Part 15 of the FCC Rules.
Operation is subject to the following two conditions:
- This device may not cause harmful interference.
- This device must accept any interference received, including interference that may cause undesired operation.
Note
This equipment has been tested and found to comply with the limits for a Class B digital device, under Part 15 of the FCC Rules. These limits are designed to protect reasonably against harmful interference in a residential installation.
- Reorient or relocate the receiving antenna.
- Increase the separation between the equipment and the receiver.
- Consult the dealer or an experienced radio/TV technician for help.
If you love your iOttie product, let us know by leaving a review online, or connect with us on our social platforms.
Support
20 W 37th St New York, NY 10018 U.S.A.
Download Links