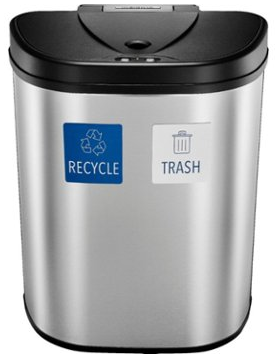
Insignia NS-ATC18DSS1 Automatic Trash Can
Read all instructions carefully before using the Trash Can User Manual
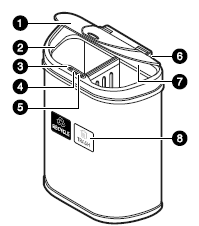
PACKAGE CONTENTS
- Lid
- Liner rings (2)
- Base
- Magnetic labels (2)
- Quick Setup Guide
FEATURES
- Two compartments (9.3 gal/35 l each) with magnetic labels let you sort trash and recycling
- IR sensor detects your hand (or another object) to automatically open and close the lid
- Battery operated (3 D batteries, not included) for cordless operation
- Liner rings hold standard trash bags in place
- Fingerprint-free stainless steel fits seamlessly into any living space
INSERTING THE BATTERIES
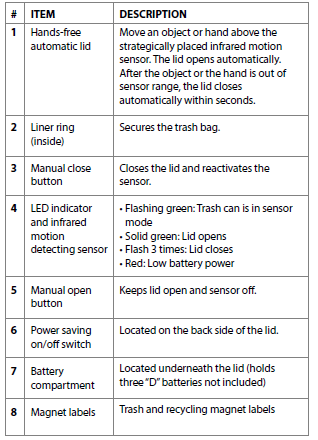
- Locate the battery compartment underneath the lid.
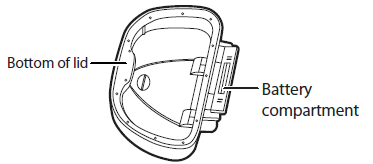
- Push the tab on the battery cap in and carefully lift it to open.
- Insert three heavy-duty D-size batteries (not included) by the positive (+) and negative (-) poles shown in the battery compartment.
- To close, insert the side without the clip first, then push the battery cap down. Make sure that it’s securely fastened (it should click into place).
SETTING UP YOUR TRASH CAN
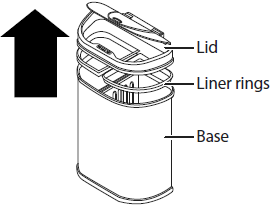
- Remove your lid and liner ring.
- Insert the trash bag through the liner ring.
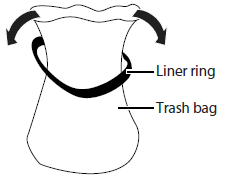
- Fold the upper rim of the bag around the liner ring.
- Place the trash bag and the liner ring in the trash container.
- Tuck the bag completely into the bottom of the container so that the edges of the bag are concealed after the lid is closed. Note: Do not put the liner ring inside the bag.
- Repeat steps 2-5 on the other side.
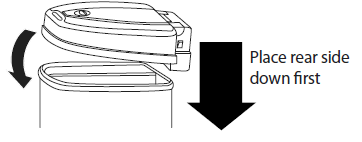
- Align the lid with the base and gently place the lid on top.
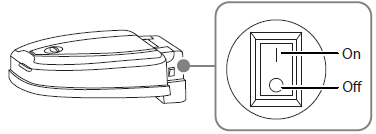
TURNING YOUR TRASH CAN ON AND OFF
- Locate the power switch on the back of the automatic lid.
- Press the switch to the “I” position to turn the power/sensor on.
- Press the switch to the “O” position to turn the power/sensor off.
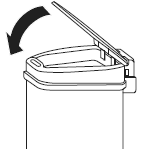
USING YOUR TRASH CAN
- Place your hand or an object within inches of the motion sensor (located on the lid). The lid opens automatically

- After your hand or object is out of the sensor range, the lid closes automatically within seconds. The lid remains open if the object stays within the sensor range.
USING MANUAL MODE
- To keep the lid in the open position for a longer period, press the OPEN button.
- Press the CLOSE button to close the lid and reactivate the sensor.
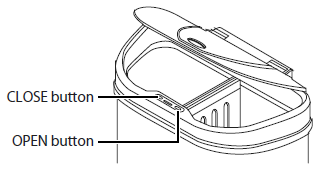
Note: The lid has a soft close feature that allows the lid to close at a slow and quiet pace
LED INDICATORS
- Turning on the trash can: Turn the power switch into the “I” position and a green light will flash once, indicating that the trash can is in sensor mode.
- Opening the lid: Wave above the sensor, a solid green light appears when the lid opens.
- Lid closing: A green light will flash 3 times, then the lid closes. A solid green light appears when the lid is in motion.
- Low battery: A red light appears when battery power is low. Replace the batteries
TROUBLESHOOTING
The lid does not open
- Make sure that the power is on by pressing the power switch.
- Make sure that the batteries are installed correctly.
- Wipe the sensor with a dry cloth.
The indicator light is a constant green
- Press the power switch to close the trash can.
- Check to see if there are any objects within the sensor area. If there are, remove them.
- Wipe the sensor with a dry cloth to make sure that the sensor is clean and that there is no excess moisture on it.
Opens slowly and the indicator light flashes yellow
Battery power is low. Replace the batteries.
Note: If the above solutions do not correct the problem, contact customer service.
SPECIFICATIONS
- Dimensions: 13 × 21.3 × 26.4 in. (33 × 54.2 × 67.1 cm)
- Dimensions with lid open: 13 × 21.3 × 36.5 in. (33 × 54.2 × 92.7 cm)
- Sensor distance: 7.8 in. (20 cm)
- Batteries: Three D (not included)
- Input: DC 4.5 V, .15 mA
- Net weight: 12.6 lbs. (5.7 kg)
- Basket capacity: 9.3 gal (35 l)(each side)
- Material: Stainless steel
IMPORTANT SAFETY INFORMATION
- Align batteries according to the positive and negative poles.
- Do not submerge the trash can in water because it is equipped with many electrical components. The trash can may be wiped with a damp cloth.
- Do not manually force the lid to close. This can cause damage to the internal gears. If the gears are damaged, the automatic lid will not function properly.
- Replace used batteries promptly to prevent battery acid leakage. Battery acid may cause damage to the electrical components of the trash can.
- Do not mix new and used batteries.
- Do not place the trash can in direct sunlight or a heavily moisturized environment.
- Do not mix alkaline, standard (zinc-carbon), or rechargeable (NiCad, NiMH, etc) batteries.
- Batteries are harmful if swallowed, so keep them away from young children.
LEGAL NOTICES
This device complies with part 15 of the FCC Rules. Operation is subject to the following two conditions: (1) This device may not cause harmful interference, and (2) this device must accept any interference received, including interference that may cause undesired operation. Changes or modifications not expressly approved by the party responsible for compliance could void the user’s authority to operate the equipment.
Note: This equipment has been tested and found to comply with the limits for a Class B digital device, under part 15 under the rules. These limits are designed to provide reasonable protection against harmful interference in a residential installation. This equipment generates, uses, and can radiate radio frequency energy and, if not installed and used by tbyay cause harmful interference to radio communications. However, there is no guarantee that interference will not occur in a particular installation. If this equipment does cause harmful interference to radio or television reception, which can be determined by turning the equipment off and on, the user is encouraged to try to correct the interference by one or more of the following measures:
- Reorient or relocate the receiving antenna.
- Increase the separation between the equipment and the receiver.
- Connect the equipment to an outlet on a circuit different from that to which the receiver is connected.0
- Consult the dealer or an experienced radio/TV technician for help. CAN ICES-3(B)/NMB-3(B)
ONE-YEAR LIMITED WARRANTY
Visit www.insigniaproducts.com for details.
CONTACT INSIGNIA
For customer service, call 1-877-467-4289 (U.S. and Canada) or
- 01-800-926-3000 (Mexico)
- www.insigniaproducts.com
INSIGNIA is a trademark of Best Buy and its affiliated companies. Distributed by Best Buy Purchasing, LLC 7601 Penn Ave South, Richfield, MN 55423 U.S.A. ©2020 Best Buy. All rights reserved.