
ILIFE-A10s Vacuuming Cleaner & Mopping Robot
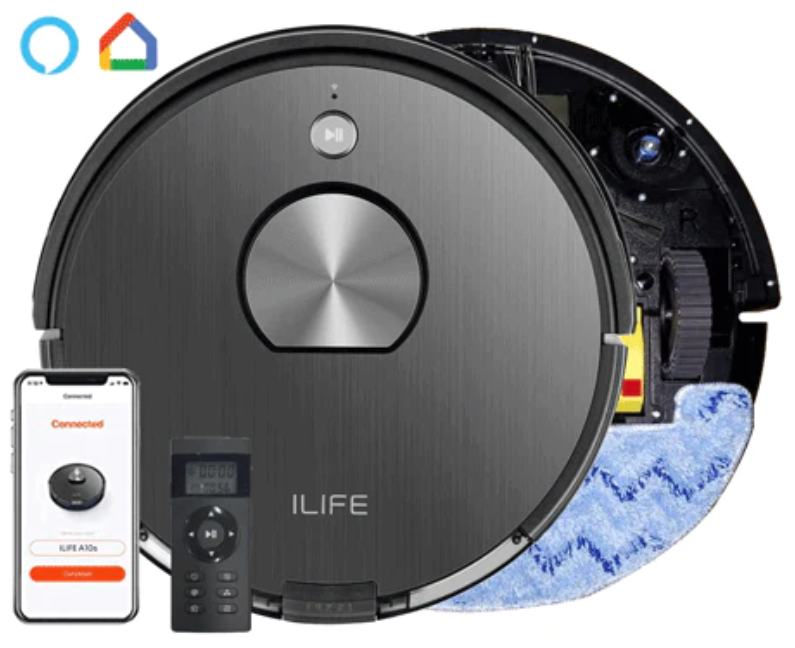
ILIFE-A10s Vacuuming Cleaner & Mopping Robot User Manual.
Safety instructions
Before using this product, please read the following safety precautions.
- Read this user manual thoroughly and carefully before using this product.
- Save this user manual.
- The harm portion that product descriptions in this user manual may lead to
WARNING
- Only the certified technician may disassemble the product. Users are not allowed to disassemble or repair the product.
- Only use the adapter provided by the factory. Using another un-matched adapter may cause electric shock, fire, or product damage.
- Do not touch the power cord, plug, or adapter when your hands are wet.
- Do not make clothes or part of a body drawn into the product’s wheels.
- Do not make this product close to cigarettes, lighters, matches, or any flammables.
- If the product is needed to clean, clean it after charging is stopped.
- Do not over-bend the power cord or pressure the power cord with heavy or sharp objects.
- This product is used only indoors, do not use it outdoors.
- Do not sit on top of this product or attach an object on top of it.
- Do not use this product in a wet or moist environment (any environment with liquid).
NOTE
This product could not be used by children, mentally challenged people, or people who lack related experience and knowledge (Unless their people instruct or supervise them).
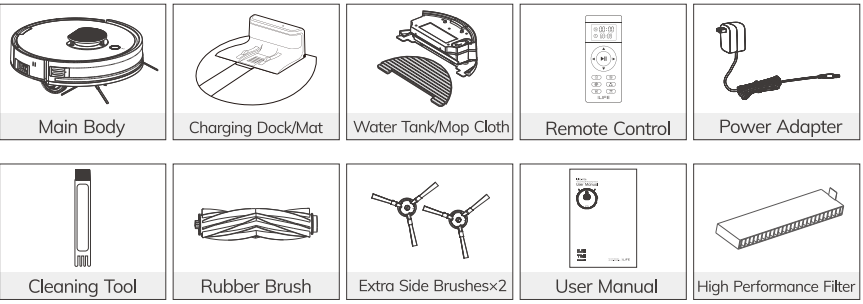
Product Components
Main Body
Dustbin
Water Tank
Charging Dock
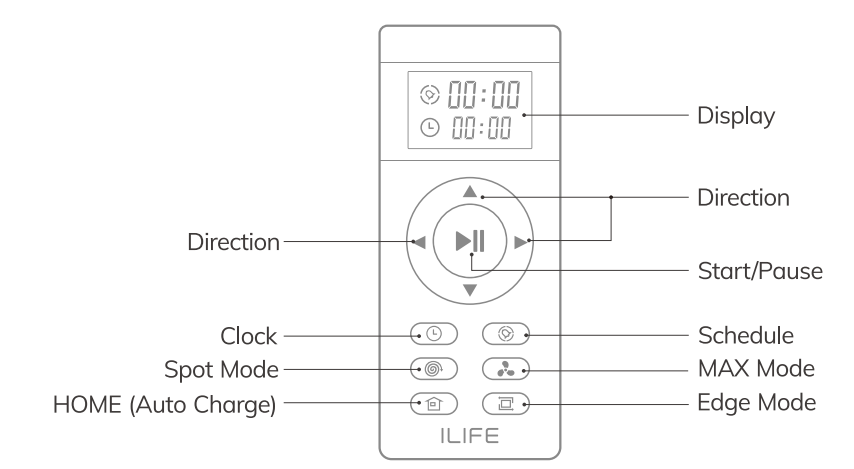
Remote Control
List of Accessories
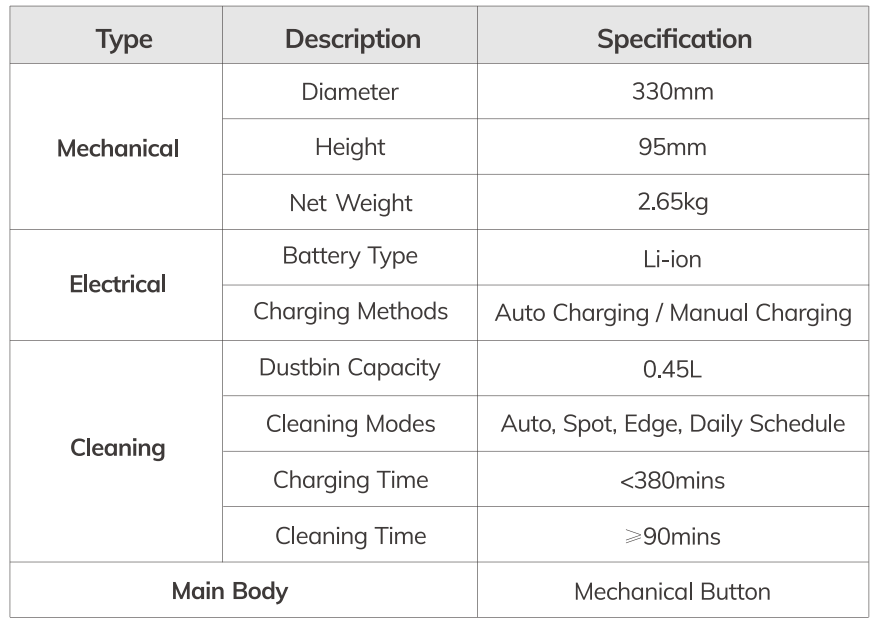
Product Specifications
How To Use
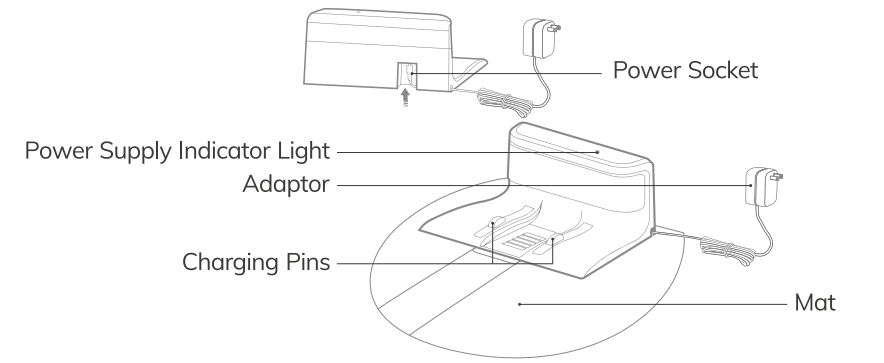
Charging
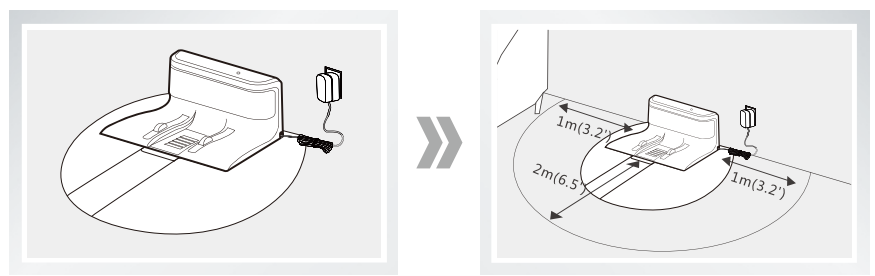
- Placing Charging Dock
- Plug the adaptor into the charging dock;
- Align it well and place the mat under the charging dock;
- Put the charging dock against a wall and remove obstacles and reflective objects about 1 meter on both sides and about 2 meters in front;
- Connect to power.
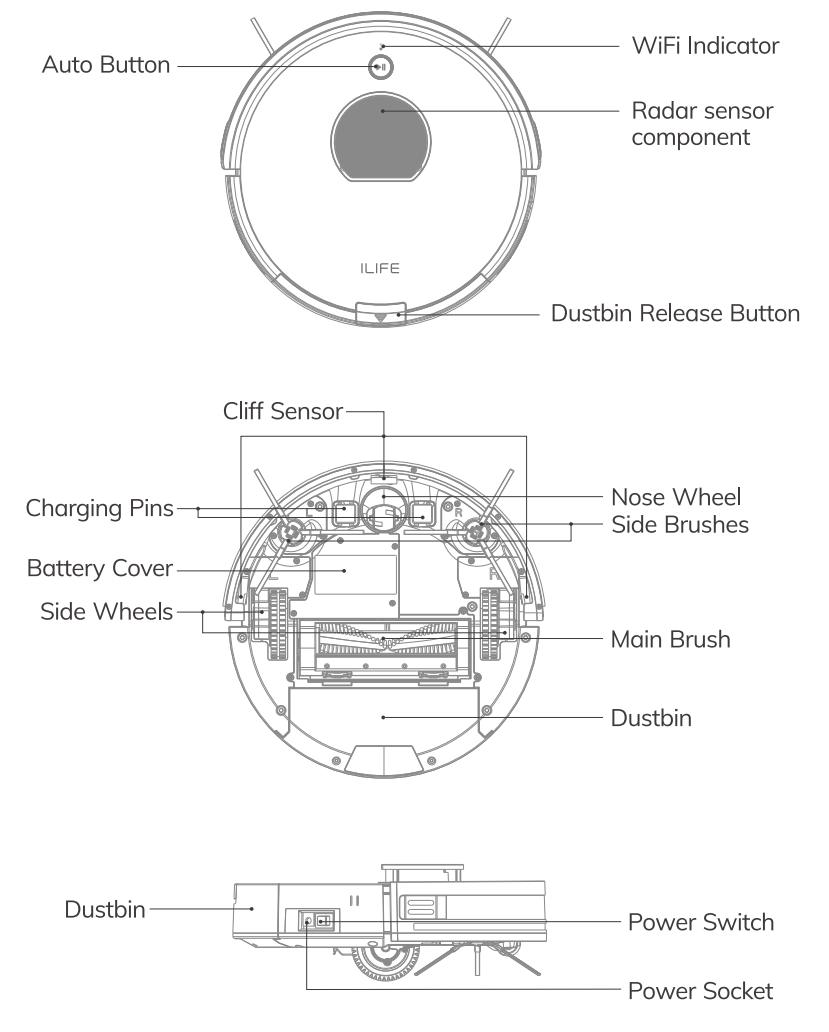
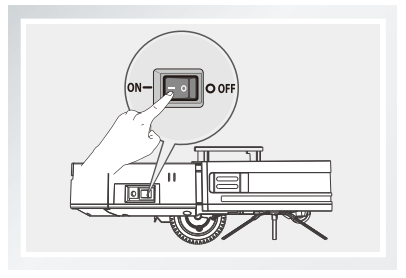
- Turning on the Power Switch
Turn on the power switch on the side of the main body. “-” is ON and “O” is OFF.
- Charging the Robot
- Auto Charge
- When the battery runs low in Auto mode, the robot will automatically search the charging dock for recharge.
- While on standby, press the # button on the remote control. The robot will start searching the charging dock for recharge.
Reminder:
To avoid lowered charging performance, make sure the charging pads on the main body and charging dock are clean. - Manual Charge
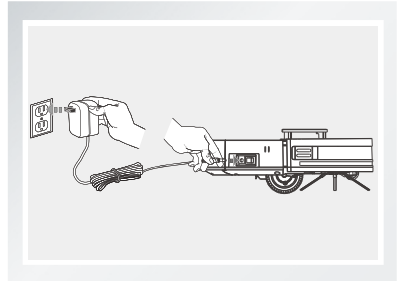
- Turn on the power switch on the side of the main body. Plug in the adaptor and connect to power.
Reminders
- For regular use, always leave the main body on the charging dock, and make sure its power switch is turned on.
- If the robot will not be used for a long time, fully charge it before storing it in a cool, dry place.
- Do not charge the robot manually after a cleaning schedule is set. The robot will not execute scheduled cleaning after a manual charge.
Start/Pause/Sleep
- Sleep: The robot is idle; the Power switch is on and the indicator light is off.
- Standby: The Robot is not working; the Power switch is on and the light at the main button is pulsing.
- Start: The robot is working; the Green light at the Auto button stays on.
- Turn on the Robot
- Turn on the power switch on the side of the main body.
- Press • on the main body to start cleaning.
- Press (- on the remote control to start cleaning.
Note:
start cleaning.
While in Sleep mode, press © to activate standby mode. Press again to
- Pause
- Pause means switching from cleaning to standby. To pause a cleaning cycle, press (a) on the remote control or the main body.
Note:
The robot accepts new tasks once it is paused.
- Pause means switching from cleaning to standby. To pause a cleaning cycle, press (a) on the remote control or the main body.
- Sleep
- To enter Sleep Mode:
- Press and hold @ for 3 seconds.
- The robot enters Sleep mode automatically after idling for 10 minutes.
Cleaning Modes
Multiple cleaning modes allow robots to perform deep cleaning in different environments and on different floorings. Use the remote control to select a suitable cleaning mode. Before selecting cleaning modes, make sure the robot is on standby (the power switch is on and the auto button is lighting green).
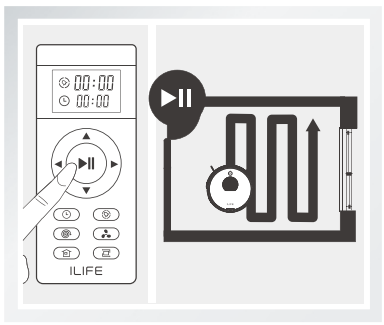
- Auto Mode
The most frequently used cleaning mode. Press on the main body or l on the remote control. The robot plans a path and cleans along a zigzag pattern. During cleaning, the robot detects and cleans areas that have been missed. ILIFE- Robot plans a cleaning path autonomously during a cleaning cycle. If the robot is moved manually or with the remote control, it will plan a new path and may repeat areas that have been cleaned.
- Robots may stop working briefly during a cleaning cycle. Wait patiently for it to detect areas that have been missed or to revise the cleaning path. The number and duration of these brief stops depend on the complexity of the home environment.
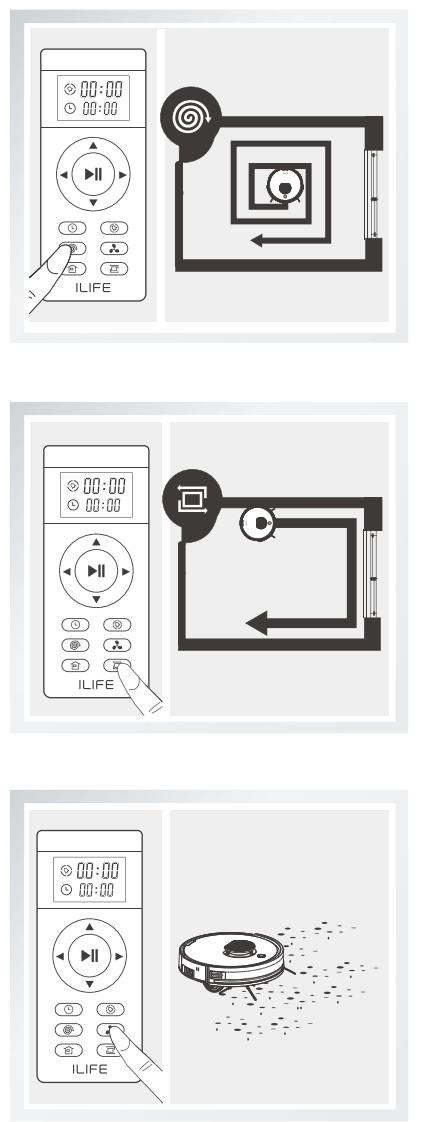
- Spot Mode
The robot takes a spiral path to clean a specific area with concentrated dust and debris. - Edge Mode
While on standby, the robot moves forward until it detects a wall. It cleans around the edges of the walls once. - MAX Mode
Honestied dust, Press the MA button on the remote control to increase the suction level. Press MAX again to return to normal level.
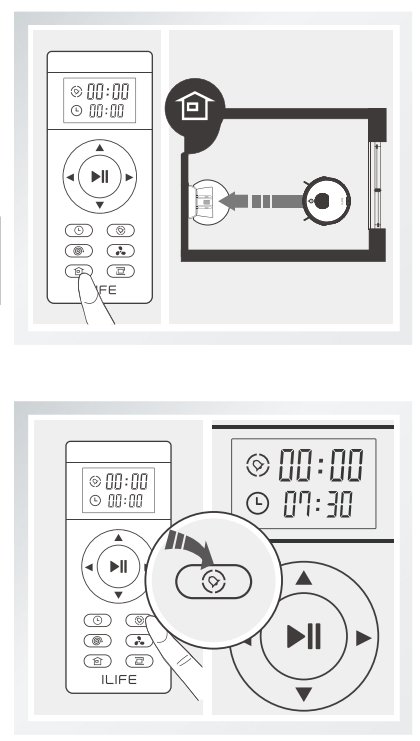
- Auto Charge
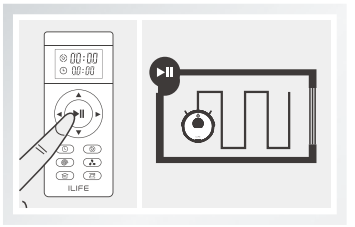
When the battery runs low during a cleaning cycle, the robot will automatically activate the “Auto Charge” function searching and returning to the charging dock for recharge. Auto Charge can also be activated by pressing @ on the remote control. - Schedule Mode
Preset cleaning cycles at any specific time. Tap the Schedule button on the remote control. The display
Schedule Mode
- To offer a complete automatic cleaning experience, the robot receives preset cleaning schedules. Set local time and schedules with the remote control or mobile APP. The robot will start cleaning automatically at the preset time every day.
- To activate the robot, tap @ on the main body or 4 on the remote control.
- Set Local Time with Remote Control

- Set a schedule
- Cancel a Schedule
Adjust the scheduled time to “00:00” and save, or turn off the power switch on the main body.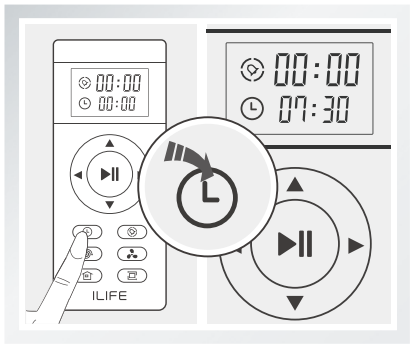
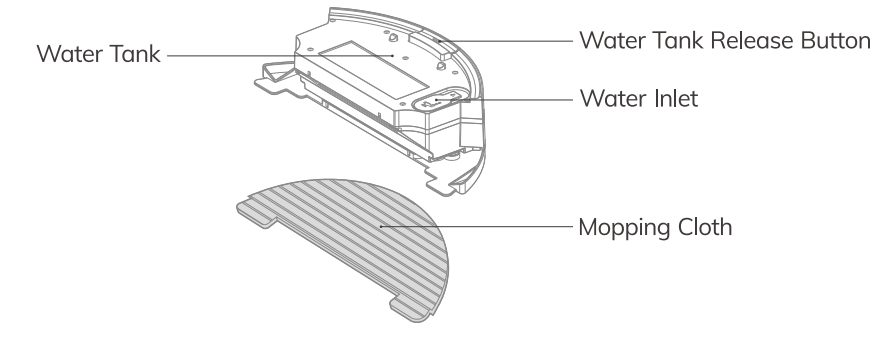
Water Tank
This product contains water tank components. After sweeping and vacuuming, replace the dustbin with the water tank for mopping function.
- For best performance, mop one room at a time.
- Manually move the robot to another room that requires mopping. Refill water and clean the mop cloth, if necessary, before the robot starts mopping.
- Do not use the water tank on the carpet. To prevent mop cloth from staining the carpet, roll up the carpet edges before mopping.
- Make sure there is enough water for mopping during cleaning. Refill water when needed. Remove the water tank before a refill.
- Remove the water tank before charging.
- Water Refill
Open the water inlet cap. Slowly pour in water with a cup.

- Attach Mop Cloth
Close the cap tight and attach the mop cloth firmly. Secure with the rings on both sides.

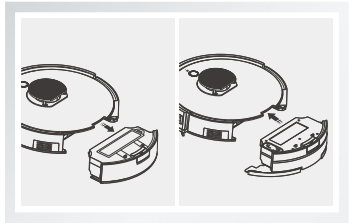
- Install Water Tank
Press the dustbin release button to remove the dustbin and replace it with the water tank.
- Mopping
Press the Auto button to start mopping and vacuuming.
APP Download
The robot can be controlled by the “ILIFEHOME” app. Scan the QR code to install the app on your iOS or Android device.

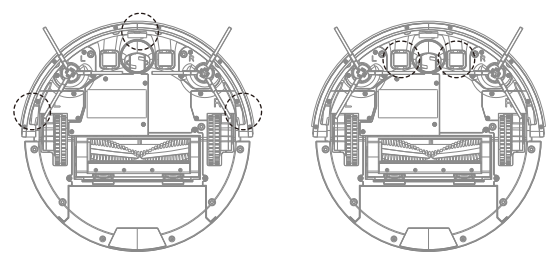
Cleaning Side Brushes & Main Brush
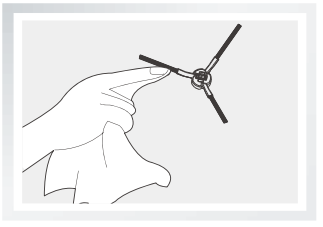
Cleaning Side Brushes
Remove side brushes. Wipe clean with a clean cloth.
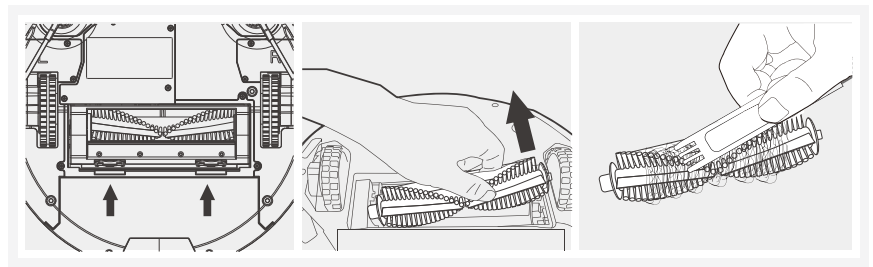
Cleaning Main Brush
Remove the main brush cover. Take out the main brush. Cut the hair winding around the brush for easy removal.
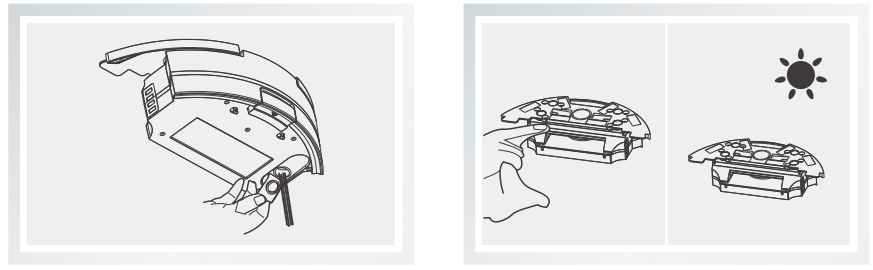
Cleaning Sensors & Charging Pins
Use cleaning tools or a soft cloth to clean the sensors and charging pins
Note
Remove dust or foreign objects on sensors and charging pins on the charging dock as soon as possible.
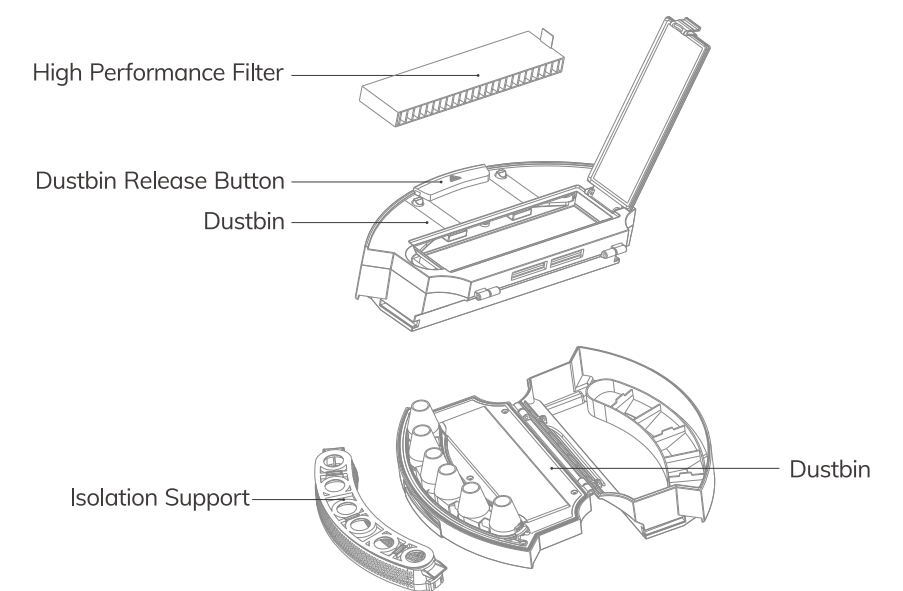
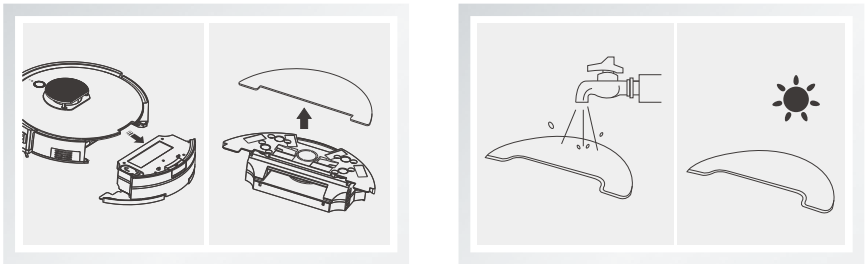
Cleaning Dustbin & Filters
Clean dustbin and filters after each use:
- Take out the dustbin. Check the suction port if there is anything stuck in it. Clean suction port if needed.
- Wash the replaceable primary filter with water every 15-30 days. Do not squeeze. Air dry after washing.
- Tap to remove dust from the high-performance filter. Do not wash with water.

Cleaning Water Tank Components
- Cleaning Mop ClothRemove: Take out the water tank and mop the cloth after each use.MaintenanceRinse and dry the mop cloth.
- Cleaning Water TankRemoveAfter each use, remove the mop cloth holder and mop cloth, and empty the water tank.
Maintenance:
Wipe the water tank with a dry cloth before air drying. Do not rinse the water tank directly with water.
Note: Do not submerse the vibrating water tank in water.
Troubleshooting
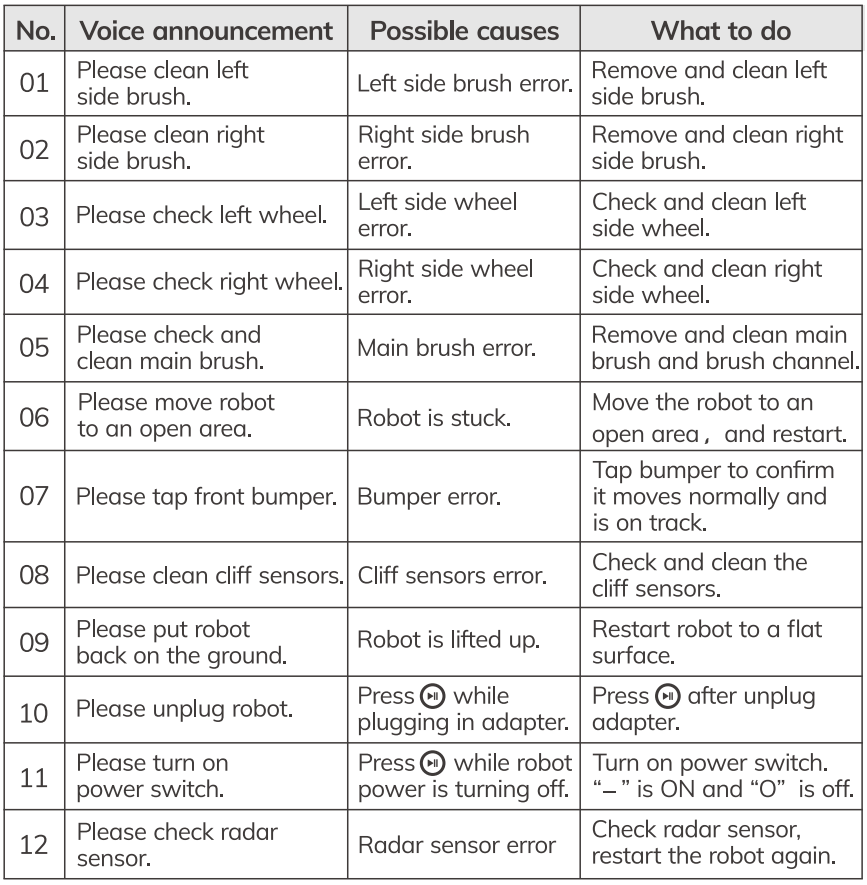
Alert Reference in case of errors. red light stays on with voice announcement
Reminders
If the solutions above don’t help:
- Restart the robot by turning on the power switch on the side.
- If problems persist, send a robot to the nearest repair service center.