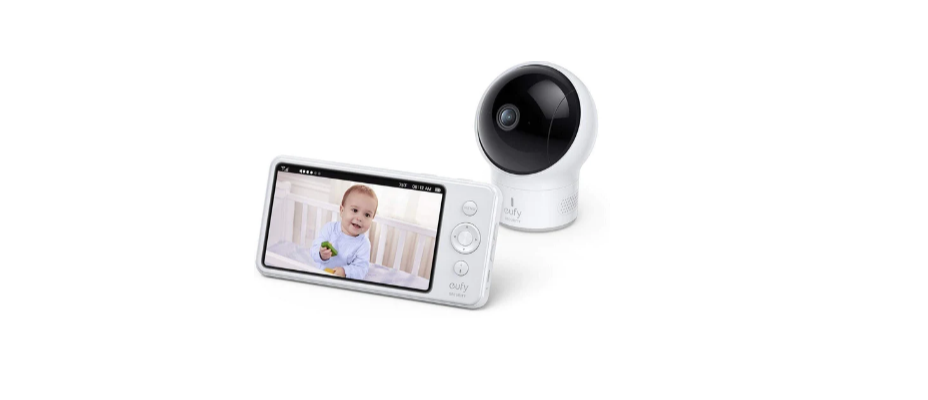
Eufy Security Space View Baby Monitor
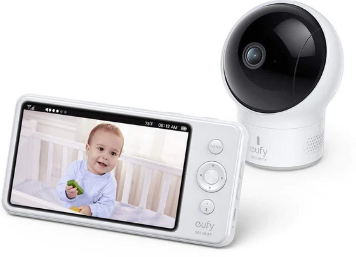
Eufy Security Space View Baby Monitor User Manual.
WHAT’S IN THE BOX
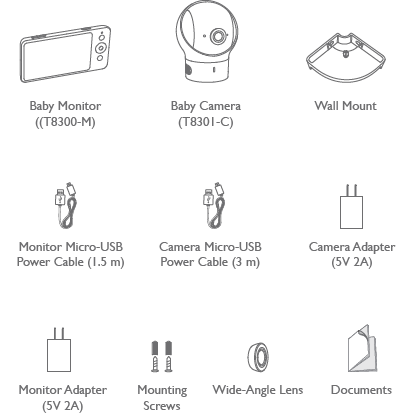
Power adapter varies by region
FEATURE INTRODUCTION
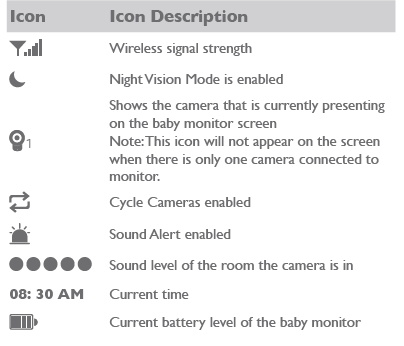
Monitor Features:
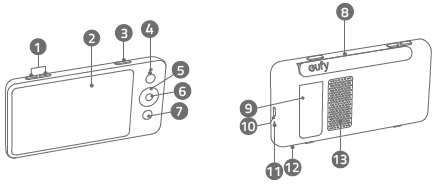
- Volume controls
- Screen
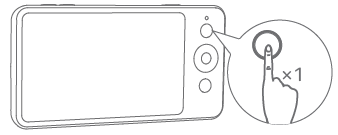
- Power button
- Press to switch on / off the monitor screen
- Press and hold for 2 seconds to power on / off
- Menu button
- Navigation buttons
- OK button
- Press to confirm the selection
- Press to switch camera display if more than 2 cameras added
- Return to the previous level of the menu / Talk button
- Press and hold to speak to the camera
- When the menu is opened, press to return to the previous level of the menu
- Monitor Antenna
- Support stand
- Micro USB charging port
- LED indicator
- Red: charging
- White: Fully charged
- Microphone
- Speaker
Camera Features
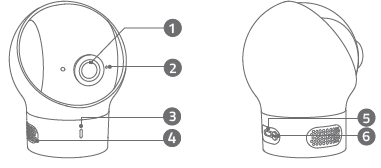
- Standard camera lens
- Microphone
- Power LED Status indicator
- Speaker
- Micro USB port
- Pairing button
SETTING UP THE CAMERA AND MONITOR
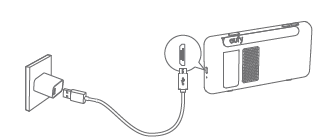
Charge the Monitor
Fully charge the monitor before use. To charge:
- Connect one end of the micro USB cable to the baby monitor, and the other end to the power adapter.
- Plug the adapter into a power outlet.
- Press and hold the power button for 2 seconds to turn the baby monitor on.
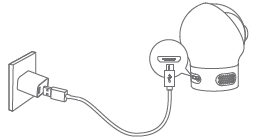
Charge the Camera
- Connect one end of the micro USB cable to the baby camera, and the other end to the power adapter (5V 2A)
- Plug the adapter into a power outlet.
The new baby monitor and camera will be set up automatically. You are all set to use the products after the monitor and camera are charged.
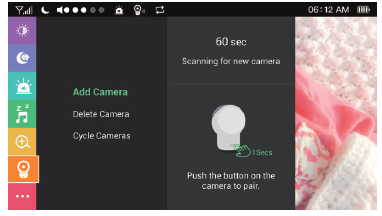
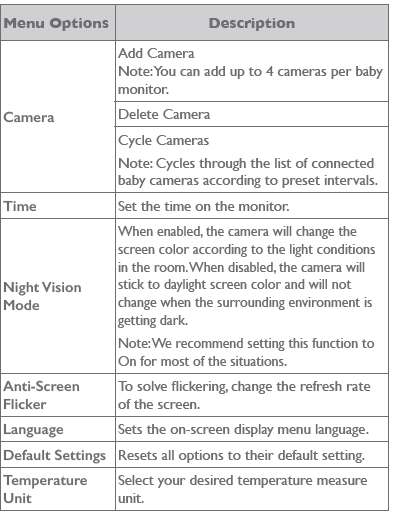
ADDING A CAMERA TO THE BABY MONITOR
- Enter menu settings, go to Camera -> Add Camera, then follow onscreen instructions to start the pairing.
- Press and hold the pairing button on the rear of the camera for 1 second until a notification prompt is heard.
PLACING THE CAMERA (WALL MOUNT & CORNER MOUNT)
- Use the monitor to test the viewing angle from your desired mounting spot.
- Mark the screw holes with a pencil.
- Drill 1/5” holes into the wall and then insert the anchors into the holes.
- Insert the screws through the mounting holes of the wall mount and screw into the anchors.
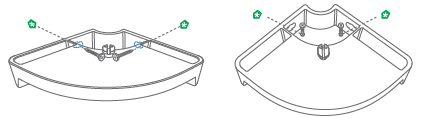
- Place the camera on the wall mount.
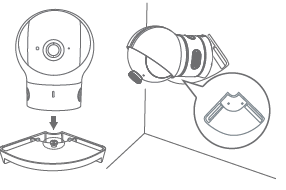

REPLACING THE CAMERA LENS
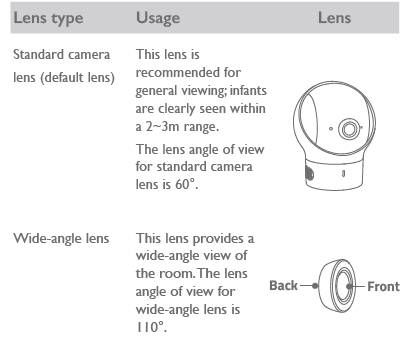
The standard camera lens is not removable. When you want to use the wide-angle lens, simply place it over the standard camera lens and fasten it.
NOTICE
Warning Strangulation Hazard: Children have STRANGLED in cords. Keep this cord out of the reach of children (more than 1m (3ft) away). Never use extension cords with AC Adapters. Only use the AC Adapters provided. This product complies with the radio interference requirements of the European Community.
Declaration of Conformity
Hereby, Anker Innovations Limited declares that this device complies with the essential requirements and other relevant provisions of Directive 2014/53/EU. For the declaration of conformity, visit the Web site https://www.eufylife.com/. The adapter shall be installed near the equipment and shall be easily accessible. Do not use the Device in an environment at too high or too low temperature, and never expose the Device to strong sunshine or too wet environment. The suitable temperature for T8300-M and accessories is -20°C-45°C. The suitable temperature for T8301-C and accessories is -20°C-40°C. When charging, please place the device in an environment that has a normal room temperature and good ventilation.
Please ensure to use only the charger offered by the manufacturer. Using an unauthorized charger may cause danger and violate the authorization of the projector and the guarantee article. The charger output voltage/current is 5Vdc/2A. The plug is considered as a disconnect device of the adapter. If you use a third-party charger, the recommended output voltage/current of the adaptor is 5Vdc/2A, and the adapter shall be CE approval type. To maintain compliance with RF exposure requirements, use products that maintain a 20cm distance between the device and the human body. Operating Frequency Range: 2410-2477MHz The T8301-C Max Output Power: 18.04 dBm
To maintain compliance with RF exposure requirements, use products that maintain a 20cm distance between the device and the human body. The following importer is the responsible party (contact for EU matters only) Importer: Anker Technology (UK) Ltd Importer Address: Suite B, Fairgate House, 205 Kings Road, Tyseley, Birmingham, United Kingdom B11 2AA
Disposal
Proper disposal and recycling help protect natural resources, human health, and the environment. For more information on the disposal and recycling of this product, contact your local municipality, disposal service, or the shop where you bought this product.
FCC Statement
This device complies with Part 15 of the FCC Rules. Operation is subject to the following two conditions: (1) this device may not cause harmful interference, and (2) this device must accept any interference received, including interference that may cause undesired operation.
Warning: Changes or modifications not expressly approved by the party responsible for compliance could void the user’s authority to operate the equipment.
This equipment generates uses and can radiate radio frequency energy and, if not installed and used by the instructions, may cause harmful interference to radio communications. However, there is no guarantee that interference will not occur in a particular installation.
- Reorient or relocate the receiving antenna.
- Increase the separation between the equipment and the receiver.
- Consult the dealer or an experienced radio/TV technician for help.
- FCC ID (for T8301-C): 2AOKB-T8300C
- FCC ID (for T8300-M): 2AOKB-T8300M
- Company Name: POWER MOBILE LIFE, LLC
- Address: 400 108th Ave., NE Suite 400, Bellevue, WA 98004-5541
- Telephone: 1-800-988-7973
IC Statement
This device complies with Industry Canada license-exempt RSS standard(s). Operation is subject to the following two conditions:
- this device may not cause interference, and
- this device must accept any interference, including interference that may cause undesired operation of the device.”
This Class B digital apparatus complies with Canadian ICES-003.
IC RF Statement:
When using the product, maintain a distance of 20cm from the body to ensure compliance with RF exposure requirements. Anker Innovations Limited Room 1318-19, Hollywood Plaza, 610 Nathan Road, Mongkok, Kowloon, Hong Kong
Customer Support: support@eufylife.com