Cuisinart TOA-70 AirFryer Toaster Oven Grill
Read the Cuisinart TOA-70 AirFryer Toaster Oven User Manual.
IMPORTANT SAFEGUARDS
When using an electrical appliance, especially when children are present, basic safety precautions should always be taken, including the following:
- Read the Cuisinart TOA-70 AirFryer Toaster Oven User Manual.
- UNPLUG FROM THE OUTLET WHEN NOT IN USE AND BEFORE CLEANING. Allow to cool before cleaning or handling and putting on or taking off parts.
- Do not touch hot surfaces. Use handles or knobs.
- To protect against electric shock, do not place any part of the AirFryer Toaster Oven and Grill in water or other liquids. See instructions for cleaning.
- This appliance should not be used by or near children or individuals with certain disabilities.
- Do not use outdoors.
- Do not place the AirFryer Toaster Oven and Grill on or near a hot gas or electric burner or in a heated oven.
- Do not use this AirFryer Toaster Oven and Grill for anything other than its intended purpose.
- To avoid burns, use extreme caution when removing AirFryer Toaster Oven and Grill accessories or disposing of hot grease.
- When not in use, always unplug the unit. Do not store any materials other than the manufacturer’s recommended ovenproof accessories in this AirFryer Toaster Oven and Grill.
SAVE THESE INSTRUCTIONS
Please read and keep these instructions handy. These instructions will help you to safely use your Cuisinart® AirFryer Toaster Oven and Grill and get the most out of it with consistent, professional results.
SPECIAL CORD SET INSTRUCTIONS
A short power-supply cord is provided to reduce the risks resulting from becoming entangled in or tripping over a longer cord. An extension cord may be used if caution is taken in its use. If an extension cord is used, the marked electrical rating of the extension cord must be at least as great as the electrical rating of the appliance, and the longer cord should be arranged so that it will not drape over the countertop or tabletop, where it can be tripped over or pulled on by children.
NOTICE
This appliance has a polarized plug (one blade is wider than the other). As a safety feature, this plug will fit in a polarized outlet only one way. If the plug does not fit fully in the outlet, reverse the plug. If it still does not fit, contact a qualified electrician. Do not attempt to defeat this safety feature.
FEATURES
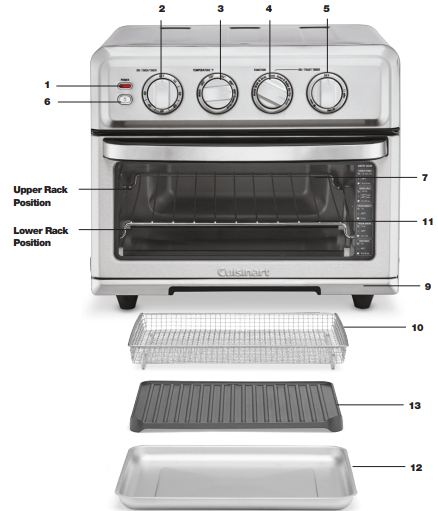
- Power Light
The indicator light will turn on and remain lit when the oven is in use. - ON/Oven Timer Dial
Use to set the desired time for all functions except Toast. Setting the Oven Timer powers the unit on and begins the cooking cycle. When the timer runs out, the unit will power off. - Oven Temperature Dial
Use to set the desired temperature. - Function Dial
Use to select cooking methods – Warm, Broil, Convection Broil, Toast, Bake, Convection Bake, AirFry, and Grill. - ON/Toast Timer Dial
Use to set the desired toast shade from light to dark. Setting the Toast Timer powers the unit on and begins the toasting cycle. When a cycle is complete, the unit will power off.
Light Button
- To turn on the interior oven light, press the Light Button while the oven is in use and the door is closed. If the door is opened while the oven is on, the bulb-saver feature will turn the light off. The light turns on again when the door is closed and cooking resumes.
- Easy Clean Interior
The sides of the oven are coated, providing an easy-to-clean surface. - Safety Auto Off Door Switch (not shown)
This oven comes equipped with a Safety Auto Off Switch that cuts off power to the unit when the oven door is opened. Please make sure to keep the oven door closed during cooking/air drying. - Pull-Out Crumb Tray
The Crumb Tray comes already positioned in your oven. It slides out from the bottom front of the AirFryer Toaster Oven and Grill for easy cleaning. - AirFryer Basket
Use the AirFryer Basket in conjunction with the AirFry function to optimize your cooking results. It is recommended that the AirFryer Basket be nested in the Baking Pan.
Oven Rack
- The Oven Rack can be used in two positions: upper and lower. The upper rack position has a 50% stop feature so the rack stops halfway out of the oven. The Oven Rack can be removed by lifting the front of the rack and sliding it out. See page 5 for more details on Oven Rack positions.
- Baking Pan/Drip Tray
A Baking Pan/Drip Tray is included for your convenience. Use alone when baking or roasting. Use the Baking Pan with the AirFryer Basket when AirFrying. Use the Baking PanV with the Grill/Griddle plate when using the Grill function. - Grill/Griddle Plate
Reversible Grill/Griddle Plate is to be used in conjunction with the Grill function. Use a Grill/Griddle Plate with the Baking Pan. - Cord Storage (rear, not shown)
Takes up excess cord and keeps countertop neat.
BEFORE FIRST USE
Place your AirFryer Toaster Oven and Grill on a flat surface. Before using, be sure the oven is 2 to 4 inches away from the wall or any objects on the countertop. Do not use on heat-sensitive surfaces. OBJECTS SHOULD NOT BE STORED ON THE TOP OF THE OVEN. IF THEY ARE, REMOVE ALL OBJECTS BEFORE YOU TURN ON YOUR OVEN. THE EXTERIOR WALLS GET VERY HOT WHEN IN USE. KEEP OUT OF REACH OF CHILDREN.
Caution: It is not recommended to cover the AirFryer Basket and Grill/Griddle Plate with aluminum foil. If covered, the foil prevents the fat from dripping into the Drip Tray. Grease will accumulate on the foil surface and may catch fire. If you choose to use foil to cover the Baking Pan/Drip Tray, be sure the foil is cut to neatly fit into the pan and does not touch the wall or heating elements.
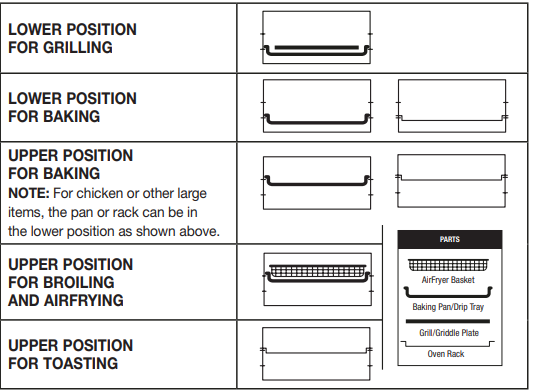
WARNING: Placing the Oven Rack in the upper position with the rack upward while toasting may result in a fire. Refer to the rack position diagrams below for proper use. Turning off the AirFryer Toaster Oven and Grill: Turn BOTH the ON/Oven Timer and the ON/Toast Timer Dials to the OFF position. The power light will turn off.
DIAGRAMS FOR ACCESSORY POSITIONS
Each recipe gives you step-by-step directions and will tell you where the Baking Pan, Oven Rack, AirFry Basket, and Grill Plate should be positioned for best results. Please refer to the accessories diagrams below for recommended positions.
OPERATION
Unwind the power cord. Check that the Crumb Tray is in place and that there is nothing in the oven. Plug the power cord into the wall outlet.
Broil or Convection Broil
Place the AirFryer Basket on top of the Baking Pan to use to Broil in the upper rack position. (See Diagrams for accessory positions, page 5.) Set the Function Dial to either Broil or Convection Broil. Set the Temperature Dial to Toast/Broil. Then turn the ON/Oven Timer Dial to the desired cooking time to turn on the oven and begin broiling. The power light will illuminate. The timer will ring once when the cycle is complete and the oven will power off when the time expires. To stop broiling mid-cycle, turn the ON/Oven Timer dial to the OFF position.
Broiling Tips
Use the provided AirFryer Basket fitted inside the Baking Pan to broil. Never use glass oven dishes to broil. Be sure to keep an eye on food – items can get dark quickly while broiling.
Bake or Convection Bake
Fit the Baking Pan or Oven Rack into either rack position. (See Diagrams for accessory positions, page 5.) Set the Function Dial to Bake or Convection Bake. Set the Temperature Dial to the desired temperature. Then turn the ON/Oven Timer Dial to the recommended cooking time to turn on the oven. (Incorporate this time into the total baking time.) The power light will illuminate. The timer will ring once the time has expired and the cycle is complete; the oven will power off. To stop baking mid-cycle, turn the ON/Oven Timer Dial to the OFF position.
Baking Tips
Select Bake for more delicate items like custards, cakes, and eggs. Use the Baking Pan in the lower rack position for fresh pizza. Place frozen pizza directly on the Rack in the upper rack position to cook.
Convection Baking Tips:
Select Convection Bake for hearty baked goods that require even browning such as scones and breads as well as for roasts and poultry. Convection Bake is also perfect for baking evenly browned and crispy homemade pizzas. Most recipes recommend reducing heat or temperature by 25°F when using Convection Bake. Always check for doneness 10 minutes before the end of the suggested cooking time.
Warm
Fit the provided Baking Pan or Oven Rack into the upper rack position. Set the Temperature Dial to Warm. Set the Function Dial to Warm. Then turn the ON/ Oven Timer Dial to the desired warming time to start the oven and begin warming. The power light will illuminate. The timer will ring once when the cycle is complete and the oven will power off when the time expires. To stop warming mid-cycle, turn the ON/Oven Timer dial to the OFF position.
Toast
Fit the Oven Rack into the upper rack position. If toasting two items, center them in the middle of the Oven Rack. Set the Function Dial to Toast. Set the Temperature Dial to Toast/Broil. Turn the ON/ Toast Timer Dial to the desired shade setting from light to dark using the marked settings to turn on the oven and begin toasting. The oven power light will illuminate. When completed, the timer will ring and the oven will turn off. To stop toasting mid-cycle, turn the ON/Toast Timer dial to the OFF position.
Important Note on Toasting
The Oven Rack must be in the upper rack position as indicated in the diagram on page 5. AirFry (Refer to the chart on page 8 for recommended cooking times and temperatures for various types of foods.) Place the AirFryer Basket onto the Baking Pan. AirFry in the upper rack position. Set the Function Dial to AirFry. Set the Temperature Dial to the desired temperature. Then turn the ON/Oven Timer Dial to the desired cooking time to turn on the oven and begin AirFrying. The oven power light will illuminate. The timer will ring once when the cycle is complete, and the oven will power off when the time expires. To stop AirFrying mid-cycle, turn the ON/Oven Timer dial to the OFF position.
AirFrying Tips
AirFrying is a healthier alternative to frying. Some examples of different crumb mixtures include breadcrumbs, seasoned breadcrumbs, panko breadcrumbs, cornflakes, potato chip crumbs, graham cracker crumbs, quinoa, various flours, etc.
When AirFrying large quantities of food that crowd the pan, toss food halfway through cooking to ensure even cooking and color. Use higher temperatures for foods that cook quickly, like bacon and chips, and lower temperatures for foods that take longer to cook like breaded chicken. F Line the Baking Tray with aluminum foil for easy cleanup. Please note that when most foods cook, they release water. When cooking large quantities for an extended period, condensation may build up, which could leave moisture on your countertop.
Grill
Place the Grill/Griddle Plate on the baking tray and place in the oven in the lower rack position. Set the Function Dial to Grill. Set the Temperature Dial to the desired temperature. Then turn the ON/Oven Timer Dial to the recommended cooking time to turn on the oven.
Grilling Tips:
Flipping foods halfway through cooking time ensures even cooking and grill/griddle marks.
CLEANING AND MAINTENANCE
Always allow the oven to cool completely before cleaning. Always unplug the oven from the electrical outlet before cleaning. Do not use abrasive cleaners, as they will damage the finish. Simply wipe the exterior with a clean, damp cloth and dry thoroughly. If using a cleaning agent, apply it directly onto the cloth, not directly onto the toaster oven. To clean interior walls, use a damp cloth and a mild liquid soap solution or a spray solution on a sponge. Never use harsh abrasives or corrosive products. These could damage the oven surface. Never use steel wool pads, etc., on the interior of the oven.
They are NOT dishwasher safe. After cooking greasy foods and after your oven has cooled, always clean the top interior of the oven. If this is a regular basis, your oven will perform like new. Removing the grease will help to keep the toasting consistent, cycle after cycle. To remove crumbs, slide out the Crumb Tray and discard the crumbs. Wipe clean and replace. To remove baked-on grease, soak the tray in hot, sudsy water or use nonabrasive cleaners. Never operate the oven without the Crumb Tray in place. Never wrap the cord around the outside of the oven. Use the cord storage cleats on the back of the oven.
WARRANTY
Limited Three-Year Warranty
This warranty is available to U.S. consumers only. Except as otherwise required under applicable law, this warranty is not available to retailers or other commercial purchasers or owners. We warrant that your Cuisinart® AirFryer Toaster Oven and Grill will be free of defects in materials and workmanship under normal home use for 3 years from the date of original purchase. We recommend that you visit our website, https://cuisinart.registria.com, for a fast, efficient way to complete your product registration. However, product registration does not eliminate the need for the consumer to maintain the original proof of purchase to obtain the warranty benefits. If you do not have proof of purchase date, the purchase date for purposes of this warranty will be the date
HASSLE-FREE REPLACEMENT WARRANTY
Your ultimate satisfaction with Cuisinart products is our goal, so if your Cuisinart® AirFryer Toaster Oven and Grill should fail within the generous warranty period, we will repair it or, if necessary, replace it at no cost to you. To obtain a return shipping label, email us at www.cuisinart.com/customer-care/product-assistance/product-inquiry. Or call our toll-free customer service department at 1-800-726-0190 to speak with a representative.