
Cuisinart PE-50 Pasta Extruder Attachment
IMPORTANT SAFEGUARDS
When using electrical appliances, basic safety precautions should always be taken, including the following:
- READ ALL INSTRUCTIONS BEFORE USING.
- Turn the dial to the OFF position and unplug the Cuisinart® Stand Mixer before fixing or removing the pasta extruder attachment, after use, and before cleaning.
- Close supervision is necessary when any appliance is used by or near children. Cuisinart does not recommend the use of this appliance by children or individuals with certain disabilities.
- NEVER FEED FOOD BY HAND; ALWAYS USE THE PUSHER. Avoid contact with moving parts and fitted attachments. To reduce the chances of bodily injury and/ or damage to the Stand Mixer or pasta extruder attachment, keep hands, clothing, cooking utensils, etc., away from the moving parts during the operation.
- The use of attachments not recommended or sold by Cuisinart may cause free, electric shock or injury.
- Do not use more than one attachment at a time.
- Do not exceed the maximum capacities listed in this instruction booklet.
- Do not use the Stand Mixer or attachment if it is damaged or if the cord is damaged. Have it checked and serviced before resuming use?
- Do not use this attachment for anything other than its intended use.
- Do not use outdoors.
- To protect against the risk of electric shock, do not put the power base unit in water or other liquids.
- Do not let the cord hang over the edge of the table or counter.
- Never leave your pasta extruder attachment unattended while the Stand Mixer is running.
- The attachments are intended for use with the basic appliance (SM-50).
- Do not operate your appliance in an appliance garage or under a wall cabinet. When storing in an appliance garage always unplug the unit from the electrical outlet. Not doing so could create a risk of freezing, especially if the appliance touches the walls of the garage or the door touches the unit as it closes.
SPECIAL CORD SET INSTRUCTIONS
A short power-supply cord is provided with the Stand Mixer to reduce the risks resulting from becoming entangled in or tripping over a longer cord. Longer extension cords are available and may be used if care is exercised in their use. If a long extension cord is used, the marked electrical rating of the extension cord must be at least as great as the electrical rating of the appliance, and the longer cord should be arranged so that it will not drape over the countertop or tabletop where it can be pulled on by children or tripped over.
UNPACKING INSTRUCTIONS
- Place the gift box containing your Cuisinart® Pasta Extruder Stand Mixer Attachment on a fat, sturdy surface before unpacking.
- Lift the corrugated insert out of the gift box. Remove the body, wrench, and pasta plates. To assemble the pasta extruder attachment, follow Assembly Instructions on page 5. Replace all packaging materials inside the box and save the box for repackaging. Before using it for the first time: Wash all parts according to Cleaning and Maintenance on page 6.
WARNING
RISK OF FIRE OR ELECTRIC SHOCK DO NOT OPEN
WARNING: TO REDUCE THE RISK OF FIRE OR ELECTRIC SHOCK, DO NOT REMOVE THE COVER (OR BACK) NO USER-SERVICEABLE PARTS INSIDE REPAIR SHOULD BE DONE BY AUTHORIZED SERVICE PERSONNEL ONLY
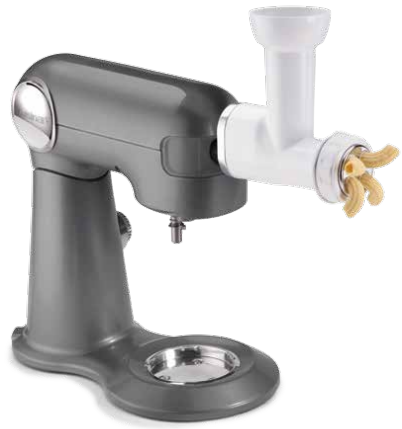
PARTS AND FEATURES

- Body
- Feed Tube
- Feed Screw
- Ring Nut
- Wrench/Pusher/ Feed Screw Remover
- Pasta Cutter Ring
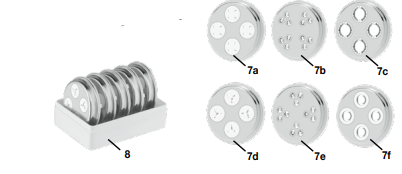
- Six Different Pasta Plates You can make the pasta of your choice.
- Pasta Plate for Spaghetti
- Pasta Plate for Small Macaroni
- Pasta Plate for Rigatoni
- Pasta Plate for Fusilli
- Pasta Plate for Bucatini
- Pasta Plate for Large Macaroni
- Pasta Plate Storage Case
ASSEMBLY INSTRUCTIONS
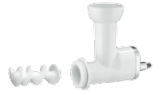
- Insert the feed screw, metal end first, into the front end of the pasta extruder body. Rotate until the plastic X on the feed screw lines up with the X-shaped groove inside the pasta extruder body.
- Fit one of the pasta plates on top of the feed screw. Make sure that the notches on the four sides of the pasta plate slide securely onto the four grooves on the front end of the body.
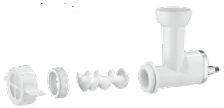
- Fit the ring nut over the pasta plate and turn it clockwise until it is secured to the body.
- Attach the pasta cutter by sliding it over the ring nut and aligning the two notches on the side of the cutter with the two grooves on the pasta extruder body. Push in firmly, and while pushing firmly, turn the cutter clockwise to secure. It should move freely around the pasta plate and extruder body.
- To switch the pasta plate, first, remove the pasta cutter, then the ring nut, and the current pasta plate, follow assembly instructions 2 to 4 with the new pasta plate. Make sure there is no pasta dough obstructing the round groove located in the center of the feed screw.
ATTACHING TO STAND MIXER
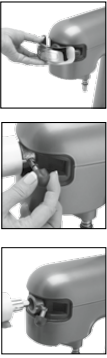
- Make sure the Stand Mixer is OFF.
- Gently pull the outlet cover off the front of the mixer head to remove it.
- Turn the Stand Mixer attachment knob counterclockwise until the outlet opening is unobstructed.
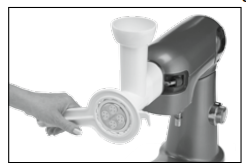
- Insert the assembled extruder attachment into the outlet opening, lining up the square metal hub on the extruder with the square indentation in the outlet opening.
- Turn the Stand Mixer attachment knob clockwise to secure to the mixer.
OPERATION
- Prepare pasta dough as directed by the recipe, letting it rest in the refrigerator until it is ready to be extruded.
- Cut dough into 1-inch pieces. Cover with plastic wrap or a damp paper towel so it doesn’t dry out.
- Line a sheet tray with parchment paper and generously dust with semolina four to keep the pasta from sticking. Set sheet below extruder attachment.
- Set the Stand Mixer to Speed 5 and slowly drop in 4 pieces of dough, one at a time, without using the pusher (if making spaghetti or bucatini, use Speed 10). Do not overfill.
NOTE: Dough will “knead” in the extruder chute for about 1 minute before extrusion begins. - When extruded pasta reaches the desired length, use the pasta cutter ring to cut it, by turning the cutter first to the left and then quickly to the right; let cut pasta fall onto a dusted sheet tray. If pasta dough sticks to the back of the cutter this may lead to unclean cuts. If this is the case first stop the unit, remove the pasta cutter ring, and clean out any stuck dough. Replace the cutter ring and continue with the remaining dough. If this continues to occur dough may be too soft. To prevent this from occurring dust each piece of dough in “00” four before putting it through the extruder.
- Drop in more dough pieces, one at a time, as pasta is extruded and cut. Generously dust all cut pasta with more semolina four.
- Repeat the extrusion and cutting process with the remaining dough pieces. NOTE: Pasta can be cooked immediately or generously dusted with semolina four, dried, and stored in airtight bags in the refrigerator.
- Boil pasta in generously salted water to the desired doneness. Recommended cooking time is about 3 minutes for spaghetti and 6 minutes for al dente rigatoni, though cooking times vary (see Tips and Hints section).
CLEANING AND MAINTENANCE
- Remove the pasta cutter manually by pushing it firmly and rotating it counterclockwise to release the notches from the grooves on the pasta extruder body. Then remove the ring nut manually or with the wrench if it is fastened too tightly.
- The feed screw can be removed by using the hook on the top of the wrench/pusher. Please note: the feed screw metal washers may be very hot. Let cool before touching.
- Allow dough on the pasta plates to dry before cleaning. Once the dough is dry, separate the plastic and metal pieces of the pasta plates and gently tap out any loose dough. To remove the stubborn dry dough, using a wooden or plastic skewer, or toothpick, is helpful. Do not use metal tools to scrape off dough or you may cause damage to the plates. The pasta plate pieces are marked for easy assembly.
- F = Fusilli
- B = Bucatini
- R = Rigatoni
- LM = Large Macaroni
- SM = Small Macaroni
- S = Spaghetti

- Do not wash pasta extruder housing in the dishwasher or immerse in water or other liquids. Wipe the extruder with a damp cloth. Wash the ring nut in warm, soapy water. Do not put the ring nut or pasta plates in the dishwasher. Pasta plates can be washed in warm, soapy water and are top-rack dishwasher safe.
- Any other servicing should be performed by an authorized service representative.
Tips and Hints
- It is essential to stir the four before you measure it. Do not scoop it right out of the bag.
- The key to making fresh pasta is to have the right feel of the dough – not too moist or too dry. The dough should be pliable and come together in one ball, yet should not be sticky to the touch.
- The humidity of the day can greatly affect the pasta dough. If the day is very humid, watch and feel the dough when you are finished kneading. If it is still sticky, knead in one tablespoon of four at a time until the stickiness disappears.
- Always add pasta dough to the feed tube slowly, waiting a couple of minutes for it to knead in the chute and begin extruding before adding more. Do not overflow, which will cause the pasta to extrude very slowly.
- If pasta extrudes too slowly, turn off the Stand Mixer and carefully remove some dough from the pasta extruder chute.
- If a piece of pasta gets stuck, turn off the Stand Mixer and gently nudge the lodged dough piece with the back of the wrench.
- A pasta cutter is included to cut pasta, but a paring knife or metal bench scraper can also be used.
- Try to cut the pasta into similar lengths to ensure even cooking.
- The dough may come out curly in the first batch. The dough should straighten in the second batch. Any curled pasta can be reprocessed.
- Separate pasta as soon as it is cut from the pasta extruder. Toss freshly extruded pasta with semolina four to prevent sticking. Pile dusted noodles together in loose bundles on a fat, clean surface.
- To cook pasta, add 1 tablespoon of salt and 1 tablespoon of oil to 6 quarts of boiling water. Add pasta slowly and separately; make sure no pasta is sticking together before adding to water. Cook as directed, stirring occasionally. Drain in a colander.
- Fresh pasta is best if cooked immediately. Store for up to 5 days in the refrigerator, first air-drying for one hour, then sealed in a plastic bag.
- Generously dusted fresh pasta can be “dried” to achieve a texture more similar to dried, boxed pasta. Simply let it sit at room temperature for up to 4 hours before storing.
- Fresh pasta cooks much faster than dried, boxed pasta, but cooking times will vary based on the size and thickness of any pasta. As you work with your homemade pasta, you will learn the timing that works best.
- The Stand Mixer should rest at least one hour after processing 2 pasta dough recipes.
- Generously dust pasta with semolina four after extruding to prevent sticking. Excess four will fall off during cooking.