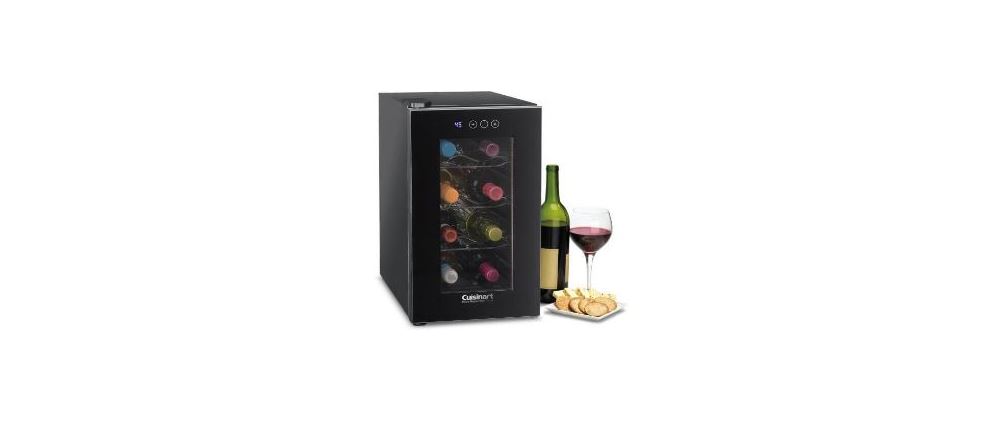
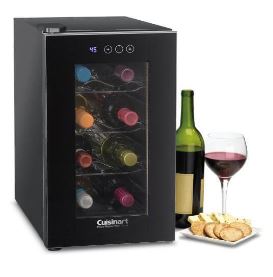
Cuisinart CWC-800CEN Private Wine Cellar
Read the Cuisinart CWC-800CEN Private Wine Cellar User Manual.
IMPORTANT SAFEGUARDS
- This product is intended for household use only.
- To protect against electric shock, do not immerse the unit, plug, or cord in water or spray with liquids.
- Close supervision is necessary when any appliance is used by or near children.
- Unplug from the outlet when not in use, when moving from one location to another, and before cleaning.
- To disconnect the appliance, grip the plug and pull it from the wall outlet. Never pull by the cord.
- Do not operate the appliance in the presence of explosives and/or flammable fumes.
- Do not place the appliance or any of its parts near an open flame, cooking, or other heating appliance.
- The use of attachments not recommended by the manufacturer may be hazardous.
- Place the unit on a dry, level surface.
- A loose fit between the AC outlet (receptacle) and plug may cause overheating and a distortion of the plug. Contact a qualified.
- Read the Cuisinart CWC-800CEN Private Wine Cellar User Manual.
WARNING
- To reduce the risk of fire, electric shock, or personal injury, unplug or disconnect the appliance from the power supply before servicing.
- Keep ventilation openings, in the appliance enclosure or the built-in structure, clear of obstruction. servicing.
- Do not use mechanical devices or other means to accelerate the defrosting process, other than those recommended by the manufacturer.
- Do not damage the refrigerant circuit.
SAVE THESE INSTRUCTIONS FOR HOUSEHOLD USE ONLY
Note: Use of an adapter is not permitted in Canad
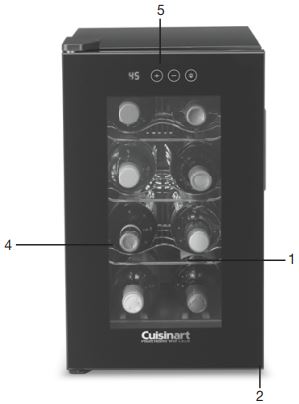
PARTS
- Removable Shelves
- Leveling Legs (4)
- Water Tray (not shown)
- Tempered Glass Door
- Adjustable Temperature Control
UNPACKING YOUR WINE CELLAR
Remove all packaging material. This includes all adhesive tape holding the wine cellar accessories inside and outside. You may want to keep the box and packing materials for use at a later date. Before using your Cuisinart® Private Reserve® Wine Cellar for the first time, remove all protective paper and wrapping. Wipe the housing and internal chamber with a damp cloth to remove any dust from the warehouse or shipping
OPERATING INSTRUCTIONS
Important: When using the wine cellar for the first time, allow at least 24 hours for the internal temperature to adjust properly. Make sure there are at least 3 to 5 bottles in the unit.
Using your Wine Cellar
Place your wine cellar on a flat surface that is strong enough to support it when fully loaded. Gently place/slide the racks in the wine cellar. Plug the power cord into a standard electrical outlet and the unit will turn on automatically to the default setting. Place bottles inside the cellar. Determine the best setting to use: refer to the temperature guide for appropriate serving temperatures (see page 7). The unit’s cooling system operates efficiently with an ambient temperature of less than 70°F (21°C).
Proper Air Circulation
To ensure that your wine cellar works at the maximum efficiency it was designed for, you should install it in a location where there is proper air circulation and electrical connections. Allow 2 inches of space on both sides and rear of the wine cellar to allow proper ventilation. To ensure proper internal air circulation do not overfill your wine cellar. This wine cellar is designed to be freestanding only, and should not be recessed or built-in (fully recessed).
NOTE: Allow enough space in the front of the unit to open the door 120°.
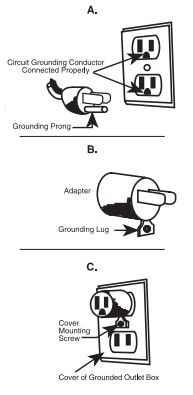
Electrical Requirements
Do not plug the unit into the same outlet as a refrigerator or microwave. Make sure there is a suitable power outlet (120 volts, 15 amps) with proper grounding to power the wine cellar. Avoid the use of three-prong plug adapters or cutting off the grounding prong to accommodate a two-plug outlet. This is a dangerous practice since it provides no effective grounding for the wine cellar and may result in a shock hazard.
Leveling your Wine Cellar
Your wine cellar has 4 leveling legs. After properly placing your wine cellar in its final position, you can level your wine cellar. (Please note that the leg that stands on the hinge is the shorter leg.) Leveling legs can be adjusted by turning them clockwise to raise the wine cellar or by turning them counterclockwise to lower the cellar.
Installation Limitations
Select a suitable location for the wine cellar on a hard, even surface away from direct sunlight or heat source, e.g., radiators, baseboard heaters, cooking appliances, etc.
NOTE: To minimize the risk of rusting, leakage, and insulation damage, avoid placing the unit in a place where heavy moisture is present. Under no circumstances spill or directly apply water onto or into the unit.
INSTALLING & MAINTAINING YOUR AIR FILTER
Your Wine Cellar has a removable air filter that helps keep the fan and motor free of dust and dirt. It is easy to install and remove and should be cleaned every 3 months.
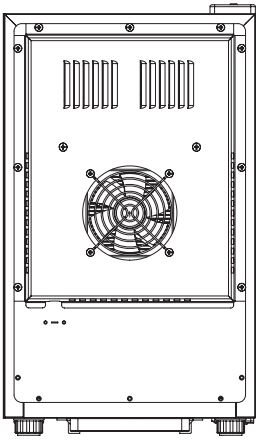

To Install:
Align the tabs on the air filter with the slots on the back of your Wine Cellar. Press the filter down until the filter retainers attach to the fan cover.
NOTE: This air-intake filter is an accessory to reduce the chance of rust and hair from getting into the ventilation fan and the heat sink. However, the installation of an air filter may slightly affect the energy performance of the unit
To clean:
Remove the air filter and wash with warm, soapy water. Rinse thoroughly, dry completely, and re-install it in the back of the Wine Cellar.
WINE CELLAR FEATURES AND USE
Temperature Adjustments/Control
Important note: To operate efficiently, thermoelectric products should be in an environment with an ambient temperature of less than 70°F (21°C). When initially turned on, the LED will show the default setting at 55˚F. Your wine cellar has an electronic temperature control on the front of the unit. You can set the temperature of your wine cellar at any setting from 39˚ to 68˚F. The LED will then display the set temperature.
NOTE
The display will show the preset cavity temperature. During the temperature setting, flashing on the display may be (or may not be) observed, it depends on the speed to press to button, and either way is normal. Please note that the actual cabinet temperature in a thermal electric unit is dependent on the ambient temperature. You may set the cabinet temperature within range but the unit may not reach that temperature. For this model, when the ambient temperature is 77˚F, the lowest temperature that can be reached is 50-52˚F. When the ambient temperature is 66˚, the cabinet temperature can reach approximately 39-41˚F.
INTERIOR LIGHT CONTROL
Your wine cellar also has a light for your viewing pleasure. The interior display light option allows you to showcase your collection of wines. To activate this feature, press the light button. This button is located on the control panel (see below). The interior light will remain on permanently until the light button is pressed again. Under normal operation, the light should remain off.
CLEANING AND MAINTENANCE
Warning: To avoid electric shock always unplug your wine cellar before cleaning. Ignoring this warning may result in death or injury.
Caution: Before using cleaning products, always read and follow the manufacturer’s instructions and warnings to avoid personal injury or product damage
General Cleaning
Prepare a cleaning solution of 3-4 tablespoons of baking soda mixed with warm water. Use a sponge or soft cloth, dampened with the cleaning solution, to wipe down your wine cellar. Rinse with clean warm water and dry with a soft cloth. Do not use harsh chemicals, abrasives, ammonia, chlorine bleach, concentrated detergents, solvents, or metal scouring pads. Some of these chemicals may dissolve, damage, and/or discolor your wine cellar.
Power Interruptions
Occasionally there may be power interruptions due to thunderstorms or other causes. Remove the power cord from the AC outlet when a power outage occurs. When the power has been restored, plug the power cord into the AC outlet.
Vacation and Moving Care
For long vacations or absences, unplug the unit, empty contents from the wine cellar, and clean the wine cellar and door gaskets according to the General Cleaning section. Prop doors open, so air can circulate inside. When moving always keep the wine cellar upright. Do not move the unit lying on its side.
Cleaning and Maintenance
Any other servicing should be performed by an authorized service representative.
WINE TIPS AND HINTS
When choosing wine, take advantage of the knowledge of the personnel in the wine store as well as reviews of wines from wine publications. The price of a wine is not necessarily indicative of relative quality. When you find a comfortably priced wine, purchase it in quantity to have it on hand as your “house wine.” Keep it chilled in your Cuisinart® Private Reserve® Wine Cellar and be ready for any occasion.
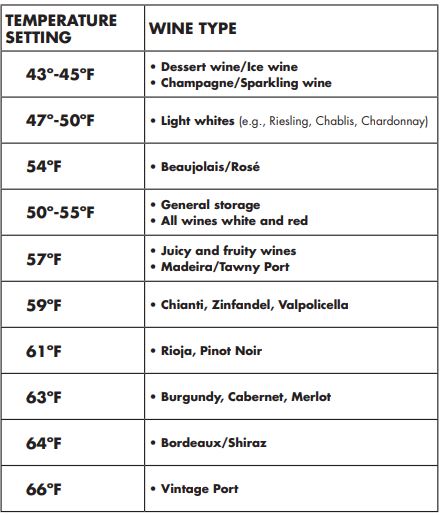
WINE STORAGE TEMPERATURE CHART
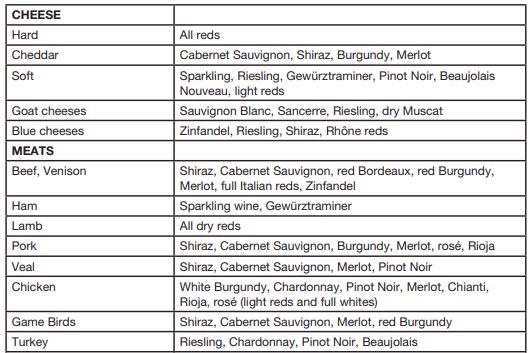
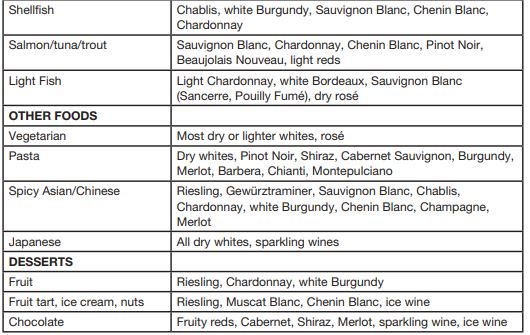
WINE AND FOOD PAIRING
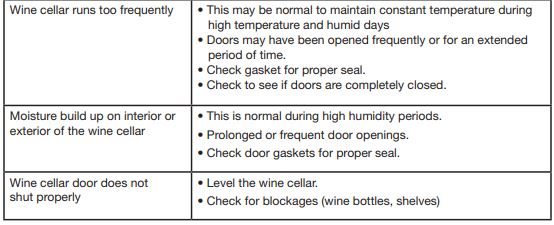
TROUBLESHOOTING
You can easily solve many common problems by trying the suggestions below.

Limited Three-Year Warranty (U.S. and Canada ONLY)
This warranty is available to consumers only. You are a consumer if you own a Cuisinart® CookFresh™ Digital Glass Steamer that was purchased at retail for personal, family, or household use. Except as otherwise required under applicable law, this warranty is not available to retailers or other commercial purchasers or owners. We warrant that your Cuisinart® CookFresh™ Digital Glass Steamer will be free of defects in materials and workmanship under normal home use for 3 years from the original purchase date. We recommend that you visit our website, www.cuisinart.com for a fast, efficient way to complete your product registration. However, product registration does not eliminate the need for the consumer to maintain the original proof of purchase to obtain the warranty benefits.
Please pay by check or money order made payable to Cuisinart (California residents need only supply proof of purchase and should call 1-800-726-0190 for shipping instructions).
NOTE
Please be sure to include your return address, daytime phone number, description of the product defect, product model number (located at the bottom of the initializing date of purchase, and any other information pertinent to the product’s return.
BEFORE RETURNING YOUR CUISINART PRODUCT
If you are experiencing problems with your Cuisinart product, we suggest that you call our Cuisinart Service Center at 1-800-726-0190 before returning the product for service. If servicing is needed, a Representative can confirm whether the product is under warranty and direct you to the nearest service location.
Important
Trademarks or service marks of third parties used herein are the trademarks or service marks of their respective owners.
©2016 Cuisinart 150 Milford Road East Windsor, NJ 08520 Printed in China