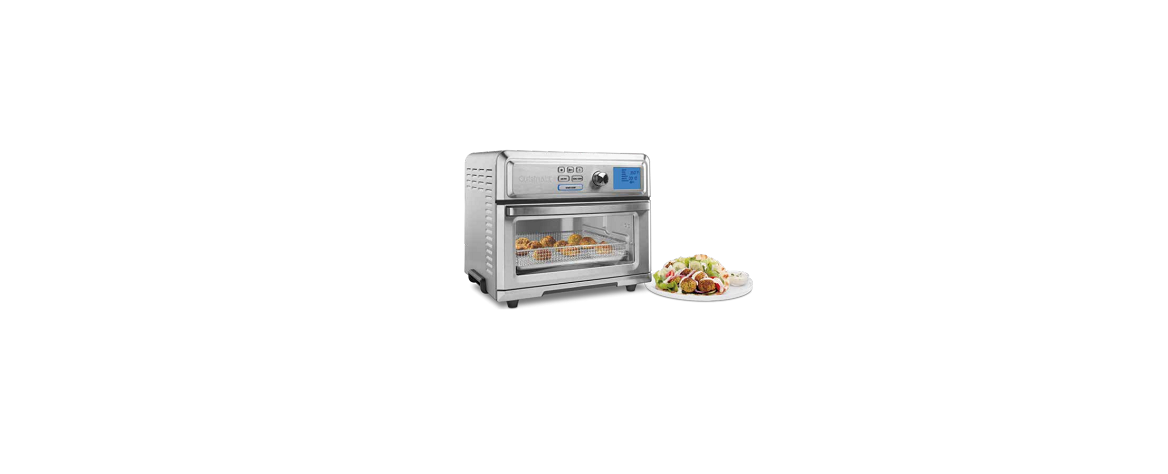
Cuisinart TOA-65 AirFryer Toaster Oven
Cuisinart TOA-65 AirFryer Toaster Oven User Manual.
IMPORTANT SAFEGUARDS
When using an electrical appliance, especially when children are present, basic safety precautions should always be taken, including the following:
- Read all instructions.
- UNPLUG FROM THE OUTLET WHEN NOT IN USE AND BEFORE CLEANING. Allow to cool before cleaning or handling, putting on or taking off parts.
- Do not touch hot surfaces. Use handles or knobs.
- To protect against electric shock, do not place any part of the Digital AirFryer Toaster Oven in water or other liquids. See instructions for cleaning.
- This appliance should not be used by or near children or individuals with certain disabilities.
- Do not operate any appliance with a damaged cord or plug, or after the appliance has malfunctioned or has been dropped or damaged in any way or has been dropped in water. Return the AirFryer Toaster Oven to the store or retailer where purchased for examination repair or adjustment.
- The use of accessory attachments not recommended by Cuisinart may cause injury.
- Do not use outdoors.
- Do not let the cord hang over the edge of the table or countertop where it could be pulled on inadvertently by children or pets, or touch hot surfaces, which could damage the cord.
- Do not place the AirFryer Toaster Oven on or near a hot gas or electric burner or in a heated oven.
SAVE THESE INSTRUCTIONS
Please read and keep these instructions handy. These instructions will help you use your Cuisinart® Digital AirFryer Toaster Oven to its fullest so that you will achieve consistent, professional results.
SPECIAL CORD SET INSTRUCTIONS
A short power-supply cord is provided to reduce the risks resulting from becoming entangled in or tripping over a longer cord. Extension cords are available and may be used if care is exercised in their use. If an extension cord is used, the marked electrical rating of the extension cord must be at least as great as the electrical rating of the appliance, and the longer cord should be arranged so that it will not drape over the countertop or tabletop, where it can be tripped over unintentionally or pulled on by children.
NOTICE
This appliance has a polarized plug (one blade is wider than the other). To reduce the risk of electric shock, this plug is intended to fit into a polarized outlet only one way. If the plug does not fit fully into the outlet, reverse the plug. If it still does not fit, contact a qualified electrician. Do not attempt to modify the plug in any way.
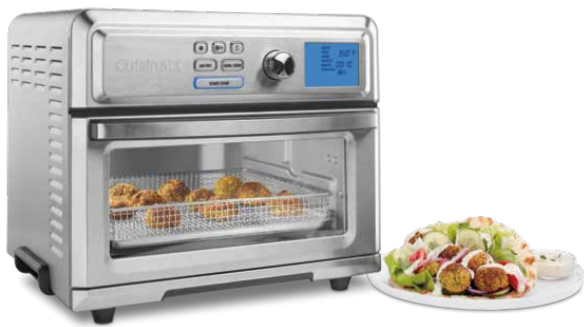
FEATURES AND BENEFITS

- Control Panel
Large LCD, dial, and intuitive buttons make the unit easy to use (see details on page 5). - Cool-Touch Handle
Handle designed to stay cool during cooking. - Interior Light
Interior light to easily view food while cooking. - Viewing Window
Large viewing window to check progress. - Oven Rack
Can be used in two positions. - Rack Positions
- Position 1 is the bottom position and this is recommended when cooking larger foods (e.g., whole chicken).
- Position 2 has a 50% stop feature, so the rack stops halfway out of the oven. The oven rack can be removed from Position 2 by lifting the front of the rack and sliding it out.
- NOTE: Refer to page 7 for suggested rack positions with different functions.
- Easy-Clean Interior
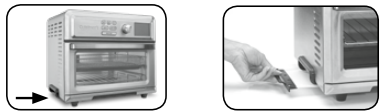
The sides of the oven’s interior are coated with non-stick. - Pull-Out Crumb Tray
The Crumb Tray comes already positioned in your oven. The tray slides out from the lower front of the oven to clean. - AirFryer Basket
Use the basket when using the AirFry, Broil, or Dehydrate functions to optimize your cooking results. We recommend setting the AirFryer Basket in the Baking/Drip Pan. - Baking/Drip Pan
A Baking/Drip Pan is included for your convenience. Use alone when Baking or Roasting. Use a Baking/Drip Pan with an AirFryer Basket when AirFrying, Broiling, or Dehydrating. - Quick Reference Guide
Built-in guide with recommendations and tips on how to use the unit. Before first use, slide in place.
GETTING TO KNOW YOUR CONTROL PANEL
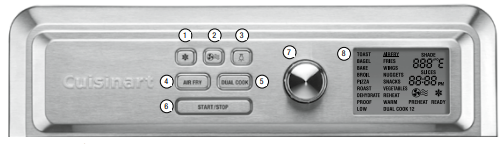
- Defrost Button
For use with Toast, Bagels, Pizza, and certain AirFry presets. When activated, the defrost icon will display on the LCD screen. - Fan Speed Button
To change the fan speed from Low to High, press the Fan Speed button. When the fan icon is displayed on the LCD screen, the fan speed is set to High. The icon will disappear for Low fan speed. - Light Button
To turn on/off the interior oven light, press the light icon. The interior light will turn off automatically after 20 seconds. - AirFry Button
Can be used to select manual AirFry function or AirFry presets. - Dual Cook
Use to program two-stage cooking operation. - Start/Stop Button with Indicator Light
Use to start and stop cooking. The indicator will illuminate when cooking. - Selector Dial
Rotate Selector Dial to scroll through options on the LCD screen. Press the center of the dial to confirm selections. - LCD Screen
Displays cooking functions, toast shade and slices, temperature, cooking/ countdown timer, clock time, fan speed, and defrost.
BEFORE FIRST USE
- Place your Digital AirFryer Toaster Oven on a flat, level surface.
- Move oven 2 to 4 inches away from the wall or from any objects on the countertop. Do not use on heat-sensitive surfaces.
- Check that the Crumb Tray is in place and that there is nothing in the oven.
- Insert Quick Reference Guide on the bottom left side of the unit.
- Plug the power cord into the wall outlet.
SETTING THE CLOCK
The clock can only be set when the oven is not cooking and the time is displayed on the screen.
To set the clock:
- If the LCD is not displaying the clock, scroll through the function menu until the clock is displayed.
- Press and hold the Selector Dial for 3 seconds.
- The clock hour will flash; turn the knob to set the hour, then press Selector Dial to confirm.
- The clock minutes will flash; turn the knob to set minutes, then press Selector Dial to confirm.
NOTE: If nothing is pressed, the clock will automatically be set to the currently displayed time.
OVEN TONE VOLUME
The tone volume can only be adjusted when the time is displayed on the screen.
- Press the AirFry and Dual Cook buttons simultaneously for 3 seconds.
- The number 1 (default setting) or currently selected setting will display.
- Use Selector Dial to set preferred tone level: 0 (off/tones deactivated), 1 (low), or 2 (high).
- Once your selection is displayed, press Selector Dial to confirm.
GENERAL OPERATION
To operate the oven, follow these simple steps:
- Place the appropriate rack, pan, and/or basket in the position recommended in the chart on page 7.
- Use the Selector Dial to scroll through functions.
- When the desired function is flashing, press Selector Dial to confirm. The start/Stop button will flash and the LCD screen will display the last selected or default temperature and time (shade and slices for Toast and Bagel settings).
- To use displayed settings, press Start/Stop to begin the operation. The start/Stop button will illuminate, indicating the unit is cooking.
- To change settings:
- Turn the Selector Dial to choose the desired temperature (or shade)
- Press the Selector Dial to confirm; time (or slices) will flash
- Turn the Selector Dial to choose the desired time (or slices)
- When the countdown timer reaches 0:00, the oven will beep three times and the heaters will turn off.
FUNCTION DURING COOKING CYCLE
To change time: During the cooking cycle, use the Selector Dial to add or decrease time. The new countdown time will be displayed, and cooking will continue. To change temperature: During the cooking cycle, press the Selector Dial until the current temperature flashes. Turn the Selector Dial to the desired temperature and cooking will continue at the new temperature. To change the function: You must press Start/Stop to stop the current program. Then turn the Selector Dial and press it to select another function. Press Start/Stop again to continue the cooking cycle.
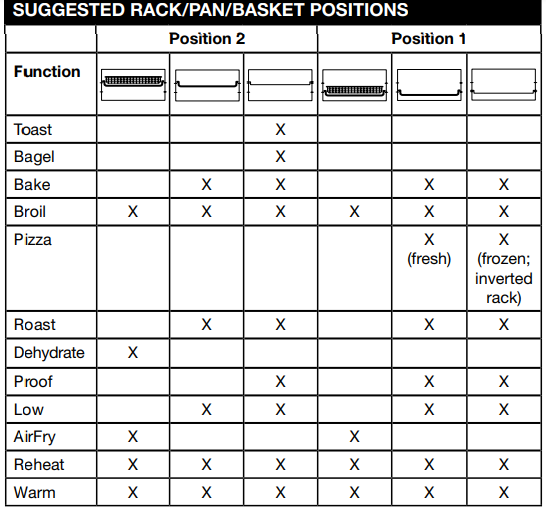
OVEN RACK AND PAN POSITION DIAGRAMS
Please refer to the chart below for suggested Oven Rack, Baking/Drip Pan, and dryer basket positions.
TIPS AND HINTS
AIRFRY
TIP:
For best results, use the provided AirFryer Basket fitted into the Baking/Drip Pan. AirFry can be used at 200°F – 450°F for up to 1 hour. This function is used for AirFry meals as a healthy alternative to deep frying in oil. A high fan speed and multiple heating elements circulate hot air to prepare a variety of meals that can be both delicious and healthier than traditional frying.
- Default: 400°F; 10 minutes.
- Many foods that can be fried can be AirFried without using excess amounts of
oil. AirFried foods will taste lighter and be less greasy than deep-fried foods. - AirFrying doesn’t require oil, but a light spray can enhance browning and crispiness. Use an oil sprayer or a nonstick olive oil cooking spray to keep it extra light, a pastry brush to evenly coat, or pour a little oil into a bowl, add food, and toss.
AIRFRYER CHART
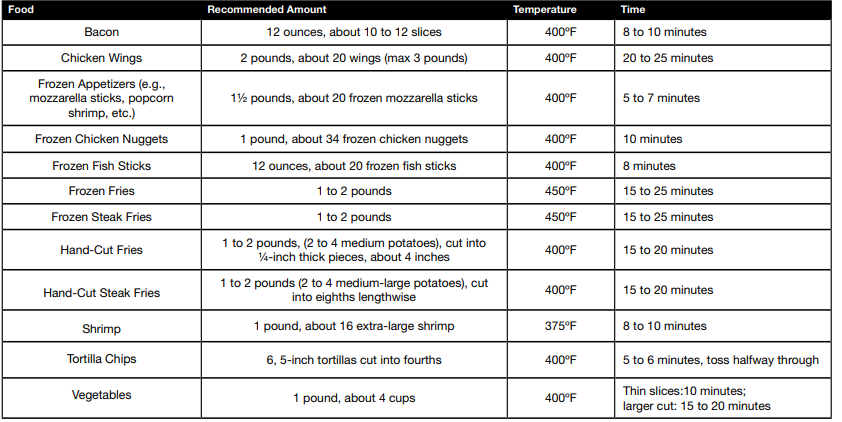
NOTE: AirFrying doesn’t require oil, but a light coating can enhance browning and crispiness. Use an oil sprayer or a nonstick olive oil cooking spray to keep it extra light, a pastry brush to evenly coat, or pour a little oil into a bowl, add food, and toss.
CLEANING AND MAINTENANCE
- Always unplug the oven from the electrical outlet and allow it to cool completely before cleaning
- Do not use abrasive cleaners, as they will damage the finish. Simply wipe the exterior with a clean, damp cloth and dry thoroughly. Apply the cleansing agent to a cloth, not directly onto the toaster oven, before cleaning
- To clean interior walls, use a damp cloth and a mild liquid soap solution or a spray solution on a sponge. Remove any residue from cleaners with a clean, damp rag. Never use harsh abrasives or corrosive products. These could damage the oven surface. Never use steel wool pads, etc., on the interior of the oven
- Cleaning the accessories:
- After cooking greasy foods and once your oven has cooled, always clean the top of the oven interior. If this is done regularly, your oven will perform like new. Removing the grease will help to keep toasting consistent, cycle after cycle
- To remove crumbs, slide out the front Crumb Tray and discard the crumbs. Wipe clean and replace. To remove baked-on grease, soak the tray in hot, sudsy water or use nonabrasive cleaners. Never operate the oven without the Crumb Tray in place
TROUBLESHOOTING

WARRANTY
LIMITED THREE-YEAR WARRANTY
This warranty is available to consumers only. You are a consumer if you own a Cuisinart® Digital AirFryer Toaster Oven that was purchased at retail for personal, family, or household use. We recommend that you visit our website, www.cuisinart.com for a fast, efficient way to complete your product registration.
BEFORE RETURNING YOUR CUISINART PRODUCT
If your Cuisinart® Digital AirFryer Toaster Oven should prove to be defective within the warranty period, we will repair or, if we think necessary, replace it. To obtain warranty service, please call our Consumer Service Center toll-free at 1-800-726-0190 or write to Cuisinart, 7475 North Glen Harbor Blvd., Glendale, AZ 85307.
©2018 Cuisinart
150 Milford Road
East Windsor, NJ 08520
Printed in China