Cosori BM201-CO Series Original Bread Maker
Cosori BM201-CO Series Original Bread
Package Contents
- 1 x Bread Maker
- 1 x Recipe Book
- 1 x Quick Reference Guide
- 1 x User Manual
- 1 x Bread Pan
- 1 x Kneading Blade
- 1 x Measuring Spoon
- 1 x Measuring Cup
- 1 x Hook
IMPORTANT SAFEGUARDS
Follow basic safety precautions when using your bread maker. Read all instructions
Key Safety Points
- Do not touch hot surfaces. To open, use a heat-resistant glove or oven mitt to lift the lid.
- Only remove the bread pan once it has cooled.
- Do not block any ventilation openings. Keep your hands and face clear of openings.
- Always use heat-resistant gloves, pads, or oven mitts when handling hot materials, and when placing items in or removing items from the bread maker, including the bread pan
General Safety
- Do not immerse the bread maker housing or plug in water or liquid.
- Closely supervise children near the bread maker.
- Unplug when not in use, and before cleaning. Allow to cool before putting on or taking off parts.
- Do not use your bread maker if it is damaged, not working, or if the cord or plug is damaged. Contact Customer Support (see page 19)
- Do not use third-party replacement parts or accessories, as this may cause injuries.
- Do not use outdoors.
While Baking
- Never use your bread maker without the bread pan in place
- Do not place oversized foods or metal utensils into your bread maker
- Do not place paper, cardboard,non-heat-resistant plastic, or similar materials into your bread maker Do not touch any moving or spinning parts. Keep hands and utensils away from moving blades or discs while kneading dough to reduce the risk of personal injury or damage to the bread maker. A scraper may be used only when the bread maker is not running.
- Make sure the lid is securely in place before operating the bread maker.
Note: This bread maker uses a short power-supply cord to reduce the risk of entangling or tripping. Use extension cords with care. The marked electrical rating of the extension cord must be as great as the rating of the bread maker(see page 3).
Plug & Cord
- Your bread maker has a polarized plug (one prong is wider than the other), which fits into a polarized outlet only one way. If the plug does not fit, reverse the plug. If it still does not fit, do not use the plugin that outlet. Do not alter the plug in any way.
- Do not let the power cord (or any extension cord) hang over the edge of a table or counter, or touch surfaces.
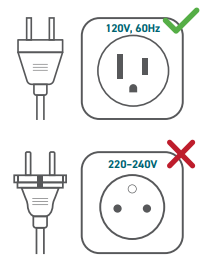
- Your bread maker should only be used with 120V, 60Hz electrical systems. Do not plug into another type of outlet.
Note: This bread maker uses a short power-supply cord to reduce the risk of entangling or tripping. Use extension cords with care. The marked electrical rating of the extension cord must be as great as the rating of the bread maker (see page 3
Electromagnetic Fields (EMF)
- The Cosori Bread Maker complies with all standards regarding electromagnetic fields (EMF). If handled properly and according to the instructions in this user manual, the appliance is safe to use based on scientific evidence available today
GETTING TO KNOW YOUR BREAD MAKER
Your Cosori Bread Maker will help you bake with greater efficiency than ever before. Use 12
presets, customizable controls, and a built-in kneading function to perfect every loaf.
Bread Maker Diagram 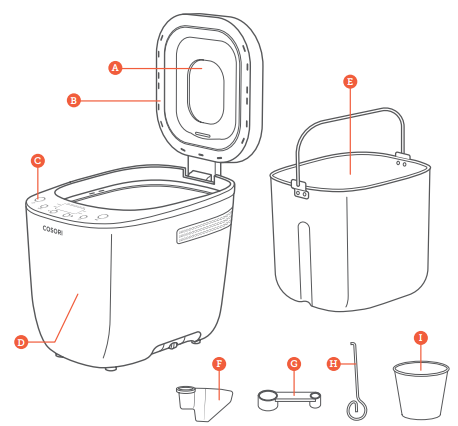
- Viewing Window
- Top Lid
- Control Panel
- D. Body
- E. Bread Pan
- F. Kneading Blade
- G. Measuring Spoon
- H. Hook
- I. Measuring Cup
Presets
- Basic
- Knead
- Bake
- Quick
- Rolls
- Pizza Dough
- Artisan Dough
- French Bread
- Whole Wheat
- Fruit Bread
- Ferment
- Gluten-Free
Control Panel
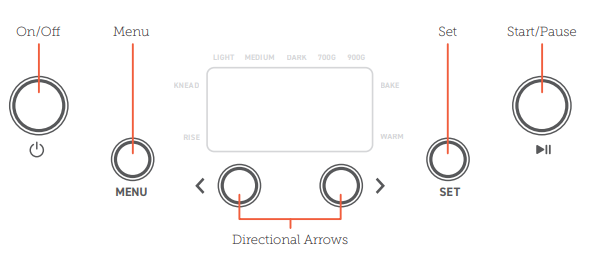
Display

Display Messages
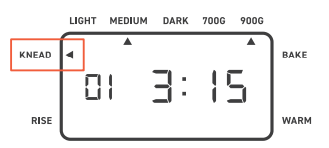
- The bread maker is in the kneading stage
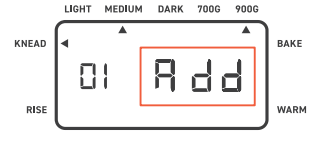
- Reminder to add any additional ingredients before the second kneading stage.
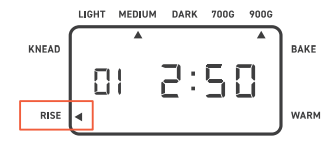
- The bread maker is in the rising stage.
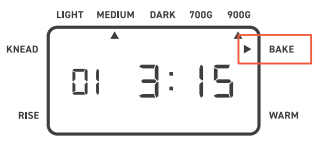
- The bread maker is in the baking stage.

- Keep Warm is turned on.
BEFORE FIRST USE
Setting Up
- Remove all packaging from the bread maker, including any temporary stickers.
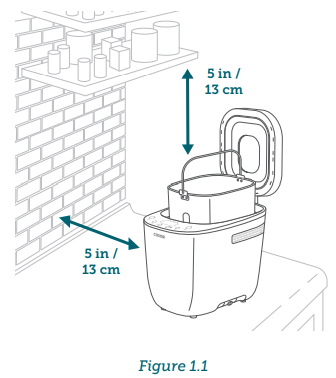
- Place the bread maker on a stable, level, heat-resistant surface. Keep away from areas that can be damaged by steam (such as walls or cupboards)
Note: Leave 5 inches / 13 cm of space behind and above the bread maker. [Figure 1.1] Leave enough room in front of the bread maker to remove the bread pa
- Open the lid and remove the bread pan.
- Wash the kneading blade, bread pan, and accessories thoroughly with a nonabrasive sponge
- Wipe the inside and outside of the bread maker with a slightly moist cloth. Dry with a towel
- Put the bread pan back inside the bread and make
Test Run
A test run will help you become familiar with your bread maker, make sure it’s working correctly, and clean it of possible residues.
- Make sure the bread pan is empty, then plug in the bread maker.
- Select the Bake preset. The display will show “1:20” and “700g”
- Press the button to begin. Let the bread maker run for 10 minutes, then press the button again to stop.
- After the bread maker has cooled, clean and dry the bread pan and the kneading blade once more
Bread Pan Tips
- To remove the bread pan, turn it slightly counterclockwise, then lift.
- To lock the bread pan in place, turn it clockwise.
- Never use the bread maker without the bread pan in place
USING YOUR BREAD MAKER
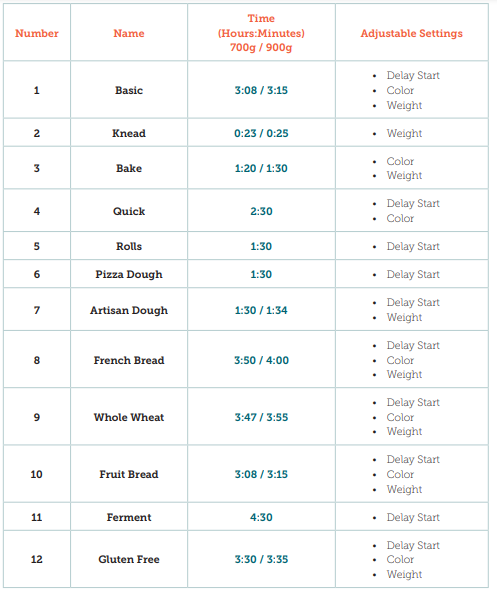
Preset Settings
Presets are programmed with the ideal settings for making different types of bread
- You can delay the start of the cooking process, adjust the crust color (Light, Medium, Dark), and select the weight (700g & 900g) unless otherwise note
To change a preset’s default settings
- Select the preset.
- Adjust color and size.
- Press and hold the Menu button for 3 seconds to save the new settings. The bread maker will beep 1 time when the process is complete.
To add Delay Start
- Select the preset.
- Press the Set button. The time on the display will blink.
- Use the left and right arrows to adjust the delay time in 10-minute increments. The maximum time of a preset, including Delay Start, is 13 hours.
- Press Set again to confirm.
Delay Start time will be added to the running time reflected on the display. You cannot adjust the overall running time of any press
Note: When using Delay Start, do not use it easily perishable ingredients such as eggs, fresh milk, fruits, onions, etc.
Crust Color
The maximum temperature for each preset is determined by the selected loaf color (Light / Medium / Dark). Loaf color cannot be adjusted for the following presets: Knead, Rolls, Pizza Dough, Artisan Dough, and ferment
Presets
Making Bread
- Open the lid and remove the bread pan.
- Attach the kneading blade to the bottom of the pan. [Figure 2.1
- Add the ingredients to the bread pan. Put the bread pan into the bread maker and turn the bread pan clockwise to lock it into place. [Figure 2.2] Close the lid of the bread maker and plug the power cord into the wall
- Press Menu and select your desired preset using the left and right arrows on the display panel.
- If desired, press Set and use the left and right arrows to add Delay Start to the preset. For more information, see Delay Start (page 10).
Note: If the kneading blade remains stuck in theloaf, insert the hook into the bottom of the kneading blade and pull gently to remove the blade from the Vloaf. (Figure 2.3)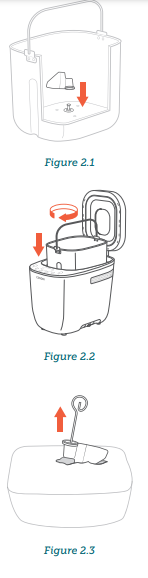
Adding Ingredients
For select presets, you will be prompted to add in any additional ingredients (such as nuts, fruits, seeds, or cheeses) to the bread maker before the second kneading cycle. The bread maker will beep 5 times to notify you. The display will show “Add” for 5 minutes while kneading continues in case you miss the initial beeps.
Tips
- Lightly coat the kneading blade with nonstick cooking spray or vegetable oil to make the blade easier to remove in case it gets stuck in the loaf.
- Add ingredients in the following order: liquids, butter, dry ingredients, then yeast. Ideally, the yeast should not touch the wet ingredients.
- Instant yeast and active dry yeast cause the bread to have different rising times. Instant yeast is much quicker and proofs faster, while active dry yeast is slower and needs to be dissolved in water to activate.
More Functions
Pausing
- While the bread maker is running, press to pause cooking. The time remaining will blink until you press again to resume cooking.
- To cancel cooking, hold the button for 3 seconds.
Keep Warm
- To turn on the Keep Warm function, press and hold Set for 3 seconds.
- To turn Keep Warm off, press and hold Set for 3 seconds again.
Overheat Protection
- If the bread maker overheats, it will automatically shut down as a safety feature. The display will show the Error Code “H”.
- Let the bread maker cool down completely before using it again.
Force Shutoff
- If necessary, the bread maker can be shut off while running by pressing and holding for 5 seconds.
CARE & MAINTENANCE
Note: Always clean the bread pan and bread maker interior after every use.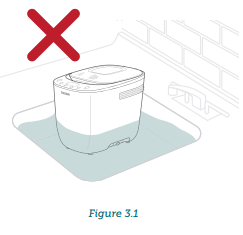
- Turn off and unplug the bread maker. Allow it to cool completely before cleaning. Use oven mitts to pull out the bread pan for faster cooling.
- Wipe the outside of the bread maker with a moist cloth, if necessary.
- The bread pan and kneading blade are dishwasher safe. You can also wash both with hot, soapy water and a nonabrasive sponge. Soak if necessary,
Note: The bread pan has a nonstick coating. Avoid using metal utensils and abrasive cleaning materials. - If necessary, clean the inside of the bread maker with a slightly moist, non-abrasive sponge or cloth. Do not immerse in water. [Figure 3.1]
- Dry before using.
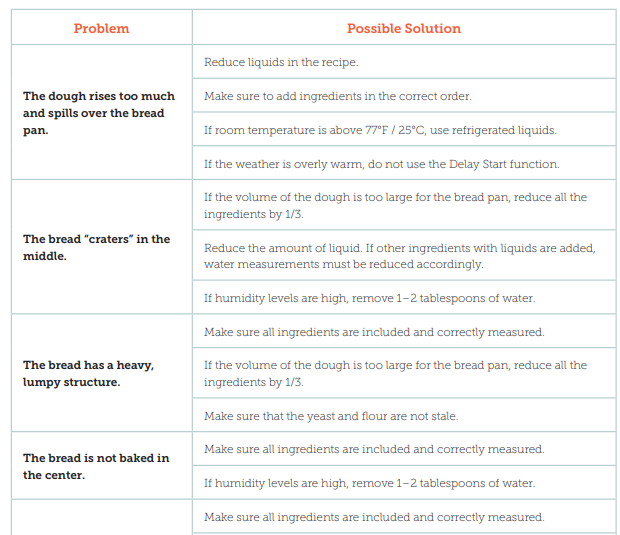
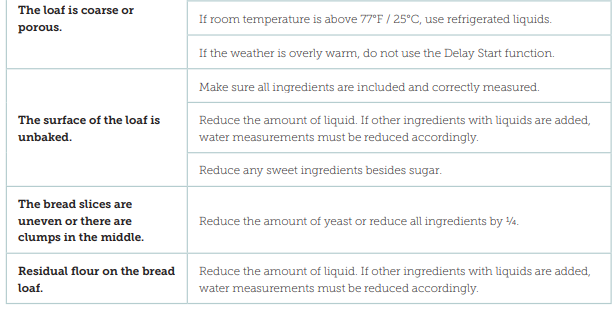
TROUBLESHOOTING
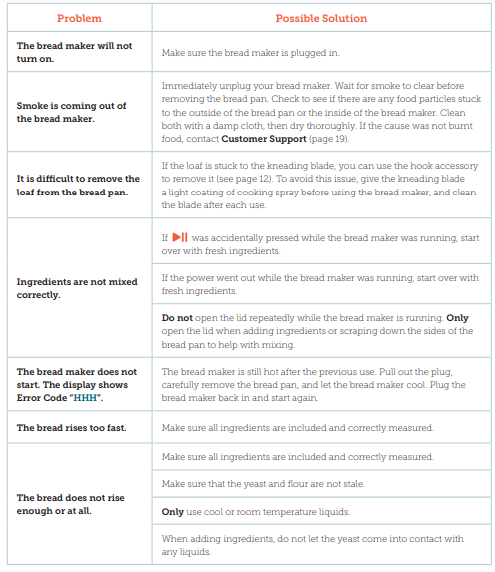
If your problem is not listed, please contact Customer Support.
WARRANTY INFORMATION
- Product Original Bread Maker
- Model BM201-CO Series
For your own reference, we strongly recommend that you record your order ID and date of purchase.
- Order ID
- Date of Purchase
TERMS & POLICY
Arovast Corporation (“Arovast”) warrants this product to the original purchaser to be free from defects in material and workmanship, under normal use and conditions, for a period of 1 year from the date of original purchase.
There is no other express warranty. This warranty does not apply:
- If the product has been modified from its original condition;
- If the product has not been used in accordance with directions and instructions in the user manual;
- To damages or defects exceeding the cost of the product.
If you discover that your product is defective within the specified warranty period, please contact Customer Support via support@cosori.com. DO NOT dispose of your product before contacting us. Once our Customer Support Team has approved your request, please return the product with a copy of the invoice and order ID.
Extend Your Warranty by 1 Year
Register your product within 14 days of purchase at www.cosori.com/warranty to extend your 1-year warranty by an additional year.
This warranty is made by:
Arovast Corporation
1202 N. Miller St. Suite A
Anaheim, CA 93806
CUSTOMER SUPPORT
If you have any questions or concerns about your new product, please contact our helpful Customer Support Team.
Arovast Corporation
1202 N. Miller St., Suite A
Anaheim, CA 92806
Email: support@cosori.com
Toll-Free: (888) 402-1684
Support Hours
Mon–Fri, 9:00 am–5:00 pm PST/PDT
Please have your order invoice and order ID ready before contacting Customer Support.
SHOW US WHAT YOU’RE MAKING
We hope this has been helpful to you. We can’t wait to see your beautiful results, and we think you’ll want to share glam shots! Our community awaits your uploads—just pick your platform of choice below. Snap, tag, and hashtag away, Cosori chef!
Considering what to cook? Many recipe ideas are available, both from us and the Cosori community
MORE COSORI PRODUCTS
If you’re happy with this bread maker, the line doesn’t stop here. Check out www.cosori.com for a line of all our beautiful and thoughtfully designed cookware. They might be right at home in your kitchen, too!
Questions or Concerns?
Mon–Fri, 9:00 am–5:00 pm PST/PDT
support@cosori.com | (888) 402-1684