CONAIR HCT45N No Slip Grip Trimmer 
IMPORTANT SAFETY INSTRUCTIONS
When using electrical appliances, especially when children are present, basic safety precautions should always be followed, including the following:
READ ALL INSTRUCTIONS BEFORE USING FOR HOUSEHOLD ONLY KEEP AWAY FROM WATER
DANGER – Any appliance is electrically live, even when the switch is off. To reduce the risk of death or injury by electric shock:
- Unplug this appliance before cleaning.
- Do not place or store appliances where they can fall or be pulled into a tub or sink.
- Do not use it while bathing or in a shower.
- Do not place in, or drop into, water or other liquids.
- Do not reach for an appliance that has fallen into the water. Unplug immediately.
- Always unplug this appliance from electrical outlet immediately after use.
WARNING
To reduce the risk of burns, electrocution, fire, or injury to persons:
- This appliance should never be left unattended when plugged in. Do not pull, twist, or wrap the line cord around the appliance.
- This appliance should not be used by, on, or near children or individuals with certain disabilities.
- Use this appliance only for its intended purpose as described in this manual. Do not use attachments not recommended by the manufacturer. Do not use an extension cord to operate this appliance.
- 4. Never operate appliance if it has a damaged cord or plug, or if it is not working properly, if it has been dropped or damaged, or dropped into water. Return the appliance to a service center for examination and repair.
- Keep the cord away from heated surfaces.
- Never drop or insert any object into any opening on this appliance.
- Do not place the appliance on any surface while it is operating.
- Do not use this appliance with a damaged or broken comb or with teeth missing from the blades, as injury may occur. Before use, make certain blades are aligned properly. (See “Care of Your Clippers.”)
- Do not operate outdoors or where aerosol (spray) products are being used or oxygen is being administered
SAVE THESE INSTRUCTIONS
OPERATING INSTRUCTIONS
his appliance is intended for household use. Use on Alternating Current (120V AC 60Hz) only. This appliance has a polarized plug (one blade is wider than the other). As a safety feature, this plug will fit in the outlet only one way. If the plug does not fit fully in the outlet, reverse the plug. If it still does not fit, contact a qualified electrician. Do not attempt to defeat this safety feature. Your new Conair® Clipper and Trimmer Kit has everything you need to achieve professional haircuts, beard trimming, and detailing at home.
Its powerful new torque motor clipper, with steel blades for long-lasting cutting precision, features a new 5-position adjustamatic taper control. Whatever hair length you set the button for, the clipper will automatically cut all hair in that section at the desired length. Also included are 9 attachment combs for different hair lengths (including left and right ear taper combs), barber scissors, a styling comb with angled teeth, a full-length barber cape, and a soft, foldable pouch for easy storage. It also comes with lubricating oil, a cleaning brush, and a blade guard for easy maintenance and protection of the clipper blades
GUIDE TO CUTTING HAIR AT HOME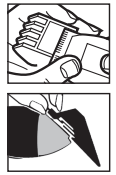
Before you start:
- Inspect your clipper. Make sure it’s free of hair and dirt, properly oiled, and running smoothly.
- Place cape around the neck of the person getting a haircut.
- Seat the person so that his or her head is at your eye level. This gives you greater visibility and control.
- First, comb your hair until it’s tangle-free. Then hold the clipper in a comfortable grip. Now you’re ready to cut.
MEDIUM TO LONG CUT
To begin with, cut only a small amount of hair until you become used to the length each attachment leaves the hair. Try the longest attachment comb and put the taper control in the highest setting. If you want a shorter cut, you can then use shorter combs.
- Short attachment comb (#1) cuts hair to 1/8″.
- Medium-Short attachment comb (#2) cuts hair to 1/4″.
- Medium-long attachment comb (#3) cuts hair to 3/8″.
- Long attachment comb (#4) cuts hair to 1/2″.
- Long attachment comb (#5) cuts hair to 5/8″.
- Long attachment comb (#6) cuts hair to 3/4″.
- Long attachment comb (#7) cuts hair to 7/8″.
- The left ear attachment comb lightly tapers over the left ear.
- The right ear attachment comb lightly tapers over the right ear.
- These combs make this part of the haircut easier.
Attach combs by holding their teeth up, then snapping them onto the bottom of the clipper blade.
To remove comb attachments, place index finger and thumb as illustrated; then pull out and up.
NOTE
Never push or shove the clipper through the hair to make it move more quickly. Professional experience shows that the clipper works most efficiently when it cuts through the hair at its speed. To begin cutting hair: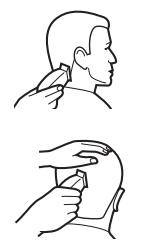
- The hair should be combed in its natural direction.
- Using the largest attachment comb, trim sides from the bottom upward. Hold the clip lightly against the hair with the teeth of the attachment comb pointing upward, yet flat against the head. Gradually lift the clipper upward and outward through the hair, trimming just a little at a time. Repeat around the sides and back of the head. If you want hair to be even shorter:
- Apply more pressure to the head with the attachment comb that is in place. This takes a little practice, of course, OR
- Just switch to a shorter attachment comb. Remember, it’s better to leave too much hair than too little. For longer hair on top, use the styling comb and lift the hair on the top of the head, cutting over the comb, or hold the hair between the fingers and cutting to the desired length. Always working from the front to the back of the head, gradually cut the hair shorter by reducing the space between the comb or fingers and the head. Comb often to check for uneven strands, and to get rid of trimmed hair. *Equipped with a turbo switch, this unit is designed to provide extra power making it easier to cut thicker, coarser hair.
OUTLINING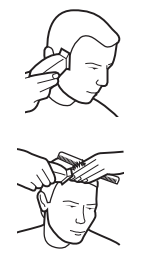
Outlining requires no attachments. Comb hair into the desired style. Position the clipper between the sideburns and the ear, making sure the corner edge of the blade is against the hairline. With the outline of the hair as your guide, slowly move the clipper over, around, and behind the ears. For the back of the neck and the sideburns, hold the clipper upside down (see across) and, holding it against the skin at the length desired, move the clipper downward
STOP. COMB. CHECK.
For best results, do as the professionals do: Comb hair often, and check clipping results as you comb. This way you avoid uneven sides, bangs, neckline, etc.
FOR ULTRA-CLOSE FADE STYLES
- A fade cut is a haircut that starts with very short hair (almost bald) on the sides of the head but lengthens as it nears the top.
- Start with clean, dry hair. If hair is fairly long, use a long comb attachment (ideally #4) to remove the bulk of your hair before starting the fade cut.
- Using the long comb attachment, trim hair, cutting against the growth of your hair (from the base of the neck up toward the top of the head). At first, until you become familiar with the different attachments, begin with a
longer one. You can always go back and make your hair a little shorter. Brush or comb away cuttings as you go. Do not force the blades through the hair. Let the trimmer do the work. Using the #1 comb attachment, you can cut hair as short as 1/8″. - Gradually trim the hair from the entire head, rotating the trimmer when necessary. Keep cutting against the natural growth of your hair.
- Establish the fade line. Remove comb attachments. With the taper control in position #1, start by blending the hair at the fade line by trimming it up and out, repeating as you rotate around the head. Cut hair shorter on the sides and base of the head than on the top of the head.
FOR THE BALD CUT
Follow the instructions for the fade cut, cutting hair progressively shorter with each pass of the clipper. For a bald effect, remove all comb attachments and move the taper control to the #5 position. To receive maximum closeness, overlap strokes in a crisscross pattern. To achieve a smooth, bald look, we recommend you finish by using a razor with lather to shave the entire head.
SHORTCUTS TO PERFECT FLATTOPS, CREW CUTS, ETC.
Always cut from the back of the neck to the crown, using the longest comb setting. Hold the comb attachment flat against the head and slowly move the clipper up through the hair. Use the same technique for the sides, cutting from the bottom to the upper side of the head. For the front to the crown, cut the hair against the direction in which it grows, then even it up with the sides. For a flattop, use the flat comb, not the attachment comb. Just cut hair on top of the head over a flat comb (see below). To taper hair down to the neckline, use attachment comb #1. Comb hair and check for uneven spots. Outline sideburns and neck areas
(see “Outlining”).
USER MAINTENANCE CARE OF YOUR CLIPPER DETACHABLE BLADE SET
This clipper comes with a detachable blade set. To remove the blades follow these steps:
- Hold the front part of the clipper with your thumb pressing on the blade and place another hand against the blade (See Fig. 1).
- When pressing the blade forward, the blade is detached (See Fig. 2).
TO REPLACE BLADE:
1. Set the Taper Control Button to the lowest position “1” (See Fig. 3.)
2. Place the blade onto the clipper body by inserting the “Blade Tongue” down below the “Lock Tap”(See Fig. 4).
3. Snap the blade down into the following position. The blade is now fixed onto the clipper body (See Fig. 5).
Use these instructions to switch between the clipper and beard trimmer blades and back.
SPECIAL OIL
To maintain the blades of your Conair clipper, oil them after every three or four haircuts. Keep oil out of reach of children.
TURBO FEATURE
This product is equipped with a turbo boost button. When activated, this will provide more cutting power. This is especially useful for cutting through thicker hair. To activate the turbo feature:
- Turn the Power switch to the “on” position.
- Press the Turbo button.
- Continue to press the Turbo button for as long as you need the extra power.
- Release the Turbo button to return to normal power.
ADJUSTABLE 5-POSITION TAPER CONTROL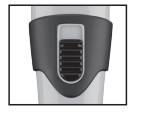
Just like levers on professional clippers, the Conair taper control is positioned at the back of the unit, which functions for both the clipper and trimmer blade so you can hold the clipper in your hand and adjust the lever at the same time…while you’re clipping/trimming. This taper control eliminates the need in some situations for an attachment comb because it lets you gradually adjust the closeness of the cut. For the closest cut and the shortest hair, push the taper control up as far as it will go to level #1. To increase the the cutting length, slowly push control down. If you push to the lowest position, level #5 or #4, it will leave hair about the same length If the clipper stops cutting but does not stop running, you will need to check the blades. For new blades, send a check or money order for $6.50 which includes postage and handling to:
STORAGE
When not in use, your clipper should be disconnected, allowed to cool, and stored in a safe, dry location, out of reach of children. Any other servicing should be performed by an authorized service representative. This appliance has no user-serviceable parts. The product is for household use only.
NOTE: Never pull on the clipper cord. Never twist or wrap the cord around the clipper. To store your clipper, lay it flat with the cord coiled up, then place it in the case.
TO OPERATE TRIMMER
- Remove the battery cover at the back of the unit by pulling straight down. (Fig. 1)
- Being careful not to bend the clips, insert the negative end of the battery first, so it will slip easily into position.
- Return the battery cover to its original position by pushing it into place.
- To use your trimmer, push the ON/OFF switch upward to the ON position.
- After you finish using your trimmer, push down on the ON/OFF switch to turn the trimmer off.
- Always purchase the correct size and grade of battery most suitable for the intended use.
- Replace the battery once it is no longer functional.
- Clean the battery contacts and also those of the device prior to battery installation.
- Ensure the battery is installed correctly with polarity (+ and -).

- 20mm trimmer head
- No-slip Grip™ handle
- Cordless/battery operated (requires AA battery; not included)*
HCT45 CLIPPER & DETAIL TRIMMER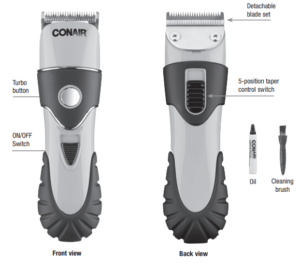
KEEP AWAY FROM WATER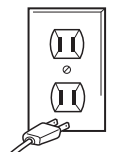
Everyone knows that electricity and water are a dangerous combination. But did you know that an electrical appliance is still electrically alive even if the switch is off? If the plug is in, the power is on. So when you are not using your appliances, keep them unplugged
LIMITED TWO-YEAR TRIMMER WARRANTY
Conair will repair or replace (at our option) your unit free of charge for 24 months from the date of purchase if the appliance is defective in workmanship or materials. To obtain service under this warranty, return the defective product to the service center listed on the back, together with your purchase receipt and $3.00 for postage and handling. California residents need only provide proof of purchase and should call 1-800-3-CONAIR for shipping instructions. In the absence of a purchase receipt, the warranty period shall be 24 months from the date of manufacture. ANY IMPLIED WARRANTIES, OBLIGATIONS, OR LIABILITIES
INCLUDING BUT NOT LIMITED TO THE IMPLIED WARRANTY OF MERCHANTABILITY AND FITNESS FOR A PARTICULAR PURPOSE SHALL BE LIMITED IN DURATION TO THE 24-MONTH DURATION OF THIS WRITTEN, LIMITED WARRANTY. Some states do not allow limitations on how long an implied warranty lasts, so the above limitations may not apply to you. IN NO EVENT SHALL CONAIR BE LIABLE FOR ANY SPECIAL, INCIDENTAL, OR CONSEQUENTIAL DAMAGES FOR BREACH OF THIS OR ANY OTHER WARRANTY, ExPRESS OR IMPLIED, WHATSOEVER. Some states do not allow the exclusion or limitation of special, incidental, or consequential damages, so the above limitation may not apply to you. This warranty gives you specific legal rights, and you may also have other rights, which vary from state to state.
contact
- Service Center
- Conair Corporation
- Service Department
- 7475 North Glen Harbor Blvd.
- Glendale, AZ 85307
- ©2014 Conair Corporation
- 150 Milford Road, East Windsor, NJ 08520
- 7475 North Glen Harbor Blvd., Glendale, AZ 85307


